
The Truth about Recovering RAID 5 with 2 Failed Disks
Users often gravitate toward RAID 5 due to its ability to stream data independently from multiple disks, allowing parallel data processing and distributing parity across all disks. To set up such an array, a minimum of three disks is required, which can endure a single disk failure. However, when two disks fail, the challenge is how to recover data and maintain the array.
The process begins with rebuilding the data, followed by reconstructing the RAID with the same configuration, and then loading the data onto the recovered RAID.

Why Does RAID 5 Fail?
There are many reasons for a RAID 5 drive to fail It's time to get to know them:
- Using a Failed Drive or rebuilding a RAID 5 Array with a Failed Drive
- One-time failure of two or more drives
- Incorrect RAID volume settings or Raid Controller malfunction
- Malware or virus damage
- Unexpected power failure or power surges
- Tip: Minimum drives for RAID 5
How to Recover RAID 5
- 1. From a previously saved backup
- 2. Using the manual method
- 3. With a dedicated professional RAID data recovery application
Before starting, it is recommended that you create an image of any failed disks. If the hard drives are not found by Windows, you will have to take them to a service representative to create the disk image.
You need to be prepared because you will most likely have to pay a lot of money, since you may have to replace hard disk controllers from a donor drive or replace platters with a donor drive.
Use Backup

First you need to check if an available backup can be restored at all. If possible, try restoring the backup to a different location, and if the data is clean and usable, proceed to the next step.
Replace any damaged disks with new disks, test them for functionality, and then load the data onto the newly configured RAID.
Now you should check the performance of the RAID array.
You should also take into account some of the nuances when recovering disks using this method:
- This process can take a long time,
- Recently recovered data may be incomplete and differ from the original form.
Manual Recovery Process
To manually recover data from a RAID 5 array with two failed drives, you'll need to prepare the following:- 1. Purchase an external storage device with ample space, such as a network-attached storage (NAS) or a personal computer.
- 2. Install essential equipment like a UPS, router, backup PC or NAS, and a computer system for operations.
- 3. Acquire two working and preferably new disks to replace the damaged ones.
Here's the process:
- 1. Connect all damaged disks to the boot disk and restore their contents to the disk.
- 2. Replace the existing disk with new scratch disks, restoring and configuring the RAID to duplicate the original setup.
- 3. Transfer all the data from the boot disk to the newly constructed RAID array.
- The process is lengthy and arduous, with no guarantees of seamless execution.
- Not all files may be restored perfectly; they might differ from the originals.
- Data may be damaged or lost without a trace during the transfer.
Use Professional Tools
The latest method to recover data from raid 5 with 2 failed drives is the safest and most efficient. It is related to purchasing the professional application DiskInternals RAID Recovery and recovering data from an array (including RAID Server failure recovery) using this assistant.
You can use a free trial of RAID Recovery to evaluate your RAID recovery capability. In addition, this application will help you create an image of each discarded disk for free as a bonus.
So, connect the drives in the array to your computer as independent local drives.
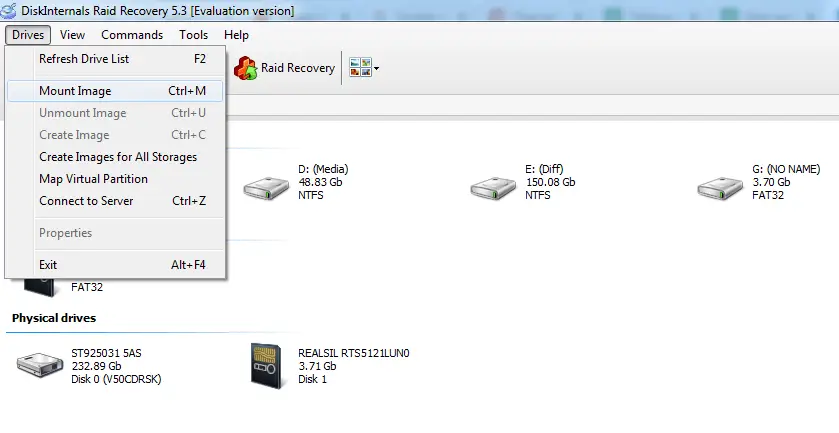
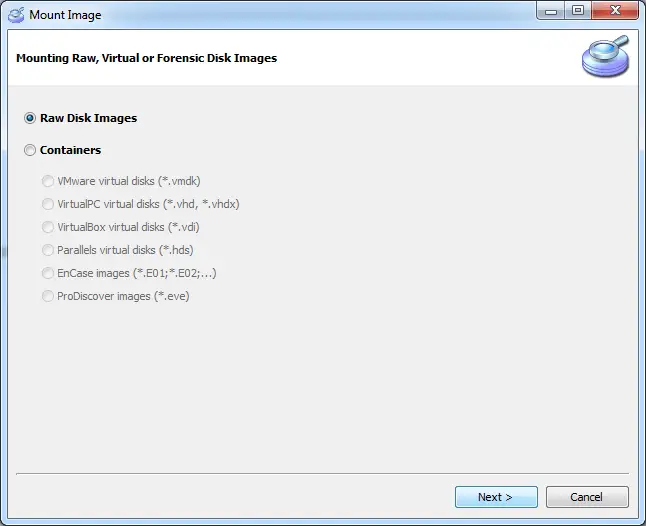
Download and run DiskInternals RAID Recovery software from the website, then open and mount the disk image obtained from the service. To do this, click Disks -> Mount Image, then click RAW Disk Image -> Next and click the Select and Attach Disk Image button.
Once you plug in the drive, click on Commands and select RAID Master.
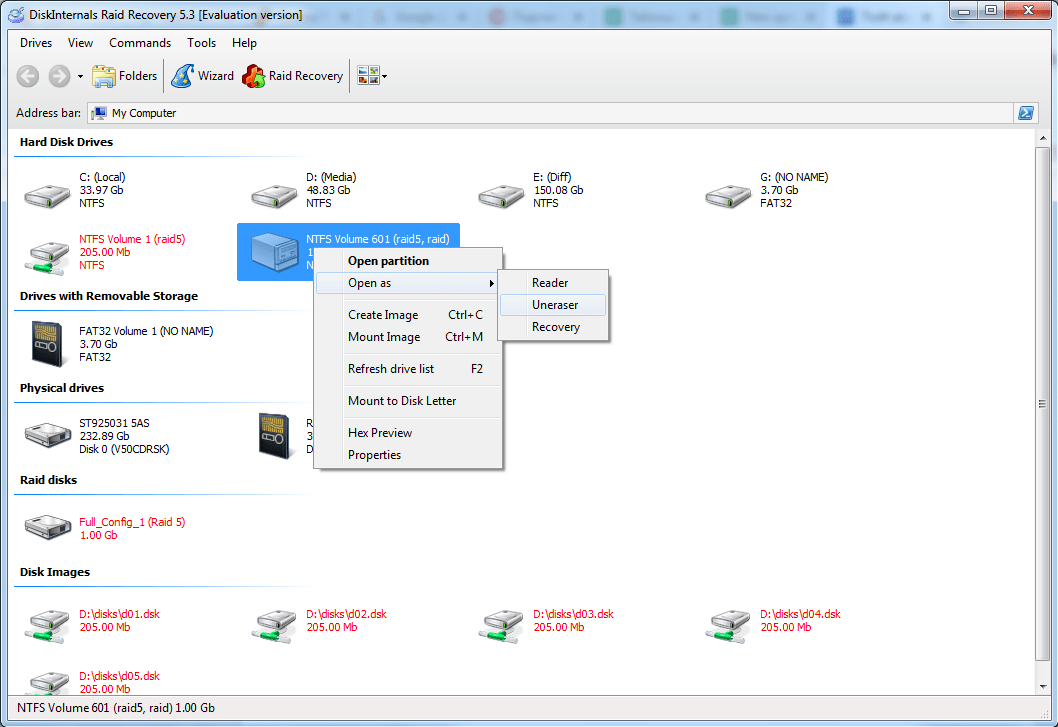
Next, select Standard Mode and RAID, then select the disks and locations for RAID recovery. Click the Next button and in the new window click Arrange by RAID Levels. Select the type of RAID array (in this case, RAID 5), then the reconstructed RAID will be added to the list of disks and marked in red.
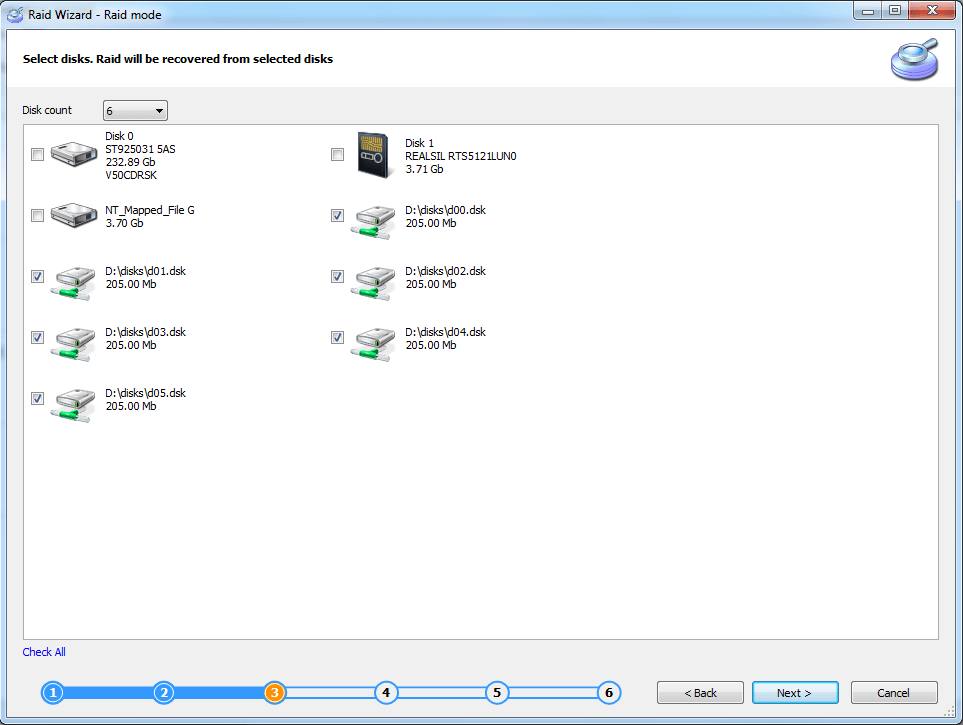
Now right click on the recovered RAID and select Open As, select one of the options:
- Reader
- Uneraser
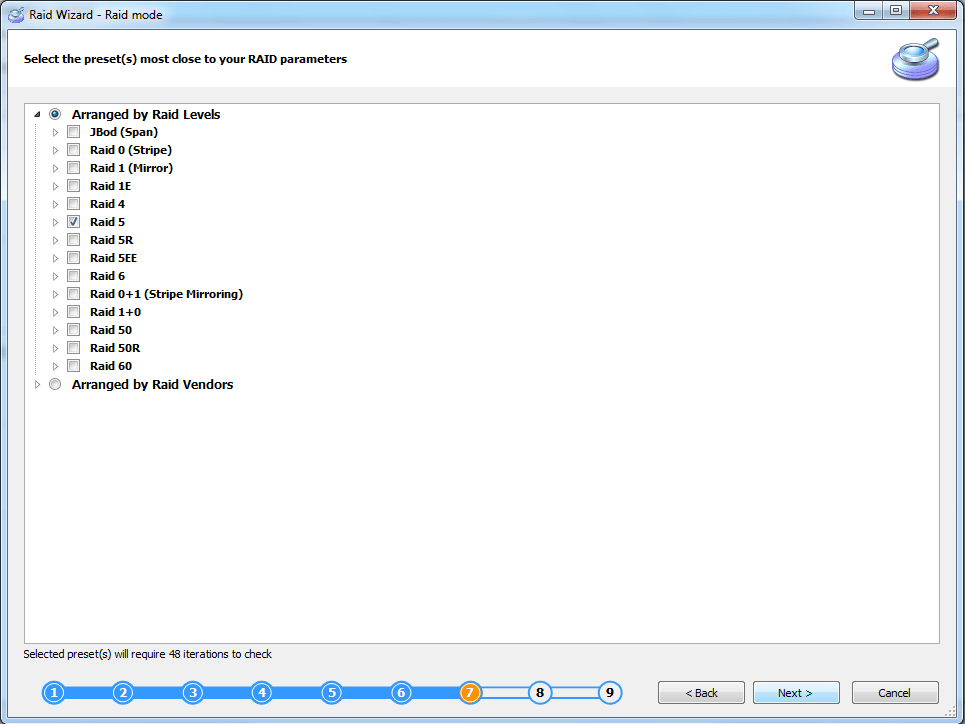
Once the scan is complete, select the data you want and save it in a new safe place by activating the purchased license.
Is It Possible to Recover RAID 5 with 2 Failed Drives?
Recovering from a RAID 5 array with two failed drives is challenging due to the inherent limitations of RAID 5. In a RAID 5 setup, data and parity are distributed across all drives, offering redundancy against a single drive failure. However, a second drive failure compromises both data and parity, making standard recovery methods ineffective due to insufficient redundancy for data reconstruction.
Despite these challenges, recovery may still be possible under certain conditions, especially if there is no severe physical damage. If the drives haven't been overwritten and some sectors remain intact, specialized data recovery firms can employ techniques like forensic imaging to extract surviving data fragments. These methods may involve using cleanroom environments to disassemble drives, using hardware tools to bypass logical failures, or applying advanced algorithms to reassemble fragmented data.
The chances of recovery improve if the failure is due to logical errors or firmware issues rather than physical damage. In these cases, RAID-specific recovery software might rebuild the array’s logical structure, although this process is time-consuming and risky without proper backups.
Given the complexity of RAID 5 recovery with two failed drives, professional intervention is often necessary, and these services are costly due to the expertise and resources required. Regular, comprehensive backups are essential as they offer the most reliable defense against data loss in catastrophic failure situations, minimizing reliance on expensive recovery processes and preserving data integrity without the associated distress and expenses.
Step-by-Step RAID 5 Recovery Guide (with 2 Failed Disks)
Step 1: Assess the Situation
- Identify the Failures: First, determine how the two disks failed. Are they suffering from logical errors like file system corruption, or is there physical damage such as misaligned read/write heads? Understanding this helps in planning the recovery approach.
- Inspect Other Hardware: Make sure there are no issues with other components, such as the RAID controller or power supply, which could further complicate recovery.
Step 2: Stop All Write Operations
- Isolate the Array: Disconnect the RAID array from your network or system to prevent any accidental write operations. This will preserve the state of the data.
Step 3: Clone the Drives
- Create Disk Images: Use reliable disk imaging tools to clone each drive, including the failed ones. Look for tools capable of handling drives with errors or bad sectors. Clone to physically separate and well-functioning storage devices to ensure data freshness.
- Verify Clones: Double-check the integrity of your clones to confirm they are usable replicas of the originals. Missing or faulty clones may hinder the next steps.
Step 4: Setup DiskInternals RAID Recovery
- Install the Software: Download DiskInternals RAID Recovery from the official website and install it on a robust machine that can handle extensive data processing with minimal risk of failure.
Step 5: Connect the Cloned Drives
- Physical Setup: Connect the cloned drives to your computer using compatible interfaces (e.g., SATA, USB enclosures).
- Confirmation: Confirm that each disk is recognized by your operating system to ensure they are ready for processing.
Step 6: Launch Auto-Detection
Automated Discovery: Use DiskInternals RAID Recovery’s auto-detect capabilities to analyze the disks for RAID parameters. The tool will attempt to identify:
- The order of the disks.
- The block (strip) size.
- The parity rotation and schema used by the original RAID configuration.
Step 7: Manual Input of RAID Parameters
- Manual Configuration: If auto-detection doesn't yield accurate results, manually enter correct RAID parameters. Cross-reference any available documentation or prior knowledge about the RAID setup if unsure.
- Emulate Controller Settings: Accurately replicate any proprietary settings; occasionally generic settings need modification to match the RAID controller's operation.
Step 8: Initiate a Deep Scan
- Comprehensive Search: Initiate a deep scan to seek out every possible fragment of data on the drives. This step is resource-intensive and might require significant computational power and time, depending on your array's size.
- Close Monitoring: Monitor the process for any immediate prompts or errors, and ensure the environment remains stable (e.g., consistent power supply).
Step 9: Preview Recoverable Files
- File Verification: Validate the files found during the deep scan by using the software’s preview feature. Open and test various file types to ensure they are reconstructed correctly.
- Check Metadata: Sometimes metadata like file names and dates may be scrambled. Look for familiar patterns or identifiers to guide any overarching data reconstruction.
Step 10: Recover and Save Data
- Select a New Destination: Always save recovered data to a different drive—not back to the RAID or clone disks—to avoid overwriting any remaining data fragments that might be needed for subsequent attempts.
- Backup the Recovered Data: Once recovered, immediately back up the data to multiple storage solutions to cushion against further data loss events.
Step 11: Validate the Recovered Data
- Data Integrity Testing: Execute thorough checks on the recovered data. Open files, run checksums, and verify that data is not corrupt or incomplete. Software utilities for hashing, like MD5 or SHA-1, can affirm data integrity post-recovery.
FAQ
- How to recover RAID 5 disk failure?
Recovering from a RAID 5 disk failure can be a complex process, but tools like DiskInternals RAID Recovery can help simplify it. Here's a concise guide to recover RAID 5 using DiskInternals RAID Recovery:
- 1. Install DiskInternals RAID Recovery: Download and install the software on a computer that can access the RAID disks.
- 2. Connect the Disks: Ideally, connect the disks from the RAID array to your computer. If the failed disk has been replaced or is still readable, include it in the connection.
- 3. Launch the Software: Open DiskInternals RAID Recovery and allow it to detect the connected RAID disks.
- 4. Auto-detection: Use the auto-detection feature to allow the software to identify the RAID configuration automatically. This helps in reconstructing the RAID parameters if they're not known.
- 5. Manual Setup: If auto-detection fails or is inaccurate, manually enter the RAID parameters such as block size, order, and number of member disks.
- 6. Scan and Reconstruct: Initiate a scan process. The software will reconstruct the array and display the files. This can take some time depending on the size and complexity of the RAID.
- 7. Preview Files: Before recovering, preview some files to ensure they are intact and properly reconstructed.
- 8. Recover Files: Choose the location where you want to save the recovered files. It's recommended to use a different drive than the RAID array to avoid overwriting data.
- 9. Check and Verify: Once the recovery is complete, verify the integrity of the files to ensure everything is intact.
- Can RAID 5 work with 2 drives?
RAID 5 requires at least three drives to function. This is because RAID 5 uses striping with parity, which distributes both data and parity information across all the drives in the array. The parity information provides fault tolerance, allowing the system to reconstruct data if one drive fails.
With only two drives, RAID 5 cannot operate, as there would not be enough drives to store both data and parity information in a way that provides redundancy. If you're looking to use only two drives, RAID 1 (mirroring) or RAID 0 (striping without redundancy) are possible configurations, but they offer different levels of redundancy and performance.
- Can I recover RAID 5 if two drives failed?
Recovering a RAID 5 array when two drives have failed is extremely challenging and often considered beyond typical recovery scenarios because RAID 5 can only tolerate a single drive failure. When a second drive fails, the data from both the original and the redundant (parity) sections is lost, making reconstruction of the full data set impossible under normal RAID 5 operations.
Here are some possible approaches you might consider:
- 1. Professional Data Recovery Services: These services have specialized tools and expertise to attempt recovery from multiple drive failures. They may employ techniques such as forensic recovery, which might retrieve some data, but success is not guaranteed and can be costly.
- 2. Using RAID Recovery Software: In cases where the failure is due to logical issues (e.g., corruption rather than physical failure), some RAID recovery software might be able to reconstruct parts of the data. However, the likelihood of full recovery is still low.
- 3. Backup Restoration: If a backup exists, restoring from backup is the most reliable way to recover data. It emphasizes the importance of maintaining regular and up-to-date backups, especially for critical data.
- What tools can help me recover RAID 5 data?
DiskInternals RAID Recovery:
- Specializes in RAID recovery and supports various RAID levels, including RAID 5.
- Features automatic RAID parameter detection.
- Allows manual configuration if automatic detection is unsuccessful.
- Provides a preview of recoverable files before you proceed with the recovery.
- Should I clone the disks before recovery?
Yes, cloning the disks before attempting any recovery is a highly recommended practice. Here's why:
- Data Preservation: Cloning creates an exact copy of the disks, ensuring the original data remains intact. This allows you to perform recovery attempts on the clone, reducing the risk of further damage to the original disks.
- Error Mitigation: If an error occurs during the recovery process, having a clone means you can always return to the original data state and attempt recovery again with different methods or tools.
- Hardware Reliability: If the disks are experiencing hardware issues, cloning them immediately can preserve the current state before further degradation occurs.
- Peace of Mind: Knowing that the original data is preserved allows you to explore different recovery techniques with less stress and pressure.
- What information do I need to recover RAID 5 manually?
- Disk Order: Know the sequence of the disks in the array. The order affects how data is distributed and reconstructed.
- Block Size (Strip Size): This refers to the size of the individual blocks of data that are striped across the disks. Common sizes are 64KB or 128KB, but this can vary.
- Parity Distribution: Identify how parity information is distributed. RAID 5 typically uses rotating parity, so understanding the pattern is crucial.
- Start Offset: Some RAID controllers might introduce an offset where data begins on each disk. Knowing this start point can be vital.
- Total Number of Disks: Ensure you have the correct count and access to all functional disks in the array.
- File System Type: Familiarize yourself with the file system used on the RAID (e.g., NTFS, ext4), as this will affect how data is read and reconstructed.
- RAID Controller Details: Understanding the specifics of the controller that managed the RAID can assist in emulating its functioning during manual reconstruction.
- Any Known Disk Health Issues: Be aware of which disks had issues and the nature of those issues, as it can impact the reconstruction approach.
- What increases the risk of losing everything?
- Multiple Disk Failures: RAID 5 can only tolerate a single disk failure. If multiple disks fail simultaneously or before the array is rebuilt, data loss becomes highly probable.
- Lack of Backups: Not having an up-to-date backup of your data is a critical risk factor. Even with RAID redundancy, backups are essential for data recovery.
- Attempting Repairs without Expertise: Trying to manually recover or rebuild the array without sufficient knowledge can lead to mistakes that complicate or prevent recovery.
- Physical Disk Damage: Physical issues such as worn-out read/write heads, platter damage, or motor failure can make data unrecoverable.
- Data Corruption: Corruption at the logical level, affecting the file system or the RAID configuration metadata, could lead to loss if not handled correctly.
- Power Surges: Electrical issues can damage multiple drives simultaneously or corrupt data during writes.
- Mismatched Drives: Using drives with different models or firmware without proper configuration can lead to inconsistencies or failures in the RAID.
- Overwriting Data: If recovery attempts write over the existing data, the original data may become irretrievable.
- How long does RAID 5 recovery take?
- Size of the Array: Larger RAID arrays will naturally take longer to recover due to the volume of data that must be processed.
- Extent of Damage: If the array has suffered extensive corruption or multiple disk failures, the recovery process might be more complex and time-consuming.
- Disk Speed and Health: The performance and condition of the disks in the array can affect recovery speed. Healthier disks tend to be processed more quickly.
- Recovery Method: Automated tools might work faster than manual methods, but if the RAID parameters need to be reconstructed manually, it can take considerably longer.
- System Resources: The processing power and RAM available on the machine performing the recovery can also impact how long the process takes.
- Use of Cloning: If you decide to clone the disks before recovery, this adds to the total recovery time.