
RAID 5 on Windows 10 Usage
Here you will find out:
- how does RAID 5 on Windows 10 work
- methods how to set up RAID 5 on Windows 10
- when DiskInternals may help
Are you ready? Let's read!
About RAID 5 on Windows 10
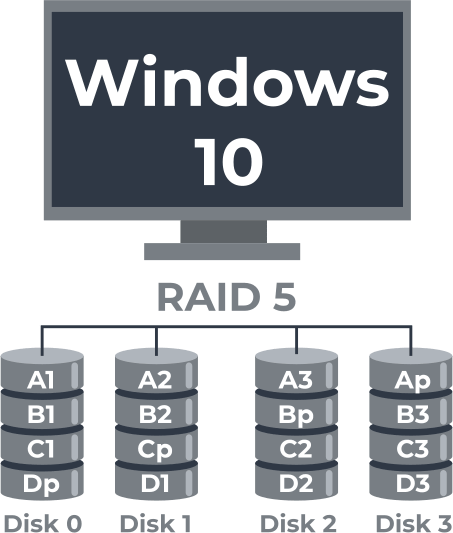
RAID combines multiple drives to enhance file performance and security.
This article will focus on setting up RAID 5 on the Windows 10 operating system, which can present unique challenges. Typically, RAID 5 requires at least three disks and uses an efficient data distribution method called volume striping with parity. In the event of a hardware failure, it’s possible to replace the faulty drive and rebuild the data from the remaining drives. RAID 5 is compatible with various file systems, including FAT, FAT32, and NTFS, and is commonly used in commercial settings. However, if you are an individual user interested in data security and system performance, setting up a RAID 5 on Windows 10 is a viable option.
This article will guide you through different effective methods to configure RAID 5 on Windows 10.
What is RAID 5? Learn more!What you need to set up a RAID 5
Minimum drives for RAID 5: you should have 3 or more dynamic disks.
If you want everything to be perfect, then use 4 dynamic disks. Remember that IDE, SCSI, or mixed architecture is also valid. The system files and the boot operating system must be on a different volume. A RAID 5 volume can take up only 20 MB per drive or the entire drive.
If you have disks that you want to upgrade to a dynamic disk, then they must contain at least 1 MB of free space at the end of the disk. Otherwise, a successful update will not occur. These are the basic requirements for a RAID 5 setup. Next, you can begin the process of creating an array.
How to set up a RAID 5 on Windows 10 via Storage Spaces
Using this method to create an array is not difficult even for a novice. But it is important to follow all the recommendations.
To get started, you need to properly install the hard drives on your computer and then boot into Windows 10. It is recommended that you back up important data from the drives. Now click on Start and, in the search bar, type “Disk spaces” and press Enter.
In a new window, click the "Create a new pool and storage location" button. In the "Name and drive letter" section, specify the necessary parameters for the storage array. Next, Windows 10 will check all the drives and select them in the next window.
In the "Stability" section, select the "Parity" option, which is equivalent to RAID level 5.
Next, set the disk size correctly in the "Size" field. It is recommended that you select the default size, in which case it should be correct (keep in mind that the pool may be larger than the actual physical capacity, and if you run out of space, you will need to add more disks). Select the "Create storage location" section and wait for the process to finish. To monitor the array, enter “Manage Storage Spaces” in the search field on the Start menu.
Tip: RAID 5 vs RAID 0How to set up a RAID 5 Windows 10 via Disk Management
To get started, go to Disk Management and right-click on one of the dynamic disks designed to create a RAID 5.
From the list provided, select "Create Volume". The Wizard will help you; click "Next". Then click on the line “RAID 5 volume” and also click "Next". Now you have to select the drives to create the array and click on the Add button. Pay attention to the “Disk size” field; here you can adjust the size of the disks as you wish. Next, the Wizard will let you select a few more parameters of the array (Assign a drive letter, mount this volume in an empty folder, etc.).
Next, select "Format this section", where you may select the following parameters:
- Select the FAT32 or NTFS file system
- The unit size is selected by default
- In the Volume Label field, select the default label "New Volume"
- You can also select “Quick formatting” and the “Compress files and folders” checkbox, or postpone both of these tasks
- Finally, in the Summary window, click Finish
As a result, the status of the disks is displayed as “Good” and RAID 5 is ready for use even without rebooting the system.
What else do you need for RAID 5 data safety?
Despite the fact that RAID 5 is fault-tolerant, there are cases when the array capabilities are not enough to recover certain missing files. In such cases, you must use the special application DiskInternals RAID Recovery. It is designed specifically to recover files from any level of arrays. For beginners, there is a built-in Recovery Wizard, and for your peace of mind and confidence there is a free preview of the data found. It also automatically determines the necessary parameters of the array and its subsequent deep scan. So, how to recover data from RAID drives?
Before using the application, read the instructions:
Install DiskInternals RAID Recovery. Next, launch the Recovery Wizard, if necessary.
Choose which array will be scanned and which scanning mode you prefer (fast, deep or reader).
Then you just have to wait for the search results and view them for free.
This is a prerequisite, as the company cares about its reputation and will not offer you the purchase of a license without your confidence.
Once you understand that the application is excellent and all the files are in place, acquire a license and export the data to any other drive.
That's all, your mission is over. Enjoy unrivaled results — congratulations!