
How to Recover Data from RAID Hard Drive
A popular technique called RAID (Redundant Array of Independent Disks) combines numerous physical hard drives into a single logical unit. RAID setups offer increased performance, data redundancy, or a combination of the two. Even with this cutting-edge technology, data loss events can still happen for a variety of reasons, including device malfunctions, software bugs, or unintentional deletions. Leading provider of data recovery solutions DiskInternals offers specialist software called RAID Recovery that is made to properly handle data loss situations within RAID arrays.
Understanding RAID Array Recovery
RAID (Redundant Array of Independent Disks) is a technology that combines multiple physical hard drives into a single logical unit to improve performance, data redundancy, or both. There are different RAID levels, each with its own characteristics, including RAID 0, RAID 1, RAID 5, RAID 6, and more. While RAID setups offer benefits like improved performance and data protection, they can also introduce complexity and potential points of failure.
RAID hard drive recovery refers to the process of recovering data from a RAID array when one or more of the drives fail or become inaccessible. Here are the general steps and considerations for RAID hard drive recovery:
- 1. Identify the Issue: Determine the cause of the RAID failure. It could be a physical drive failure, logical corruption, controller failure, or other issues.
- 2. Assess RAID Level: The recovery process may vary depending on the RAID level used. RAID 0, for example, offers no redundancy, so a single drive failure could result in data loss. RAID 1, on the other hand, provides mirroring, so data can be recovered from the healthy drive if one drive fails.
- 3. Replace Failed Drive: If a drive has physically failed, replace it with a new drive of the same size and specifications. Some RAID configurations can rebuild the array automatically when a new drive is detected.
- 4. Backup: Before attempting any recovery, it's essential to make a backup or clone of the remaining drives to avoid further data loss due to potential recovery attempts.
- 5. Professional Assistance: RAID recovery can be complex, especially when dealing with multiple failed drives or intricate configurations. In many cases, it's advisable to seek professional data recovery services that specialize in RAID recovery.
- 6. Reconstruction: RAID arrays use specific algorithms to distribute data across multiple drives. Depending on the RAID level and configuration, data reconstruction may involve using parity information, mirroring, or striping. Specialized software or hardware controllers may be necessary to reconstruct the data.
- 7. Data Recovery Tools: Depending on the situation, you might use specialized data recovery tools to access and recover data from the RAID array. Some tools are designed to work with specific RAID levels or configurations.
- 8. Rebuild the Array: Once data recovery is complete, you might need to rebuild the RAID array. This involves restoring the data to its original structure and configuration.
- 9. Data Verification: After the recovery and rebuild processes, it's crucial to verify the integrity of the recovered data to ensure that no corruption or data loss occurred during the recovery process.
- 10. Prevention: To prevent future data loss, consider implementing regular data backups, monitoring drive health, and following best practices for RAID maintenance.
- 1. Data Redundancy: One of the primary benefits of RAID is data redundancy. RAID levels such as RAID 1, RAID 5, RAID 6, RAID 10, and others provide mechanisms to store redundant copies of data across multiple drives. In the event of a single drive failure, the redundant data ensures that data remains accessible, minimizing the risk of data loss.
- 2. Improved Data Availability: The redundancy provided by RAID configurations leads to improved data availability. If a drive fails, the system can continue to function without interruption, allowing users to access data and continue their work while the failed drive is replaced and the RAID array is rebuilt.
- 3. Increased Performance: RAID can enhance data read and write performance, especially in RAID levels like RAID 0. In RAID 0, data is striped across multiple drives, which can result in significantly faster data transfer rates for tasks like video editing, gaming, and other I/O-intensive operations.
- 4. Scalability: RAID configurations can be easily scaled to accommodate changing storage needs. Depending on the RAID level used, additional drives can be added to expand the storage capacity or increase performance without significant downtime or data migration.
- 5. Cost-Effectiveness: Some RAID levels, like RAID 1, use mirroring to create redundancy, which can be cost-effective for critical data protection in small-scale environments. RAID 5 and RAID 6 also offer good data redundancy while using fewer drives compared to mirroring.
- 6. Fault Tolerance: RAID provides fault tolerance, which means the ability to withstand hardware failures without data loss. RAID 5 and RAID 6, for example, can tolerate the failure of a single or even multiple drives without losing data.
- 7. Increased Workload Handling: RAID configurations distribute data and I/O operations across multiple drives, allowing for better handling of heavy workloads and high-traffic environments. This can be beneficial for servers, databases, and virtualization setups.
- 8. Hot Swapping: Many RAID configurations support hot-swapping, allowing failed drives to be replaced while the system is still running. This minimizes downtime and ensures continuous data access.
- 9. Backup Performance: RAID configurations, particularly RAID 1, can improve backup performance by allowing simultaneous writes to mirrored drives. This reduces the time required for backup operations.
- 10. Data Striping: RAID 0, which uses data striping without redundancy, can significantly improve read and write performance for tasks like large file transfers and data-intensive applications.
- 1. SATA (Serial ATA): SATA is the most prevalent hard drive interface used in modern computers. It replaced the older IDE interface and offers faster data transfer speeds and more efficient data communication. SATA cables are typically thin and have a 7-pin data connector and a 15-pin power connector.
- 2. SAS (Serial Attached SCSI): SAS is a high-performance interface commonly used in enterprise-level storage systems. It is a more robust and reliable interface compared to SATA, with higher data transfer rates and the ability to support multiple drives on a single cable. SAS drives are often used in servers and storage arrays.
- 3. SCSI (Small Computer System Interface): SCSI was an older interface used in the past, primarily for high-end computing and servers. It supported fast data transfer rates and could connect multiple devices on the same SCSI bus. While still found in some legacy systems, it has been mostly replaced by SAS and SATA.
- 4. IDE (Integrated Drive Electronics): IDE, also known as Parallel ATA (PATA), was a standard interface used in older PCs before SATA became dominant. IDE cables are wider and have 40 or 80 pins, depending on the drive type. IDE drives are now obsolete, and SATA has become the standard for modern PCs.
- 5. PATA (Parallel ATA): PATA is another name for the IDE interface, which used parallel data transmission. It should not be confused with SATA, which is a newer and faster interface that uses serial data transmission.
- 6. M.2: M.2 is a newer form factor and interface used primarily in laptops and smaller form factor desktops. It utilizes PCIe (PCI Express) or SATA technology, allowing for faster data transfer rates and more compact designs.
- 7. NVMe (Non-Volatile Memory Express): NVMe is a protocol designed specifically for solid-state drives (SSDs) that use PCIe as the interface. NVMe allows for incredibly fast data transfer rates and low latency, making it ideal for high-performance storage solutions.
- RAID 0: Minimum of 2 drives. There is no redundancy, and the capacity and performance are increased by striping data across multiple drives.
- RAID 1: Minimum of 2 drives. Data is mirrored between two drives, providing data redundancy but no capacity or performance improvement.
- RAID 5: Minimum of 3 drives. Uses distributed parity to provide both data redundancy and improved performance by striping data across multiple drives.
- RAID 6: Minimum of 4 drives. Similar to RAID 5 but with double parity, allowing for data recovery even if two drives fail simultaneously.
- RAID 10 (RAID 1+0): Minimum of 4 drives. Combines RAID 1 (mirroring) and RAID 0 (striping) to offer both redundancy and performance improvement.
- RAID 50 (RAID 5+0): Minimum of 6 drives. Combines multiple RAID 5 arrays in a RAID 0 configuration to provide better performance and redundancy.
- RAID 60 (RAID 6+0): Minimum of 8 drives. Combines multiple RAID 6 arrays in a RAID 0 configuration for higher performance and greater data protection.
- 1. RAID Level: The complexity of the RAID level used (e.g., RAID 0, RAID 5, RAID 6, etc.) can impact the cost. RAID levels with redundancy, such as RAID 5 or RAID 6, may be more challenging and time-consuming to recover compared to RAID 0, which has no redundancy.
- 2. Number of Drives: The number of hard drives involved in the RAID array affects the recovery cost. RAID configurations with more drives may require more extensive efforts to recover the data.
- 3. Drive Condition: The condition of the individual drives also plays a role in determining the recovery cost. If the drives have suffered severe physical damage, specialized cleanroom procedures may be necessary, increasing the overall cost.
- 4. Data Recovery Techniques: Advanced data recovery techniques, such as reconstructing RAID arrays, rebuilding parity data, or dealing with multiple simultaneous drive failures, can contribute to higher recovery costs.
- 5. Data Size and Priority: The amount of data to be recovered and the priority of the recovery (emergency, standard, etc.) can impact the cost. Urgent recovery requests may incur additional fees.
- 6. Data Recovery Company: Different data recovery service providers may have varying pricing models, so it's essential to get quotes from multiple reputable companies to compare costs.
Advantages of RAID
RAID (Redundant Array of Independent Disks) offers several advantages, making it a popular choice for data storage in various applications, from home users to enterprise-level systems. Here are some of the key advantages of using RAID:
Why Use DiskInternals RAID Recovery?
DiskInternals RAID Recovery is a powerful software tool that specializes in retrieving data from failed or corrupted RAID arrays. Leveraging its expertise in RAID systems, this software provides a comprehensive solution for recovering data in a wide range of RAID configurations, from RAID 0 and RAID 1 to more complex setups like RAID 5 and RAID 6.
| RAID-specific Expertise DiskInternals RAID Recovery has been developed with an in-depth understanding of RAID architectures and complexities. It can handle various RAID levels, stripe sizes, and parity patterns, ensuring a higher chance of successful data recovery. | Versatility The software is equipped to handle different types of RAID configurations commonly used in both home and enterprise environments. Whether you have a RAID 0 setup for enhanced performance or a RAID 5 for data redundancy, DiskInternals RAID Recovery has got you covered. | Recovering from Multiple Failures Disk failures, controller malfunctions, accidental formatting, or other data loss incidents within a RAID array can all lead to critical data loss. The software is designed to tackle these issues and recover valuable data from seemingly unrecoverable situations. | User-friendly Interface DiskInternals understands that not everyone using the software will be a data recovery expert. Hence, the software often comes with an intuitive user interface that guides users through the recovery process step-by-step. |
| Preview Capability The ability to preview recoverable files before actually performing the recovery process is a crucial feature. DiskInternals RAID Recovery often includes this functionality, allowing users to assess whether the data can be successfully retrieved. | Non-destructive Recovery When attempting to recover data, the software prioritizes non-destructive methods to ensure that the original RAID configuration and source disks remain intact. This approach minimizes the risk of further data loss during the recovery process. | Customer Support and Updates DiskInternals takes customer satisfaction seriously, providing reliable customer support and regular software updates. These updates keep the software up-to-date with the latest RAID configurations and data recovery techniques, ensuring its effectiveness in current and future scenarios. |
DiskInternals RAID Recovery offers a powerful solution for users facing data loss in RAID arrays. With its RAID-specific expertise, versatility, and user-friendly interface, it has gained a reputation as a reliable data recovery tool. However, it's essential to understand that no data recovery software is foolproof, and results may vary depending on the specific data loss scenario.
How to use Diskinternals RAID Recovery
Using DiskInternals RAID Recovery is a straightforward process. Here's a step-by-step guide to help you recover data from a RAID array using the software:
Note: Before you begin, ensure that you have DiskInternals RAID Recovery installed on a separate system or drive from the RAID array you want to recover data from. Installing the software on the RAID array you're trying to recover from may cause data overwriting and hinder successful recovery.
Step 1: Launch DiskInternals RAID Recovery
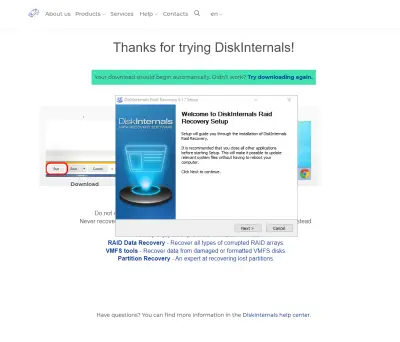
After you have downloaded and installed DiskInternals RAID Recovery software, follow these steps to launch the application and start the recovery process:
a. Locate the Application: Depending on your operating system (Windows, macOS, etc.), you might find the DiskInternals RAID Recovery software in your Applications folder (macOS) or in the Start Menu or Desktop (Windows). Look for the software's icon or name.
b. Double-Click to Open: Use your mouse or trackpad to double-click on the software's icon. This action will initiate the launching process.
c. Wait for Initialization: After you've clicked on the icon, the software will start initializing. This might involve loading necessary components and resources, as well as checking for updates.
d. User Interface: Once the software has finished initializing, its user interface will appear on your screen. This interface is where you'll interact with the software to initiate and manage the recovery process.
e. Menus and Options: The user interface will likely feature menus, buttons, and options that allow you to perform various tasks. You might see options like "Start Recovery," "Select RAID Configuration," "Scan Drives," "Preview Files," and more.
f. Connect Drives: Before you proceed with the recovery process, ensure that the RAID drives are properly connected to your computer. This could involve connecting the drives internally to your motherboard or using external enclosures.
g. Follow On-Screen Instructions: The software might provide on-screen instructions or prompts to guide you through the recovery process. These instructions could include steps for selecting the RAID configuration, scanning drives, previewing recovered files, and more.
h. Access Help and Documentation: If you're unsure about any aspect of the software or the recovery process, most recovery software includes a help section or documentation. You can usually access this by navigating to the software's Help menu or by pressing a dedicated "Help" button.
i. Start the Recovery: Once you've selected the appropriate RAID configuration and scanned the drives, you'll typically have an option to start the actual recovery process. Follow the software's prompts to begin the recovery of your data.
Step 2: Select RAID Type
When you launch DiskInternals RAID Recovery software, it will prompt you to choose the RAID configuration that corresponds to your setup. Follow these steps:
a. Choose RAID Level: Select the appropriate RAID level that matches your array. This could be RAID 0, RAID 1, RAID 5, RAID 6, or another level. Refer to your RAID documentation or configuration details to determine which RAID level your array uses.
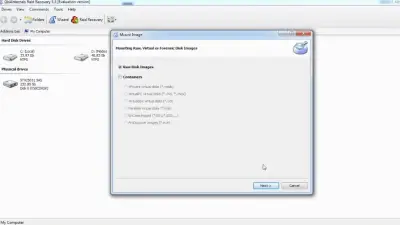
b. Select Configuration: Depending on the RAID level, you might have multiple options for configurations. For instance, if you're dealing with RAID 5, you might need to specify the number of data drives, the size of the parity drive, and the striping size. This information is essential for the software to correctly analyze and recover data from the array.
c. Provide Drive Information: The software might ask you to input information about the drives in the array. This could include the drive order, capacity, and any other relevant details. Make sure to provide accurate information to ensure the software can properly analyze and reconstruct the RAID configuration.
d. Verify Configuration: Before proceeding, review the configuration details you've provided to ensure they match your RAID setup. Making a mistake in selecting the RAID level or configuration could lead to incorrect results during the recovery process.
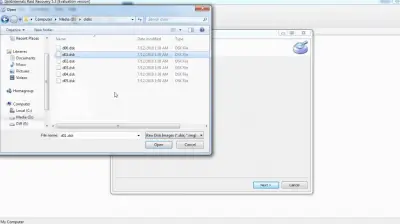
e. Confirm Selection: Once you're confident that you've selected the correct RAID level and configuration, confirm your choice. The software will then proceed to scan and analyze the drives in accordance with the selected RAID configuration.
Step 3: View and Select Partitions
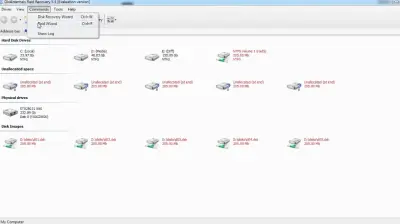
Once you've launched the DiskInternals RAID Recovery software and selected the appropriate RAID configuration, you'll likely encounter a step where you need to view and select the partitions or drives that you want to recover data from. This step is important for identifying the correct partitions and volumes that were part of the RAID array. Here's how to navigate this step:
a. Scan Drives: The software will start scanning the connected drives to identify partitions and volumes that were part of the RAID array. This scan will identify potential RAID configurations and recoverable data structures.
b. Partition List: After the scan is complete, the software will present you with a list of detected partitions and volumes. These might include partitions from different drives that were part of the RAID array.
c. Identify RAID Partitions: Look for partitions that were part of the original RAID setup. They might have names or labels that match the RAID configuration you selected earlier. For example, if you're recovering from a RAID 5 array, you might see partitions labeled as "RAID5_1," "RAID5_2," and so on.
d. Preview Data: Many data recovery software tools allow you to preview the contents of partitions before recovery. This can help you verify that the correct data is being recovered. Some software might show file and folder structures, file types, and even allow you to view the content of specific files.
e. Select Partitions: Choose the partitions that you want to recover data from. Make sure to select the partitions that contain the data you need. If you're unsure, you can often refer to the partition's size, label, or any other identifying information to help you make the right selection.
f. Exclude Irrelevant Partitions: If there are partitions in the list that you're certain are not part of the RAID array or do not contain the data you need, you can exclude them from the recovery process. This can help streamline the recovery and save time.
g. Proceed to Recovery: Once you've selected the appropriate partitions, follow the software's prompts to proceed to the data recovery process. You might be asked to choose a destination for the recovered data.
h. Start Recovery: Initiate the recovery process by confirming your selections and starting the actual data copying process. The software will work to extract data from the selected partitions and save it to the designated recovery destination.
Step 4: Preview Files
After selecting the appropriate partitions or volumes from your RAID array, the next step in the data recovery process often involves previewing the recovered files. This step allows you to see the contents of the files before initiating the actual recovery. Previewing files helps you verify that the data being recovered is intact and accurate, as well as ensuring that you're recovering the right files. Here's how to navigate this step:
a. File List: The software will typically present you with a list of recovered files and folders found within the selected partitions. This list may be organized in a directory structure that mimics the original layout of the data.
b. File Previews: Many data recovery software tools allow you to preview individual files without actually recovering them. You might be able to click on a file to see a preview of its content, such as an image thumbnail, a snippet of text, or other relevant information.
c. File Types: Pay attention to the file types and formats you're seeing in the preview. Ensure that the files you need are recognizable and that their content appears to be intact. Previewing files can help you decide which ones are worth recovering.
d. Navigate Folders: Explore the directory structure and navigate through folders to find specific files or folders that you want to recover. This step is particularly important if you're recovering a large amount of data and need to identify the essential files.
e. Verify Data Integrity: During the preview, check if the files' content looks accurate and hasn't been corrupted. If you notice any anomalies, it might indicate issues with the recovery process or the health of the recovered data.
f. Mark Files for Recovery: If you're satisfied with the previews and want to recover specific files or folders, you might have an option to mark or select those files. This action indicates to the software that you want these files to be included in the recovery process.
g. Unmark Unwanted Files: Conversely, if there are files you don't want to recover, you can unmark them or deselect them. This helps you streamline the recovery process and save space on the recovery destination.
h. Estimate Required Space: As you preview files, keep track of the total size of the data you're planning to recover. This will help you ensure that you have enough space on the destination drive to accommodate the recovered data.
i. Ensure Quality: Previewing files allows you to assess the quality of the recovered data. If you find that a significant number of files are corrupted or not as expected, it might be an indication that further recovery attempts are needed or that professional assistance should be considered.
Step 5: Select Recovery Destination
After previewing and selecting the files you want to recover from your RAID array, the next step is to choose a recovery destination where the recovered files will be saved. This destination should be a separate drive from the one you're recovering data from to prevent overwriting any existing data. Here's how to navigate this step:
a. Choose a Drive: Select a drive or storage device where you want to save the recovered files. This can be an internal or external hard drive, SSD, USB flash drive, network-attached storage (NAS), or any other storage medium.
b. Available Space: Ensure that the selected destination drive has enough available space to accommodate the recovered files. The space required will depend on the size of the data you're recovering.
c. Create a New Folder: It's a good practice to create a new folder on the recovery destination drive to store the recovered files. This helps keep the recovered data organized and separate from any existing data on the drive.
d. Specify Path: Some recovery software allows you to specify a specific path or directory within the recovery destination where the files should be saved. This can be useful for organizing the recovered files by category or purpose.
e. Check Drive Health: Before proceeding, ensure that the recovery destination drive is healthy and functioning properly. You wouldn't want to recover data to a drive that might have issues or potential failures.
f. Avoid Overwriting: As mentioned earlier, never recover data directly to the drive you're recovering from, as it could overwrite existing data and make recovery more challenging.
g. External Storage: If you're using an external storage device like a USB drive, ensure it's connected and recognized by your computer before proceeding.
h. Double-Check: Verify that you've selected the correct recovery destination and that you're comfortable proceeding with the recovery process.
Step 6: Begin Recovery Process
After you've previewed the files, selected the recovery destination, and made sure everything is in order, you're ready to initiate the actual data recovery process. This step involves copying the selected files from your RAID array to the specified recovery destination. Here's how to proceed:
a. Confirmation: Depending on the data recovery software you're using, you might be prompted to confirm your selections before proceeding with the recovery. This can include a final review of the files you've chosen and the recovery destination.
b. Initiate Recovery: Look for a button or option that begins the recovery process. This might be labeled as "Start Recovery," "Recover," or something similar. Clicking on this option will initiate the copying of the selected files to the recovery destination.
c. Monitor Progress: During the recovery process, the software will display a progress indicator. This lets you track the status of the recovery, including the number of files recovered and the amount of data copied.
d. Estimated Time: Some software might provide an estimated time for completion based on the size of the recovered data and the speed of your system and drives.
e. Do Not Interrupt: It's crucial not to interrupt the recovery process once it's started. Avoid disconnecting drives, shutting down the computer, or quitting the software while recovery is in progress.
f. Completion: Once the recovery process is complete, the software will display a message indicating success. You'll likely see a summary of the recovered files and the location where they were saved.
Step 7: Verify Recovered Data
After the data recovery process is complete, it's important to verify the integrity and quality of the recovered data. Verification ensures that the files you've recovered are usable and haven't been corrupted during the recovery process. Here's how to perform this crucial step:
a. Navigate to Recovery Destination: Access the recovery destination where you saved the recovered files. This could be an external drive, a different partition, or a designated folder.
b. Spot Check: Begin by opening a few random files from different folders. This allows you to check whether the files have been successfully recovered and whether their content appears intact.
c. File Formats: Pay attention to the file formats that were recovered. Ensure that they match the original file formats (e.g., images, documents, videos) and that the files can be opened using their respective applications.
d. Preview Content: If the recovery software offers a preview function, use it to preview the content of various recovered files. Check images, documents, videos, and any other relevant file types to make sure they display properly.
e. File Size: Compare the sizes of recovered files to the sizes of their original counterparts (if known). Significant discrepancies in file sizes could indicate corruption.
f. Check Metadata: For media files (images, videos, music), review the metadata (such as EXIF data for images) to ensure that it's intact and consistent with the original files.
g. Open Different File Types: Test various file types to make sure they're all accessible and functioning as expected. This can include opening documents, images, videos, audio files, and more.
h. File Hierarchies: If you recovered entire folders or directory structures, navigate through the hierarchy to ensure that the organization of files and subfolders matches the original arrangement.
i. Error Messages: Keep an eye out for any error messages, glitches, or anomalies while opening or interacting with recovered files. If you encounter any issues, investigate further.
j. CRC or Hash Checks: Some data recovery software might offer the option to perform CRC (Cyclic Redundancy Check) or hash checks on recovered files. These checks can help verify data integrity by comparing checksums.
k. Spot-Check Large Files: If you're recovering large files, consider spot-checking a few of them to ensure that they've been fully recovered without corruption.
What is the hard drive interface (SATA, SAS, SCSI, IDE, etc.)?
The hard drive interface refers to the method by which a hard drive connects to a computer's motherboard or storage controller. It determines how data is transmitted between the hard drive and the computer's system. Various hard drive interfaces have been used over the years, but some of the most common ones include:
How many hard drives are in the RAID?
The maximum number of drives in a RAID array can vary depending on the RAID controller or software being used and the capabilities of the system. Some RAID configurations can support a large number of drives, which is particularly common in enterprise-level storage solutions.
How much does RAID Hard Drive recovery cost?
The cost of RAID hard drive recovery can vary widely depending on several factors, including the specific data recovery service provider, the complexity of the data loss scenario, the RAID level used, the number of drives involved, the extent of data damage, and the urgency of the recovery.
Generally, RAID data recovery tends to be more expensive than recovering data from single hard drives due to the complexities involved in dealing with RAID configurations and multiple drive failures.
Here are some factors that can influence the cost of RAID hard drive recovery:
Due to these variables, it is challenging to provide a specific cost estimate without knowing the details of the specific RAID recovery situation. In some cases, RAID data recovery costs can range from a few hundred to several thousand dollars.
To ensure the best chance of successful data recovery and to get an accurate cost estimate, it's recommended to contact professional data recovery companies directly. Many reputable data recovery service providers offer free evaluations and no-obligation quotes, allowing you to understand the scope of the recovery and associated costs before making a decision. Keep in mind that while cost is an important factor, the most critical consideration should be the capability and reputation of the data recovery service provider to handle RAID data loss scenarios effectively.
Try DiskInternals RAID Recovery today and regain access to your valuable files! Don't let data loss hold you back - take action now and experience the power of RAID data recovery at your fingertips. Download DiskInternals RAID Recovery and get started on the path to data retrieval and peace of mind. Your data is worth it - act now and get back what's rightfully yours!
Related articles
- Configure RAID on Ubuntu – Step-by-Step Guide for RAID 0, 1, 5, and 10
- RAID 10 with 8 Disks — Configuration, Performance, Rebuilds & Best Practices
- Encrypting RAID Arrays — RAID with Full Disk Encryption & Secure Setup
- Effective Btrfs File Recovery: Complete Guide to Btrfs Data Recovery
- Best RAID Data Recovery Software for Linux
- Recover Data from RAID 5 on mdadm (Linux)
- ZFS RAID Setup Guide: Configuration, Management & Expansion
- A Comprehensive Review of RAID Recovery Software: Choosing the Right Tool
- DiskInternals RAID Recovery vs ReclaiMe: Comprehensive RAID Recovery Solutions Compared
- DiskInternals RAID Recovery vs EaseUS Data Recovery Wizard | Comprehensive Comparison
- How to Rebuild RAID 5 Without Losing Your Data
- RAID 1 Recovery: all you can do yourself
- RAID 10 Recovery
- RAID 5 Data Recovery Step by Step
- RAID 6 Data Recovery
- RAID 0, 1, 3, 5, 10 data recovery software for Windows 10
- RAID Recovery Services
- The Truth about Recovering RAID 5 with 2 Failed Disks
- RAID 4 Data Recovery: How to Perform It⠀
- RAID 0 vs RAID 1: Performance, Redundancy & Use Cases
- RAID 5 vs RAID 10 comparison: Which one is better for you?⠀
- SSD benefits for RAID array
- How to set up RAID in Windows 10 in 2025
- RAID 5 VS RAID 6 - advantages and disadvantages
- RAID 0 failure - How to Fix Failed Raid 0 Array
- The best NAS RAID: how to choose⠀
- HDD Raid Vs SSD Raid Storage Systems - How to move⠀
- Benefits of RAID arrays - what are the advantages of RAID?⠀
- NAS vs External Hard Drive: Comprehensive Guide to Choosing the Best Data Storage Solution
- RAID-1 vs RAID-5: Performance, Cost, and Data Protection Compared
- RAID 3 vs RAID 5: which one would you prefer?
- RAID 10 vs RAID 01: Is There Any Difference?
- RAID vs JBOD: performance and cost comparison⠀
- What are RAID 01, RAID 1+0 and RAID 0+1⠀
- Mdadm RAID 1 not activating a spare disk Linux⠀
- NAS vs SAN storage - Detailed Comparison⠀
- Perform RAID 50 Data Recovery Today!
- Basic Disks vs Dynamic: What is the Difference
- What to do if RAID array doesn't reassemble after reboot
- RAID levels 0, 1, 5, 6, and 10
- Minimum disks for RAID 10⠀
- RAID Consistency Check: Ensure Data Integrity & Recover Lost Data
- What Is a Hot Spare? Peculiarities of Usage
- Global Hot Spare vs Dedicated Hot Spare: Find the Difference
- Differences Between Software RAID and Hardware RAID
- What Are Some Common Symptoms of RAID Array Failures?⠀
- RAID status degraded - fix it⠀
- How to check RAID status? 4 different methods!
- RAID 50 vs RAID 10 - What is the difference
- RAID Array Growing: How to Perform It
- How to downsize hardware RAID partition and protect data
- How To Create RAID Arrays with mdadm on Ubuntu (22.04)
- How About RAID 1 Reliability?
- What is RAID-Z? Its Difference Between RAID-Z2 vs RAID-Z3
- Can RAID array have snapshots?
- RAID Array Metadata: What Is Inside?
- RAID 6: Replace Two Dead Drives
- Do You Need to Defragment RAID?
- How to Recover RAID partition - step by step guide⠀
- RAID 5: How Big Should an Array Be?
- Does chunk size influence the speed of RAID?
- RAID 0, 5, 6, 10 Performance
- How Does RAID 5 on Windows 10 Work?
- RAID Configuration Explained: Types, Setup, and Best Practices
- What is FakeRAID?
- Which RAID is Better to Use for 4 Drives
- What Is RAID Redundancy? | RAID Redundancy Explained for Data Protection
- RAID Array for Video Editing: How to Choose
- Perform Hyper-V Data Recovery Today
- How to Install Hyper-V in Your Environment in 2025
- Hyper-V Manager - what is it?⠀
- Hyper-V: Generation 1 vs Generation 2
- Hyper-V Live Migration - what is it?⠀
- Hyper-V Snapshot Merge
- Hyper-V Virtual Machine Replication⠀
- About Hyper-V clusters
- Difference Between Type 1 and Type 2 Hypervisor?⠀
- Hyper-V Server Core installation vs GUI - let's compare⠀
- How to Run Linux on a Hyper-V VM in 2025
- Back up Active Directory Guide - Step-by-step Instructions⠀
- What is nutanix ahv?⠀
- What is System Center Virtual Machine Manager⠀
- Make Sure Your Data is Safe While Using Microsoft Storage
- What is Microsoft SQL Server and How Can You Use it Safely?
- Set Up and Use Microsoft SQL Server Management Studio
- Microsoft SQL Server Express Guide
- Use Microsoft Windows Server Safely
- What to do if you get Microsoft SQL Server error 18456?
- Microsoft Storage Spaces
- Xserve RAID data safety
- Apple RAID Card Data Recovery
- Guide: Linux Raid and Disk Data Safety
- Here is Everything You Need to Know About RAID-Z Technology
- What is JBOD?
- Btrfs vs. EXT4: A Comprehensive Comparison of File Systems in Linux (2025)
- RAID Redundancy - best performance solutions⠀
- Is it worth using RAID 5E/5EE?
- Let's compare: Synology vs QNAP
- Here is How to Backup RAID in 2025
- No hard drive detected or disk controller not supported in RAID
- Issue with the RAID after the BIOS update
- Using SSD in RAID Array
- Synology RAID Set That Is Broken or Crashed? RAID data recovery
- Here is How to add drive to RAID 5 in 2025
- ZFS Recovery software - How to recover deleted ZFS files
- Raid Recovery Qnap⠀
- RAID recovery software for Mac⠀
- Best FREE RAID Data Recovery Software (2026)
- Best NAS hard drive recovery in 2026 | Top RAID network-attached storage Hard Drives
- SQL Server Database in Recovery Pending - How to fix it (2025)
- How to Recover RAID Array Configuration
- How to Rebuild RAID Without Losing Data
- How to rebuild RAID 1 without losing data
- How to Rebuild RAID 0 Without Losing Data
- Difference and Comparison - RAID 1 and RAID 2
- Difference between RAID 2 and RAID 3
- Difference between RAID 3 and RAID 4
- Difference between RAID 4 and RAID 5
- Buffalo Data Recovery
- Rapid RAID Recovery Software
- What is Synology Hybrid RAID (SHR). How to Recover Data from Synology Hybrid RAID
- RAID Server Data Recovery
- Recover Data from RAID on Linux
- RAID Foreign Disk: Causes, Solutions, and Best Practices
- How to Recover RAID Crash Data
- Forensic RAID Recovery
- RAID Data Recovery evaluation. What is RAID data recovery?
- Raid Drive Array Recovery
- How to Setup Raid 0 Windows 10 (11)?
- How to set up RAID 1 on Windows 10 and Linux
- How Many Disks Can Fail in RAID 5?
- What is RAID 5? Overview and Key Functions
- What Is a RAID Controller and What Are the Benefits of It?
- Recover Data from Broken/Failed RAID Set
- How to Clone RAID 0, 1, 5 Disk
- How to Remove software RAID device using mdadm
- Raid Rebuild Vs. Raid Recovery
- RAID vs. backup - differences and benefits (RAID is not a Backup)
- How to Rebuild RAID array
- What is Synology Hybrid RAID? What is the difference between SHR and RAID Drives?
- AHCI vs. RAID: Pros, Cons & Differences
- Recover Data from RAID 1 on mdadm (Linux)
- Difference & Comparison: RAID vs. non-RAID System
- Ultimate Guide to RAID Data Recovery: Tips & Techniques
- RAID Rebuild Time: What is and How to Optimize It?
- RAID Disaster Data Recovery: Techniques and Strategies for Handling Catastrophic Events
- How to Repair a Failed RAID?
- How to Set Up RAID in Windows 11: A Step-by-Step Guide
- RAID 50 vs. RAID 60 – Key Differences
- Guide to Recovering a Failed RAID Array | Step-by-Step Recovery Process
- HDD RAID vs SSD RAID and Combining Both: Everything You Need to Know
- How to Set Up and Configure RAID 10: Step-by-Step Guide
- What Is RAID 6? Definition, function
- RAID 10 vs RAID 6: Which Better?
- RAID 0: How Many Drives Are Needed?
- RAID 10: How Many Disks Are Needed and How to Set It Up
- How to recover data from a corrupted RAID?
- What is RAID 1? RAID Mirroring
- Recovering RAID 5 After Controller Failure
- NTFS RAID Recovery: Comprehensive Guide to Data Retrieval
- What is Xserve RAID? Comprehensive Guide and Overview
- Comprehensive Guide to RAID in Cyber Security: Levels, Recovery, and Best Practices
- Complete Guide to RAID Controller Failure and Recovery: Expert Tips
- Understanding Hardware RAID: Comprehensive Guide to RAID Levels and Benefits
- What is software RAID? - Comprehensive Guide
- Understanding RAID 0: Benefits, Risks, and Applications
- RAID 3 Explained: Benefits, Limitations, and Data Recovery Guide
- How Many Drives Are Needed for RAID 5? Minimum & Maximum Explained
- Understanding RAID 60: Architecture, Advantages, and Data Recovery
- Understanding RAID Striping: A Comprehensive Guide to Disk Striping and Its Variants
- RAID 10: How Many Drives Can Fail? | Comprehensive Guide to Failure Tolerance
- ZFS vs Btrfs vs RAID: Comprehensive Storage Comparison for Performance, Reliability, and Scalability
- How to Resize RAID Partitions: Step-by-Step Guide for RAID 1, 5, 6 & 10
- Comprehensive Guide to ZFS RAID Levels, Types, and Configurations
- ZFS vs RAID: Comprehensive Comparison of Performance, Reliability, and Features
- RAID 1 Minimum Drive Requirement: How Many Drives Do You Need?
- Bootable RAID Recovery Software: Complete Guide for RAID 0, 1, 5, 10 Recovery
- RAID Hard Drives Explained: What Is RAID for HDDs and External Drives
- RAID 5 Rebuild Failure Probability: Risks, Factors, and Solutions in 2025
- Understanding RAID 6 Performance: A Comprehensive Guide
- RAID Drives Explained: Learn How RAID Storage Enhances Performance
- HP RAID Recovery Tool | How to Recover Data with DiskInternals RAID Recovery Software
- Recovering Data from RAID Drives: Step-by-Step Guide to RAID Recovery
- Recover Striped RAID: Professional RAID 0 Data Recovery with DiskInternals RAID Recovery™
- BTRFS Restore File: How to Undelete Files and Restore Deleted Data Easily
- Recover Data from a RAID Array: Effective Solutions for Fast and Secure Data Retrieval
- Windows 7 RAID Recovery: How to Recover Data from RAID 1, RAID 5, and RAID 10 Arrays
- Adaptec RAID Recovery: Restore Data from Failed Arrays with DiskInternals RAID Recovery™
- What is RAID Data Recovery? | Recover RAID Arrays with RAID Recovery Software
- SAN RAID Data Recovery: Recover RAID Arrays with Professional SAN Recovery Solutions
- What is a RAID Volume? Understanding RAID Volumes and Recovery Solutions
- What is a RAID? RAID Systems Explained & How to Recover RAID Arrays with Professional Tools
- Best RAID Software for Mac | Top Free & Paid RAID Tools for macOS 2026
- Top 10 RAID Recovery Services: Best Solutions for Data Recovery
- RAID Server Data Recovery: Recover and Restore RAID Arrays Fast with Professional Tools
- RAID System Recovery: Essential Steps & Best Software for Safe Data and File Restoration
- RAID Recovery Volume: Effective RAID Array Recovery Solutions for Data Loss Prevention
- What is RAID Connectivity? Essential Guide to RAID Array Setup
- Intel RAID 0 Recovery & RAID 1 Recovery: Solutions for Data Loss & Recovery Tools
- How Many Drives for RAID 6?
- Optimize RAID for Redundancy and Performance - Expert Guide
- How to Read RAID Drives & Recover RAID Arrays on Windows: A Guide
- RAID 0 vs RAID 5: Speed, Performance & Key Differences (2026)
- Synology RAID 5 Recovery: Recover Your RAID Array with Expert Tools and Tips
- Synology RAID 1 Recovery: Recover RAID Array with Trusted Tools and Expert Solutions
- X-RAID Recovery: Expert Guide to Netgear X-RAID and ReadyNAS Data Recovery
- Interim Recovery RAID 5: Expert Guide to Data Recovery and RAID Array Repair
- MDADM RAID 0 Recovery: Expert Guide to Fix and Recover Your RAID Array
- SCSI RAID Recovery Software: Effective Solutions for SCSI RAID Data Recovery
- RAID Data Recovery for Deleted Arrays: Recover RAID Array Safely & Effectively
- What is RAID in Linux? Learn About Software RAID & Recover RAID Arrays Easily
- Change log for RAID Recovery™
- Intel Matrix RAID Recovery: Restore RAID 0, 1, 5, 10 with Reliable Solutions
- RAID Level 4: What Is RAID 4, How It Works
- RAID Restorer – Recover Data from Failed RAID Arrays with Reliable Software
- ZFS RAID with Different Size Drives – Setup, Limitations, and Best Practices
- RAID 0, 1, 5, 10 Explained: Performance, Redundancy & Best RAID Configurations
- How to Recover Data from a Broken RAID 1 Set – Step-by-Step Guide
- ZFS RAID Expansion: How to Expand RAIDZ and ZFS Pools Safely
- RAID 6 Drive Failure Tolerance: How Many Drives Can Fail?
- RAID 50: Drive Failure Tolerance and Data Recovery Solutions
- Windows Storage Spaces vs RAID: Performance, Speed, and Data Protection Comparison
- RAID 2 Array Explained: What Is RAID Level 2, Setup, and Performance Comparison
- RAID 5 RAID 6 RAID 10 - Key Differences and Performance Comparison
- RAID 5 with 3 Disks: Configuration, Benefits, and Performance Insights
- How to Create RAID 5 with 6 Disks: Complete Setup Guide and Performance Tips
- RAID 6 Double Parity Calculation Explained – Data Protection Insights
- How to Add a Disk to mdadm RAID 5: Step-by-Step Guide
- RAID 0 vs RAID 10 and RAID 10 vs RAID 0 Performance Comparison
- How to Fix Degraded RAID 1: Step-by-Step Guide to Restore RAID 1 Degraded Arrays
- RAID 5 vs RAID 0+1: Key Differences Explained
- Why RAID 1 Is Not a Good Substitute for a Backup
- How to Check Which RAID Is Configured: A Complete Guide for Windows and Linux
- RAID 50 vs. RAID 5 – Performance, Speed, and Data Protection Comparison
- RAID 50 vs. RAID 6 – Key Differences
- Configuring RAID 5: Step-by-Step Guide on How to Configure RAID 5 for Performance
- Cannot Format Old RAID Drive? Effective RAID Data Recovery Solutions
- RAID 6 with 5 Drives: Configuration, Performance, and Data Protection
- Best RAID for 6 Disks: Compare RAID 0, 5, 6, 10, 50 & 60 for Performance & Redundancy
- RAID 6 with 8 Drives: Configuration, Failures, and Performance Explained
- RAID 6 with 6 Drives: Performance, Redundancy, and Best Use Cases
- RAID 0 vs. JBOD – Key Differences, Performance, and Speed Comparison
- RAID Array Rebuild: How to Rebuild a RAID Array Safely and Recover Lost Data
- Recover Data from Old RAID Drives | Best Methods & Software for RAID Recovery
- RAID 5 with 5 Drives: Configuration, Performance & Recovery | RAID 5 5 Drives Guide
- 15 Best External Hard Drives for RAID in 2026
- Dell RAID 1 Recovery: How to Recover Data from RAID 1 on Dell Servers Safely
- Dell RAID 5 Recovery - Safely and Fast
- RAID 1E vs RAID 10: Performance, Capacity, Cost & Failure Risk Guide
- What Is RAID 1E? Performance RAID 10 1E vs RAID-1E Guide for Power Users
- RAID 1E vs RAID 5: Performance, Capacity and Failure Risk Compared
- RAID 1 Speeds: Read, Write & Disk Performance | Speed Up RAID 1 Guide
- Ext3 RAID Recovery Guide - Data Recovery RAID Ext3
- XFS RAID Recovery Guide & Best XFS RAID Recovery Software
- ASUS RAID Recovery Guide - Fix Failed ASUS RAID
- RAID Data Recovery Cost: Affordable Solutions for RAID 0, RAID 1, RAID 5, and RAID 10 Failures
- NAS as a File Server: NAS vs. File Server Comparison for Storage and Sharing
- QNAP RAID 5 Recovery Failed? Safe Data Recovery Steps for NAS Users
- ReiserFS RAID Recovery: How to Restore Data from Failed RAID Arrays
- RAID 0 vs RAID 1 vs RAID 5 vs RAID 10 — Performance, Capacity & Recovery
- ZFS Recovery Tools — Data Recovery ZFS Guide & Best Software
- RAID 1 vs RAID 5 vs RAID 10 Performance Management, Speed & Capacity Guide
- RAIDZ1 vs RAID 5 — Performance, Integrity & Recovery Comparison
- ZFS Mirror vs RAIDZ — Performance, Capacity & Recovery Guide
- ZFS Minimum Drives — How Many Disks You Need for RAIDZ1, RAIDZ2, RAIDZ3
- RAID Degraded — What to Do | Warning Fixes & Rebuild Failed Steps
- RAID 7 — What It Is? Origins, Risks & Recovery Options
- ZFS vs mdadm RAID — Why choose ZFS instead of RAID
- RAID in Cloud Storage Systems — SDS, Virtual RAID & Erasure Coding Guide
- Best RAID for OLTP: RAID Configuration for OLTP Workloads & Transactional Databases
- Best RAID for MySQL: RAID Configuration & RAID Setup for MySQL Databases
- Best RAID for NVMeoF: NVMe RAID Configuration & NVMe over Fabrics RAID Setup
- Is RAID 0 Worth It in 2026? Risk, Performance, SSD & NVMe Guidance
- Fault Tolerance in NVMe-oF RAID — Rebuild Time, Data Protection & Redundancy
- Best Practices for RAID over NVMe-oF — Tuning, Monitoring & DR
- RAID 0 vs Single Drive — SSD, NVMe & HDD Comparison (Performance vs Risk)
- RAID 0 vs Single Drive Reliability — Failure Risk, SSD Comparison & Recovery
- RAID 0 for Gaming — Is RAID 0 Good for Gaming? Performance & Risk Guide
- RAID 0 for 4K Editing — Is RAID 0 Good for 4K Video Editing?
- RAID 0 for Large File Workloads: Scratch Disks, NVMe, When It Makes Sense
- Is RAID 0 Obsolete? RAID 0 with SSD and NVMe — Still Worth It?
- RAID 0 vs. SSD Performance: PCIe 4.0, PCIe 5.0 Speed Compared
- RAID 0 Redundancy vs No Redundancy — Does RAID 0 Have Redundancy?
- Does RAID 0 Increase FPS? — RAID 0 vs Single Drive FPS Guide
- RAID 5 Interrupted Rebuild Recovery: Fix Stopped or Aborted Rebuilds
- RAID 0 Failure Probability with N Disks Explained
- RAID 5 Two-Disk Failure Recovery: Parity Recovery Beyond Tolerance
- RAID 1 Corrupted Mirror Recovery: How to Recover a Damaged RAID 1 Mirror
- When RAID 0 Is Acceptable: Use Cases, Risks, and When You Should Use RAID 0
- RAID Best Practices for VMware: Best RAID Configuration for VMware ESXi
- RAID 0 Backed by Versioned Backup: Is RAID 0 Safe with Versioned Backups?
- RAID 10 Best for VMware: Why RAID 10 Is the Recommended RAID for ESXi
- Best RAID Controller Guide: Hardware RAID Cards Compared for Servers and SSDs
- Best PCIe RAID Controller: Top Hardware PCI Express RAID Cards Compared
- RAID Controller for ESXi: VMware ESXi RAID Controller Recommendations
- RAID Controller for Linux: Best Linux-Compatible Hardware RAID Controllers
- SATA RAID Controller for ESXi: VMware ESXi Compatible SATA RAID Options
- SAS RAID Controller for VMware ESXi: Best Hardware RAID Options
- NAS Data Recovery Software & Tools for RAID Recovery
- Features
- RAID 0 Data Recovery
- RAID Reconstructor on Broken RAID Arrays
- RAID Recovery Software
- Hyper-V network adapters⠀
- Open Source RAID Recovery Software Explained and Comparison
- RAID 1: How Many Drives Are Needed for Data Redundancy?
- RAID 1 with 3 Drives: Everything You Need to Know
- RAID Calculator For Geeks – Estimate Usable Space & Drive Size
- RAID Calculator Online – Usable Space & Disk Size Calculator for RAID