
How to Create RAID Arrays in Linux with Mdadm 22.04
Here you will find out:
- how to create RAID array using mdadm
- how DiskInternals can help you with RAID server data recovery
The mdadm utility can be used to create and manage storage arrays by utilizing Linux's software RAID capabilities. When it comes to coordinating individual storage devices and creating logical storage devices with improved performance or redundancy, administrators have a lot of flexibility.
We'll go through a variety of RAID setups that may be set up on an Ubuntu 16.04 server in this post.
Prepare the disks
At least two drives ought to be ready to use and set up. Also, be careful to disregard anything on them. They will be deleted. Additionally, ensure sure you have no concern for the data integrity that will be stored on the RAID 0 drive. Speed is a benefit of RAID 0, but that's about all. All of your data is lost if a drive dies.
List every component of the system:
$ lsblk
NAME MAJ:MIN RM SIZE RO TYPE MOUNTPOINT
sda 8:0 0 7.3T 0 disk
└─sda1 8:1 0 7.3T 0 part /mnt/mydrive
sdb 8:16 0 7.3T 0 disk
sdc 8:32 0 7.3T 0 disk
sdd 8:48 0 7.3T 0 disk
sde 8:64 0 7.3T 0 disk
nvme0n1 259:0 0 7.3T 0 disk
└─nvme0n1p1 259:1 0 7.3T 0 part /
You need to make sure all the drives that will be part of the array are partition-free:
$ sudo umount /dev/sda?; sudo wipefs --all --force /dev/sda?; sudo wipefs --all --force /dev/sda
$ sudo umount /dev/sdb?; sudo wipefs --all --force /dev/sdb?; sudo wipefs --all --force /dev/sdb
Check to make sure nothing's mounted!
Ready to get your data back?
To start recovering your data, documents, databases, images, videos, and other files from your RAID 0, RAID 1, 0+1, 1+0, 1E, RAID 4, RAID 5, 50, 5EE, 5R, RAID 6, RAID 60, RAIDZ, RAIDZ2, and JBOD, press the FREE DOWNLOAD button to get the latest version of DiskInternals RAID Recovery® and begin the step-by-step recovery process. You can preview all recovered files absolutely for free. To check the current prices, please press the Get Prices button. If you need any assistance, please feel free to contact Technical Support. The team is here to help you get your data back!
Partition the disks with sgdisk
You could interactively do this with gdisk, but I like more automation, so I use sgdisk. If it's not installed, and you're on a Debian-like distro, install it: sudo apt install -y gdisk.
sudo sgdisk -n 1:0:0 /dev/sda
sudo sgdisk -n 1:0:0 /dev/sdb
Do that for each of the drives.
How to reset existing RAID devices
In this tutorial, we'll go through how to build various RAID levels. If you want to follow along, you should probably repurpose your storage devices after each section. Read this section to learn how to quickly reset your component storage devices before testing a new RAID level. Until you have created some arrays, skip this section.
Note: the array and any data put to it will be totally destroyed by this operation. Before deleting an array, make sure you're working with the right one and that you've copied off any data you need to save.
Find the active arrays in the /proc/mdstat file by typing:
cat /proc/mdstat
Output
Personalities : [raid0] [linear] [multipath] [raid1] [raid6] [raid5] [raid4] [raid10]
md0 : active raid0 sdc[1] sdd[0]
209584128 blocks super 1.2 512k chunks
unused devices: none
Unmount the array from the filesystem:
sudo umount /dev/md0
Then, stop and remove the array by typing:
sudo mdadm --stop /dev/md0
sudo mdadm --remove /dev/md0
Use the following command to find the devices that were utilized to create the array:
Note: keep in mind that the /dev/sd* names can change any time you reboot! Check them every time to make sure you are operating on the correct devices.
lsblk -o NAME,SIZE,FSTYPE,TYPE,MOUNTPOINT
NAME SIZE FSTYPE TYPE MOUNTPOINT
sda 100G disk
sdb 100G disk
sdc 100G linux_raid_member disk
sdd 100G linux_raid_member disk
vda 20G disk
├─vda1 20G ext4 part /
└─vda15 1M part
After you've discovered the devices that made up an array, return them to normal by zeroing their superblock:
sudo mdadm --zero-superblock /dev/sdc
sudo mdadm --zero-superblock /dev/sdd
Any permanent references to the array should be removed. Comment out or delete the reference to your array from the /etc/fstab file:
sudo nano /etc/fstab
/dev/md0 /mnt/md0 ext4 defaults,nofail,discard 0 0
Also, comment out or remove the array definition from the /etc/mdadm/mdadm.conf file:
sudo nano /etc/mdadm/mdadm.conf
ARRAY /dev/md0 metadata=1.2 name=mdadmwrite:0 UUID=7261fb9c:976d0d97:30bc63ce:85e76e91
Finally, update the initramfs again:
sudo update-initramfs -u
You should be able to utilize the storage devices separately or as parts of a different array at this point.
How to create RAID 0 Array
The RAID 0 array operates by chunking data and striping it over all accessible drives. This means that each disk includes a piece of the data and that information will be retrieved from many drives.
- Requirements: minimum of 2 storage devices
- Primary benefit: Performance
- Keep in mind the following: Make sure you have working backups. A single device failure will wipe out the entire array's data.
Identify the Component Devices
To get started, find the identifiers for the raw disks that you will be using:
lsblk -o NAME,SIZE,FSTYPE,TYPE,MOUNTPOINT
NAME SIZE FSTYPE TYPE MOUNTPOINT
sda 100G disk
sdb 100G disk
vda 20G disk
├─vda1 20G ext4 part /
└─vda15 1M part
In the figure above, you can see that we have two 100G disks without a filesystem. For this session, these devices have been given the IDs /dev/sda and /dev/sdb. These are the basic components that will make up the array.
Create the Array
Use the mdadm —create command to construct a RAID 0 array using these components. You must enter the device name (in our example, /dev/md0), the RAID level, and the number of devices to create:
sudo mdadm --create --verbose /dev/md0 --level=0 --raid-devices=2 /dev/sda /dev/sdb
You can ensure that the RAID was successfully created by checking the /proc/mdstat file:
cat /proc/mdstat
Personalities : [linear] [multipath] [raid0] [raid1] [raid6] [raid5] [raid4] [raid10]
md0 : active raid0 sdb[1] sda[0]
209584128 blocks super 1.2 512k chunks
unused devices: none
As you can see in the highlighted line, the /dev/md0 device has been created in the RAID 0 configuration using the /dev/sda and /dev/sdb devices.
Create and Mount the Filesystem
Next, create a filesystem on the array:
sudo mkfs.ext4 -F /dev/md0
Create a mount point to attach the new filesystem:
sudo mkdir -p /mnt/md0
You can mount the filesystem by typing:
sudo mount /dev/md0 /mnt/md0
Check whether the new space is available by typing:
df -h -x devtmpfs -x tmpfs
Filesystem Size Used Avail Use% Mounted on
/dev/vda1 20G 1.1G 18G 6% /
/dev/md0 197G 60M 187G 1% /mnt/md0
The new filesystem is mounted and accessible.
Save the Array Layout
We'll need to change the /etc/mdadm/mdadm.conf file to ensure that the array is reconstructed automatically upon startup. You may scan the current array and add the file automatically by typing:
sudo mdadm --detail --scan | sudo tee -a /etc/mdadm/mdadm.conf
Afterwards, you can update the initramfs, or initial RAM file system, so that the array will be available during the early boot process:
sudo update-initramfs -u
Add the new filesystem mount options to the /etc/fstab file for automatic mounting at boot:
echo '/dev/md0 /mnt/md0 ext4 defaults,nofail,discard 0 0' | sudo tee -a /etc/fstab
Your RAID 0 array should now automatically be assembled and mounted each boot.
How to create RAID 1 Array
RAID 1 is a type of array that mirrors data across all accessible drives. In a RAID 1 array, each disk receives a complete duplicate of the data, ensuring redundancy in the case of a device failure.
- Minimum of two storage devices are required.
- Main advantage: redundancy
- Keep in mind that while two copies of the data are kept, only half of the disk space will be available.
Identify the Component Devices
To begin, locate the IDs for the raw disks you'll be using:
sudo mount /dev/md0 /mnt/md0
lsblk -o NAME,SIZE,FSTYPE,TYPE,MOUNTPOINT
NAME SIZE FSTYPE TYPE MOUNTPOINT
sda 100G disk
sdb 100G disk
vda 20G disk
├─vda1 20G ext4 part /
└─vda15 1M part
As you can see in the diagram above, we have two 100G drives without a filesystem. These devices have been assigned the IDs /dev/sda and /dev/sdb for this session in this example. These are the raw materials that will be used to construct the array.
Ready to get your data back?
To start recovering your data, documents, databases, images, videos, and other files from your RAID 0, RAID 1, 0+1, 1+0, 1E, RAID 4, RAID 5, 50, 5EE, 5R, RAID 6, RAID 60, RAIDZ, RAIDZ2, and JBOD, press the FREE DOWNLOAD button to get the latest version of DiskInternals RAID Recovery® and begin the step-by-step recovery process. You can preview all recovered files absolutely for free. To check the current prices, please press the Get Prices button. If you need any assistance, please feel free to contact Technical Support. The team is here to help you get your data back!
Create the Array
Use the mdadm —create command to construct a RAID 1 array using these components. You must enter the device name (in our example, /dev/md0), the RAID level, and the number of devices to create:
sudo mdadm --create --verbose /dev/md0 --level=1 --raid-devices=2 /dev/sda /dev/sdb
If the component devices you are using are not partitions with the boot flag enabled, you will likely be given the following warning. It is safe to type y to continue:
mdadm: Note: this array has metadata at the start and
may not be suitable as a boot device. If you plan to
store '/boot' on this device please ensure that
your boot-loader understands md/v1.x metadata, or use
--metadata=0.90
mdadm: size set to 104792064K
Continue creating array? y
The mdadm tool will start to mirror the drives. This can take some time to complete, but the array can be used during this time. You can monitor the progress of the mirroring by checking the /proc/mdstat file:
cat /proc/mdstat
Personalities : [linear] [multipath] [raid0] [raid1] [raid6] [raid5] [raid4] [raid10]
md0 : active raid1 sdb[1] sda[0]
104792064 blocks super 1.2 [2/2] [UU]
[====>................] resync = 20.2% (21233216/104792064) finish=6.9min speed=199507K/sec
unused devices: none
The /dev/md0 device has been established in the RAID 1 configuration utilizing the /dev/sda and /dev/sdb devices, as seen in the first highlighted line. The progress on the mirroring may be seen in the second highlighted line. While this procedure is running, you may continue reading the tutorial.
Format the array
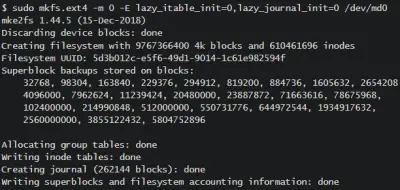
Lazy initialization is utilized in this illustration to circumvent the (very lengthy) process of initializing all the inodes. There's no practical need to carry out huge arrays the "normal"/non-lazy method, especially with brand-new disks that aren't jam-packed with outdated content.
Mount the array
Checking on our array with lsblk now, we can see all the members of md0:
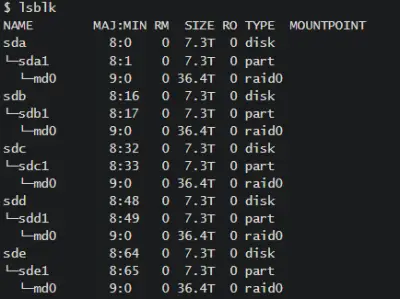
Now make a mount point and mount the volume:
$ sudo mkdir /mnt/raid0
$ sudo mount /dev/md0 /mnt/raid0
Create and Mount the Filesystem
Next, create a filesystem on the array:
sudo mkfs.ext4 -F /dev/md0
Create a mount point to attach the new filesystem:
sudo mkdir -p /mnt/md0
You can mount the filesystem by typing:
sudo mount /dev/md0 /mnt/md0
Check whether the new space is available by typing:
df -h -x devtmpfs -x tmpfs
Filesystem Size Used Avail Use% Mounted on
/dev/vda1 20G 1.1G 18G 6% /
/dev/md0 99G 60M 94G 1% /mnt/md0
The new filesystem is mounted and accessible.
Save the Array Layout
To make sure that the array is reassembled automatically at boot, we will have to adjust the /etc/mdadm/mdadm.conf file. You can automatically scan the active array and append the file by typing:
sudo mdadm --detail --scan | sudo tee -a /etc/mdadm/mdadm.conf
Afterwards, you can update the initramfs, or initial RAM file system, so that the array will be available during the early boot process:
sudo update-initramfs -u
Add the new filesystem mount options to the /etc/fstab file for automatic mounting at boot:
echo '/dev/md0 /mnt/md0 ext4 defaults,nofail,discard 0 0' | sudo tee -a /etc/fstab
Your RAID 1 array should now automatically be assembled and mounted each boot.
Creating a RAID 5 Array
The RAID 5 array type is implemented by striping data across the available devices. One component of each stripe is a calculated parity block. If a device fails, the parity block and the remaining blocks can be used to calculate the missing data. The device that receives the parity block is rotated so that each device has a balanced amount of parity information.
- Requirements: minimum of 3 storage devices.
- Primary benefit: Redundancy with more usable capacity.
- Things to keep in mind: While the parity information is distributed, one disk’s worth of capacity will be used for parity. RAID 5 can suffer from very poor performance when in a degraded state.
Identify the Component Devices
To get started, find the identifiers for the raw disks that you will be using:
lsblk -o NAME,SIZE,FSTYPE,TYPE,MOUNTPOINT
NAME SIZE FSTYPE TYPE MOUNTPOINT
sda 100G disk
sdb 100G disk
sdc 100G disk
vda 20G disk
├─vda1 20G ext4 part /
└─vda15 1M part
As you can see in the diagram above, we have three 100G drives without a filesystem. For this session, these devices have been given the identifiers /dev/sda, /dev/sdb, and /dev/sdc. These are the raw materials that will be used to construct the array.
Create the Array
Use the mdadm —create command to construct a RAID 5 array using these components. You must enter the device name (in our example, /dev/md0), the RAID level, and the number of devices to create:
sudo mdadm --create --verbose /dev/md0 --level=5 --raid-devices=3 /dev/sda /dev/sdb /dev/sdc
The array will be configured via the mdadm utility (it actually uses the recovery process to build the array for performance reasons). While this may take some time, the array can be utilized in the meanwhile. Check the /proc/mdstat file to see how far the mirroring has progressed:
cat /proc/mdstat
Personalities : [raid1] [linear] [multipath] [raid0] [raid6] [raid5] [raid4] [raid10]
md0 : active raid5 sdc[3] sdb[1] sda[0]
209584128 blocks super 1.2 level 5, 512k chunk, algorithm 2 [3/2] [UU_]
[===>.................] recovery = 15.6% (16362536/104792064) finish=7.3min speed=200808K/sec
The /dev/md0 device has been created in the RAID 5 configuration utilizing the /dev/sda, /dev/sdb, and /dev/sdc devices, as seen in the first highlighted line. The second highlighted line depicts the construction progress. You can continue the guide while this process completes.
Create and Mount the Filesystem
Next, create a filesystem on the array:
sudo mkfs.ext4 -F /dev/md0
Create a mount point to attach the new filesystem:
sudo mkdir -p /mnt/md0
You can mount the filesystem by typing:
sudo mount /dev/md0 /mnt/md0
Check whether the new space is available by typing:
df -h -x devtmpfs -x tmpfs
Filesystem Size Used Avail Use% Mounted on
/dev/vda1 20G 1.1G 18G 6% /
/dev/md0 197G 60M 187G 1% /mnt/md0
The new filesystem is mounted and accessible.
Save the Array Layout
To make sure that the array is reassembled automatically at boot, we will have to adjust the /etc/mdadm/mdadm.conf file.
Check that the array has finished building before making any changes to the settings. Because of the way mdadm generates RAID 5 arrays, the number of spares in the array will be displayed incorrectly if the array is still being built:
cat /proc/mdstat
Personalities : [raid1] [linear] [multipath] [raid0] [raid6] [raid5] [raid4] [raid10]
md0 : active raid5 sdc[3] sdb[1] sda[0]
209584128 blocks super 1.2 level 5, 512k chunk, algorithm 2 [3/3] [UUU]
unused devices: none
The output above shows that the rebuild is complete. Now, we can automatically scan the active array and append the file by typing:
sudo mdadm --detail --scan | sudo tee -a /etc/mdadm/mdadm.conf
Afterwards, you can update the initramfs, or initial RAM file system, so that the array will be available during the early boot process:
sudo update-initramfs -u
Add the new filesystem mount options to the /etc/fstab file for automatic mounting at boot:
echo '/dev/md0 /mnt/md0 ext4 defaults,nofail,discard 0 0' | sudo tee -a /etc/fstab
Your RAID 5 array should now automatically be assembled and mounted each boot.
Ready to get your data back?
To start recovering your data, documents, databases, images, videos, and other files from your RAID 0, RAID 1, 0+1, 1+0, 1E, RAID 4, RAID 5, 50, 5EE, 5R, RAID 6, RAID 60, RAIDZ, RAIDZ2, and JBOD, press the FREE DOWNLOAD button to get the latest version of DiskInternals RAID Recovery® and begin the step-by-step recovery process. You can preview all recovered files absolutely for free. To check the current prices, please press the Get Prices button. If you need any assistance, please feel free to contact Technical Support. The team is here to help you get your data back!
Creating a RAID 6 Array
Striping data among available devices is how the RAID 6 array is accomplished. Calculated parity blocks make up two of each stripe's components. The parity blocks and the remaining blocks can be used to calculate the missing data if one or two devices fail. The devices that get the parity blocks are cycled to ensure that each device receives an equal quantity of parity data. This is similar to a RAID 5 array, but allows for the failure of two drives.
- Requirements: minimum of 4 storage devices.
- Primary benefit: Double redundancy with more usable capacity.
- Things to keep in mind: While the parity information is distributed, two disk’s worth of capacity will be used for parity. RAID 6 can suffer from very poor performance when in a degraded state.
Identify the Component Devices
To get started, find the identifiers for the raw disks that you will be using:
lsblk -o NAME,SIZE,FSTYPE,TYPE,MOUNTPOINT
NAME SIZE FSTYPE TYPE MOUNTPOINT
sda 100G disk
sdb 100G disk
sdc 100G disk
vda 20G disk
├─vda1 20G ext4 part /
└─vda15 1M part
As you can see above, we have four disks without a filesystem, each 100G in size. In this example, these devices have been given the /dev/sda, /dev/sdb, /dev/sdc, and /dev/sdd identifiers for this session. These will be the raw components we will use to build the array.
Create the Array
To create a RAID 6 array with these components, pass them in to the mdadm --create command. You will have to specify the device name you wish to create (/dev/md0 in our case), the RAID level, and the number of devices:
sudo mdadm --create --verbose /dev/md0 --level=6 --raid-devices=4 /dev/sda /dev/sdb /dev/sdc /dev/sdd
The mdadm tool will start to configure the array (it actually uses the recovery process to build the array for performance reasons). This can take some time to complete, but the array can be used during this time. You can monitor the progress of the mirroring by checking the /proc/mdstat file:
cat /proc/mdstat
Personalities : [raid6] [raid5] [raid4] [linear] [multipath] [raid0] [raid1] [raid10]
md0 : active raid6 sdd[3] sdc[2] sdb[1] sda[0]
209584128 blocks super 1.2 level 6, 512k chunk, algorithm 2 [4/4] [UUUU]
[>....................] resync = 0.6% (668572/104792064) finish=10.3min speed=167143K/sec
unused devices: none
As you can see in the first highlighted line, the /dev/md0 device has been created in the RAID 6 configuration using the /dev/sda, /dev/sdb, /dev/sdc and /dev/sdd devices. The second highlighted line shows the progress on the build. You can continue the guide while this process completes.
Create and Mount the Filesystem
Next, create a filesystem on the array:
sudo mkfs.ext4 -F /dev/md0
Create a mount point to attach the new filesystem:
sudo mkdir -p /mnt/md0
You can mount the filesystem by typing:
sudo mount /dev/md0 /mnt/md0
Check whether the new space is available by typing:
df -h -x devtmpfs -x tmpfs
Filesystem Size Used Avail Use% Mounted on
/dev/vda1 20G 1.1G 18G 6% /
/dev/md0 197G 60M 187G 1% /mnt/md0
The new filesystem is mounted and accessible.
Save the Array Layout
We'll need to change the /etc/mdadm/mdadm.conf file to ensure that the array is reassembled automatically at boot. We may scan the active array and add the file automatically by typing:
sudo mdadm --detail --scan | sudo tee -a /etc/mdadm/mdadm.conf
Afterwards, you can update the initramfs, or initial RAM file system, so that the array will be available during the early boot process:
sudo update-initramfs -u
Add the new filesystem mount options to the /etc/fstab file for automatic mounting at boot:
echo '/dev/md0 /mnt/md0 ext4 defaults,nofail,discard 0 0' | sudo tee -a /etc/fstab
Your RAID 6 array should now automatically be assembled and mounted each boot.
Creating a Complex RAID 10 Array
Traditionally, a striped RAID 0 array made up of sets of RAID 1 arrays has been used to produce RAID 10. This sort of layered array provides redundancy and great performance at the cost of a lot of disk space. The mdadm utility has its own RAID 10 kind, which offers the same benefits as RAID 10 but with more flexibility. Although it is not made up of nested arrays, it has many of the same traits and guarantees. The mdadm RAID 10 will be used here.
- Minimum of three storage devices are required.
- Primary advantage: Redundancy and performance
- Consider the following: The number of data copies you choose to keep determines the amount of capacity reduction for the array. With mdadm style RAID 10, the number of copies saved is customizable.
In what is known as the "near" arrangement, two copies of each data block are kept by default. The following are the different layouts that determine how each data block is stored:
- close: The default configuration. When striping, copies of each chunk are written sequentially, which means that copies of data blocks are written around the same portion of different disks.
- far: The first and subsequent copies are written to various portions the storage devices in the array. For example, the first chunk may be written towards the start of a disk, whereas the second piece could be written halfway down another drive. For typical spinning disks, this can result in some read speed increases at the price of write performance.
- Each stripe is replicated with one drive offset. This signifies that the copies are offset from one another on the disk, but they are still near together. During some workloads, this helps to reduce excessive seeking.
You can find out more about these layouts by checking out the “RAID10” section of this man page:
man 4 md
Identify the Component Devices
To get started, find the identifiers for the raw disks that you will be using:
lsblk -o NAME,SIZE,FSTYPE,TYPE,MOUNTPOINT
NAME SIZE FSTYPE TYPE MOUNTPOINT
sda 100G disk
sdb 100G disk
sdc 100G disk
vda 20G disk
├─vda1 20G ext4 part /
─vda15 1M part
As you can see in the diagram above, we have four 100G drives without a filesystem. For this session, these devices have been assigned the IDs /dev/sda, /dev/sdb, /dev/sdc, and /dev/sdd. These are the raw materials that will be used to construct the array.
Create the Array
Use the mdadm —create command to construct a RAID 10 array using these components. You must enter the device name (in our example, /dev/md0), the RAID level, and the number of devices to construct.
You can set up two copies using the near layout by not specifying a layout and copy number:
sudo mdadm --create --verbose /dev/md0 --level=10 --raid-devices=4 /dev/sda /dev/sdb /dev/sdc /dev/sdd
You must use the —layout= option, which accepts a layout and copy identifier, if you wish to use a different layout or adjust the number of copies. Near, far, and offset are represented by the letters n, f, and o, respectively. After that, the number of copies to keep is added.
For example, to build an array with three copies in the offset layout, use the following command:
sudo mdadm --create --verbose /dev/md0 --level=10 --layout=o3 --raid-devices=4 /dev/sda /dev/sdb /dev/sdc /dev/sdd
The mdadm tool will start to configure the array (it actually uses the recovery process to build the array for performance reasons). This can take some time to complete, but the array can be used during this time. You can monitor the progress of the mirroring by checking the /proc/mdstat file:
cat /proc/mdstat
Personalities : [raid6] [raid5] [raid4] [linear] [multipath] [raid0] [raid1] [raid10]
md0 : active raid10 sdd[3] sdc[2] sdb[1] sda[0]
209584128 blocks super 1.2 512K chunks 2 near-copies [4/4] [UUUU]
[===>.................] resync = 18.1% (37959424/209584128) finish=13.8min speed=206120K/sec
The /dev/md0 device has been created in the RAID 10 configuration utilizing the /dev/sda, /dev/sdb, /dev/sdc, and /dev/sdd devices, as seen in the first highlighted line. The layout for this example is seen in the second highlighted area (2 copies in the near configuration). The third highlighted section depicts the construction progress. While this procedure is running, you may continue reading the tutorial.
Create and Mount the Filesystem
Next, create a filesystem on the array:
sudo mkfs.ext4 -F /dev/md0
Create a mount point to attach the new filesystem:
sudo mkdir -p /mnt/md0
You can mount the filesystem by typing:
sudo mount /dev/md0 /mnt/md0
Check whether the new space is available by typing:
df -h -x devtmpfs -x tmpfs
Filesystem Size Used Avail Use% Mounted on
/dev/vda1 20G 1.1G 18G 6% /
/dev/md0 197G 60M 187G 1% /mnt/md0
The new filesystem is mounted and accessible.
Save the Array Layout
To make sure that the array is reassembled automatically at boot, we will have to adjust the /etc/mdadm/mdadm.conf file. We can automatically scan the active array and append the file by typing:
sudo mdadm --detail --scan | sudo tee -a /etc/mdadm/mdadm.conf
Afterwards, you can update the initramfs, or initial RAM file system, so that the array will be available during the early boot process:
sudo update-initramfs -u
Add the new filesystem mount options to the /etc/fstab file for automatic mounting at boot:
echo '/dev/md0 /mnt/md0 ext4 defaults,nofail,discard 0 0' | sudo tee -a /etc/fstab
Your RAID 10 array should now automatically be assembled and mounted each boot. Learn how to Remove software RAID device using mdadm!
Steps to Use DiskInternals RAID Recovery
Recovering files with DiskInternals RAID Recovery is a straightforward process that can be done manually or following the on-screen instruction of the Recovery Wizard.
First Step:
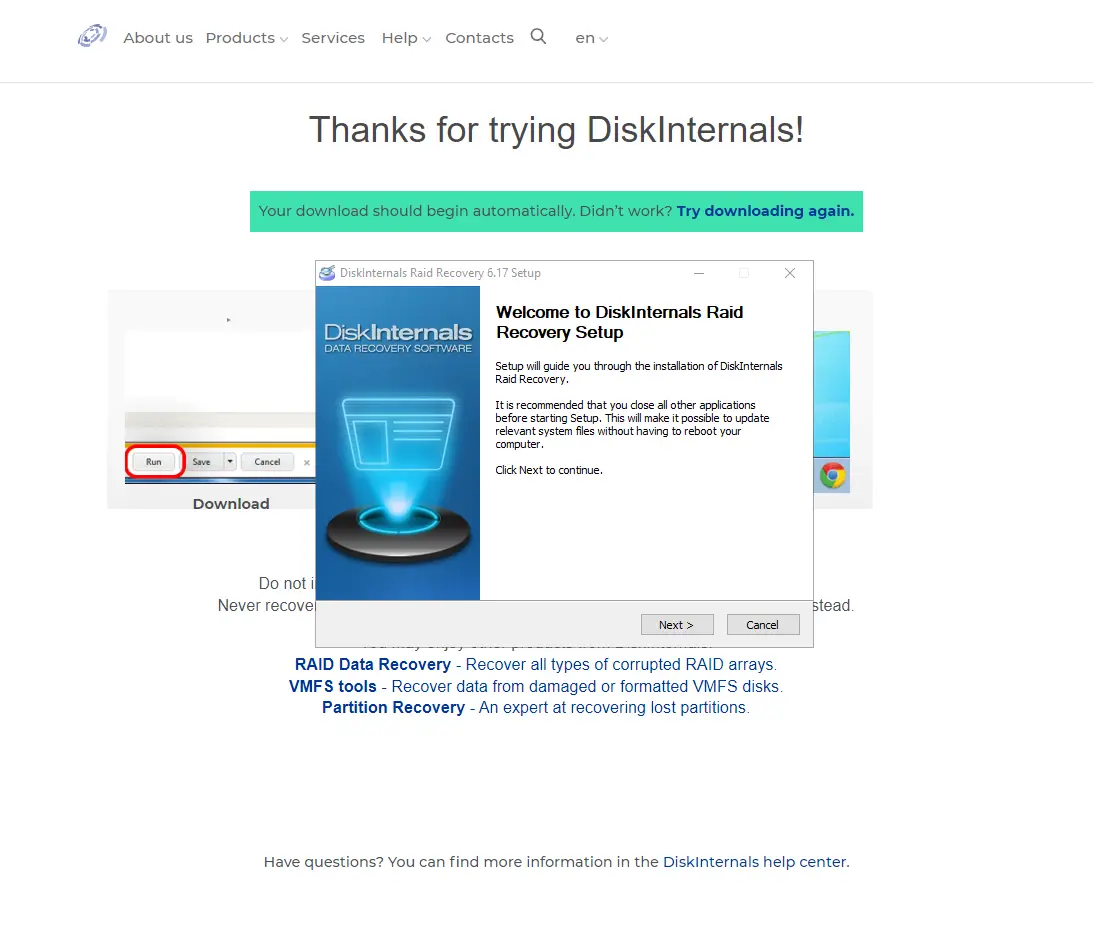
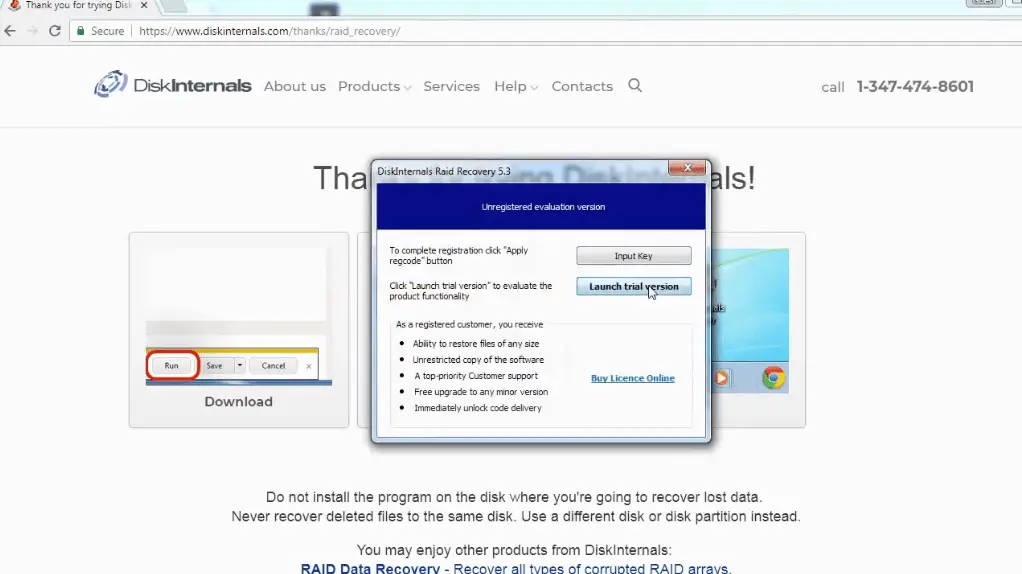
Download and install RAID Recovery on the Windows OS system. This software is compatible with Windows 7/8/8.0/10/-11 and Windows Server 2003-2019.
Second Step:
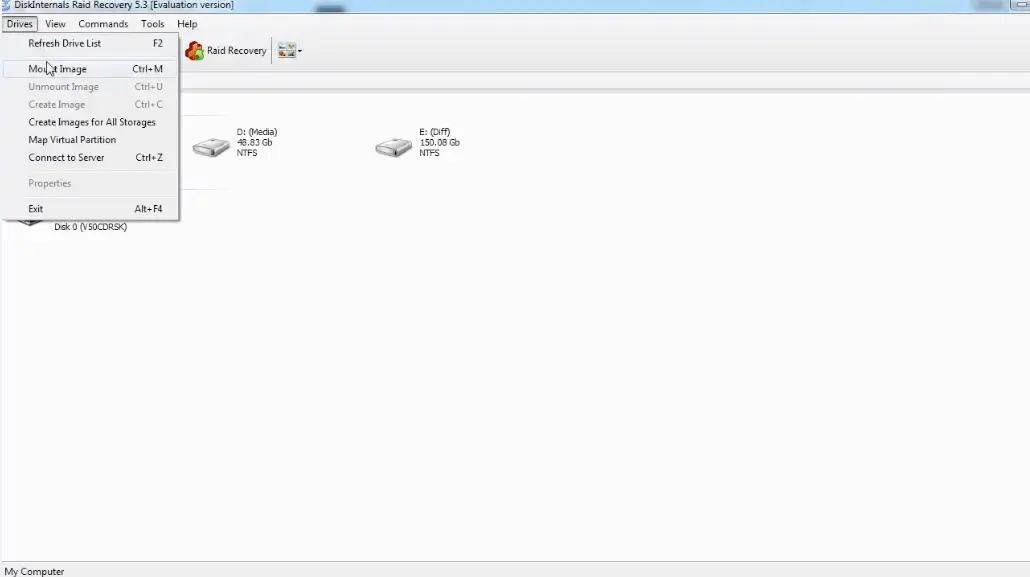
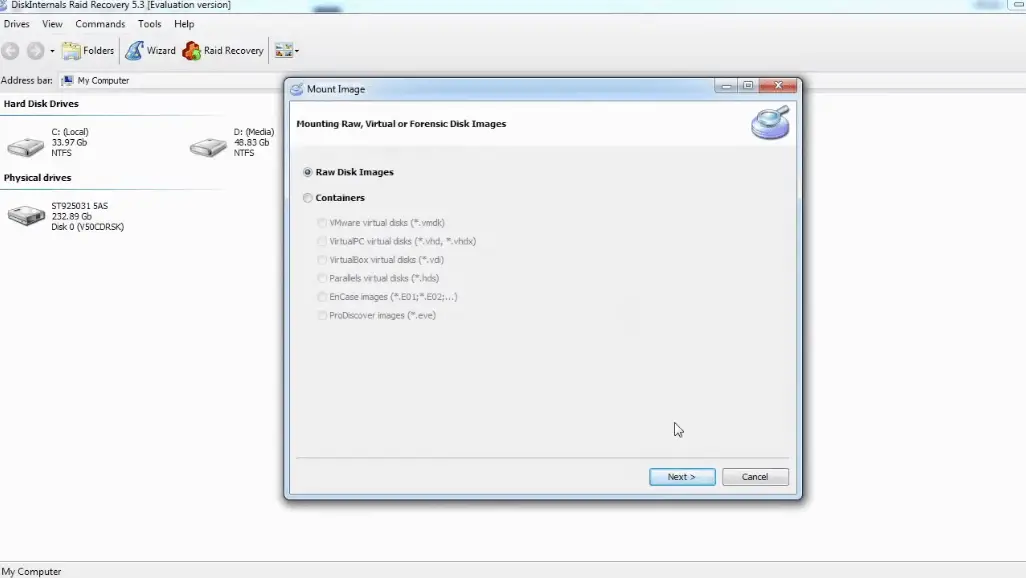
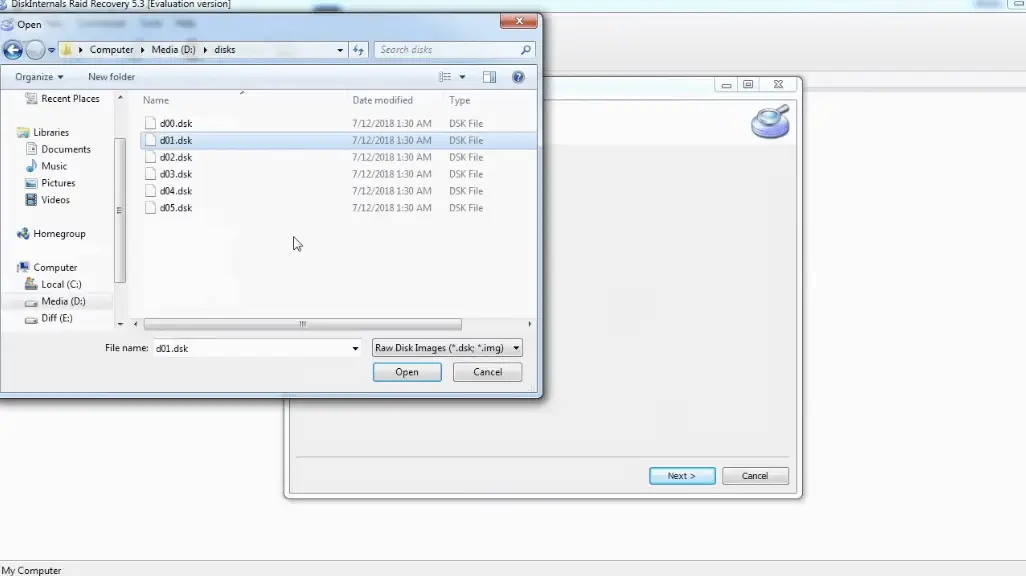
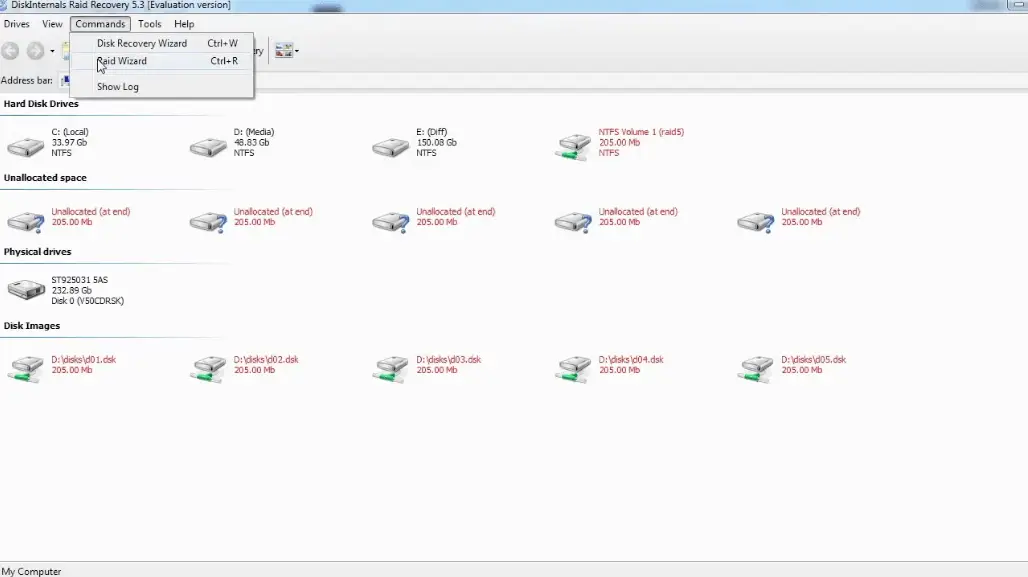
Launch the app after installation and select the affected target array. Next, choose a recovery mode:
- Fast recovery mode
- Full recovery mode
The Fast Recovery Mode scans very fast and saves time, but it doesn’t get deeper to discover all the lost files. Full Recovery Mode takes time and retrieves all lost files.
Third Step:
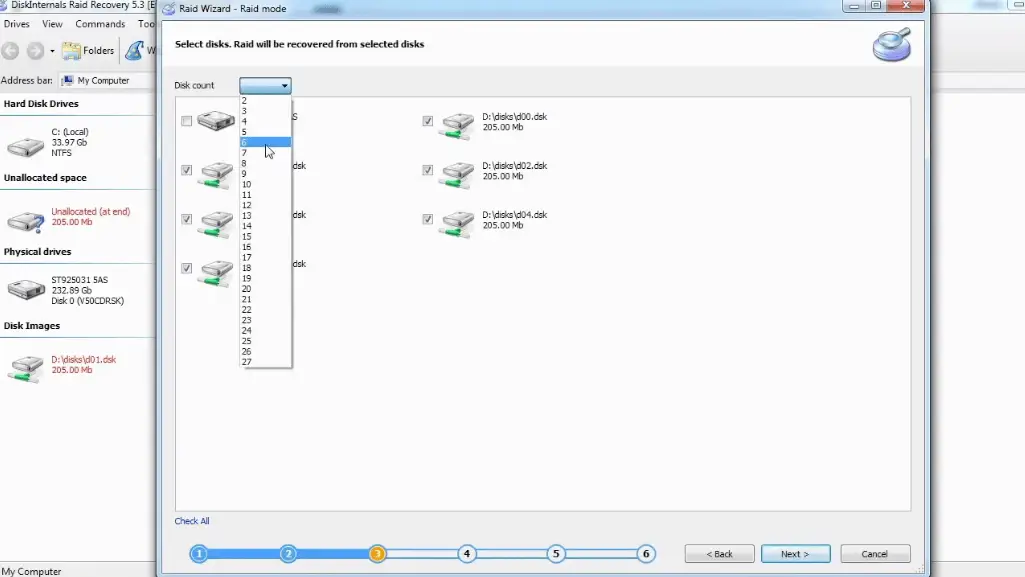
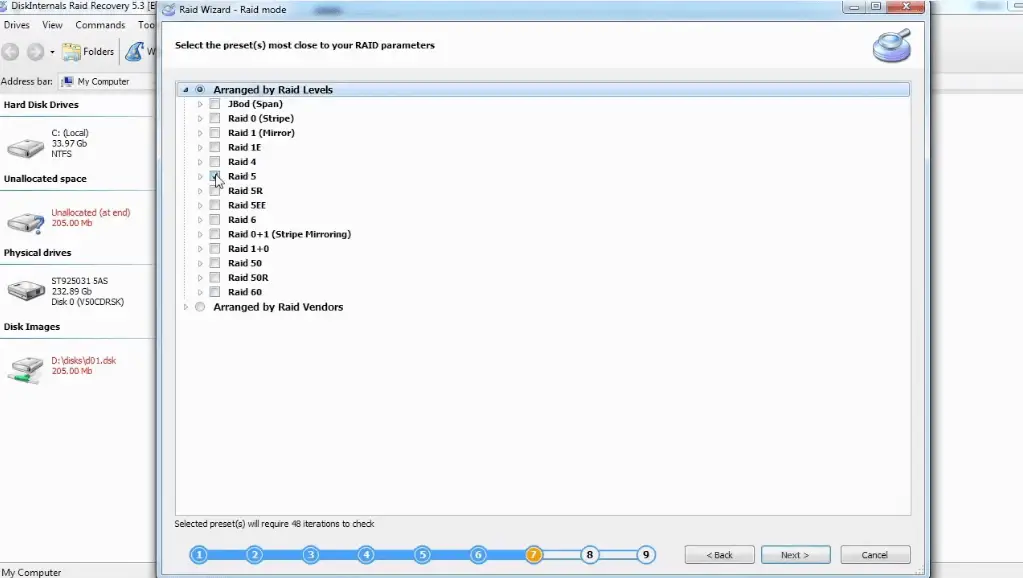
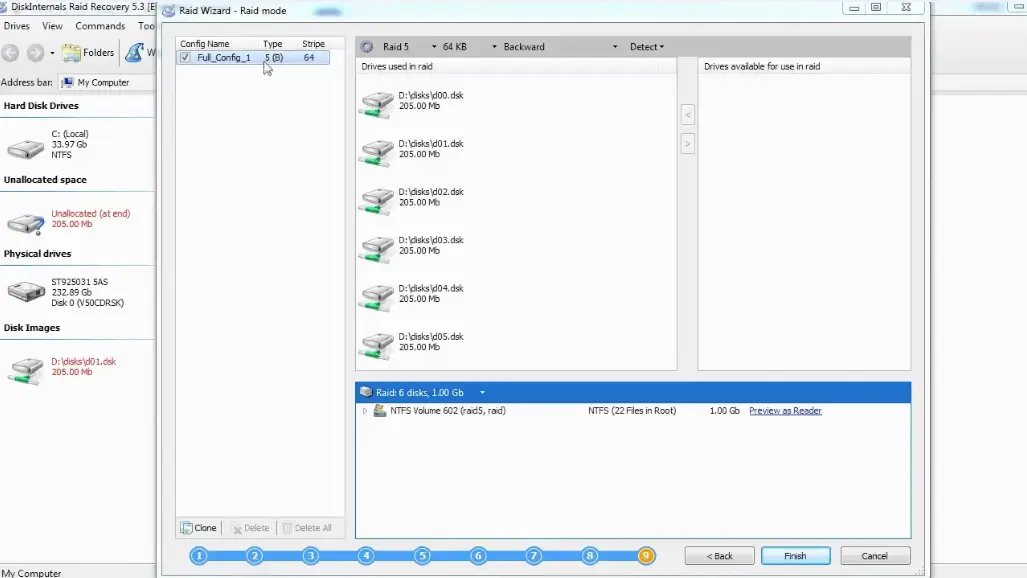
DiskInternals RAID Recovery would automatically check the status of the selected RAID array, controller, file system, or disk to recover lost files. You can preview the recovered files before proceeding to save them back to your local storage. To save the recovered files, you need to purchase a license.
Is the damage too deep/severe for you to restore? You can request guided assistance from RAID Recovery experts. Learn more about software RAID vs hardware RAID recovery here!
Recovery Tips:
- Follow the recovery steps diligently - wait until each step executes successfully before proceeding to the next; don’t hurry!
- Make sure you select the right drive for the scan; else, the program won't find the file(s) you want to recover.
- Preview the files before attempting final recovery.
- Don't re-save the recovered data on the same drive where it was deleted/lost.
Video Guide On ZFS Recovery Process
Here’s a video guide to clarify the entire steps explained above; watch to understand better. With the best software RAID recovery is easy:
Related articles
- Configure RAID on Ubuntu – Step-by-Step Guide for RAID 0, 1, 5, and 10
- RAID 10 with 8 Disks — Configuration, Performance, Rebuilds & Best Practices
- Encrypting RAID Arrays — RAID with Full Disk Encryption & Secure Setup
- Effective Btrfs File Recovery: Complete Guide to Btrfs Data Recovery
- Best RAID Data Recovery Software for Linux
- Recover Data from RAID 5 on mdadm (Linux)
- ZFS RAID Setup Guide: Configuration, Management & Expansion
- A Comprehensive Review of RAID Recovery Software: Choosing the Right Tool
- DiskInternals RAID Recovery vs ReclaiMe: Comprehensive RAID Recovery Solutions Compared
- DiskInternals RAID Recovery vs EaseUS Data Recovery Wizard | Comprehensive Comparison
- How to Rebuild RAID 5 Without Losing Your Data
- RAID 1 Recovery: all you can do yourself
- RAID 10 Recovery
- RAID 5 Data Recovery Step by Step
- RAID 6 Data Recovery
- RAID 0, 1, 3, 5, 10 data recovery software for Windows 10
- RAID Recovery Services
- The Truth about Recovering RAID 5 with 2 Failed Disks
- RAID 4 Data Recovery: How to Perform It⠀
- RAID 0 vs RAID 1: Performance, Redundancy & Use Cases
- RAID 5 vs RAID 10 comparison: Which one is better for you?⠀
- SSD benefits for RAID array
- How to set up RAID in Windows 10 in 2025
- RAID 5 VS RAID 6 - advantages and disadvantages
- RAID 0 failure - How to Fix Failed Raid 0 Array
- The best NAS RAID: how to choose⠀
- HDD Raid Vs SSD Raid Storage Systems - How to move⠀
- Benefits of RAID arrays - what are the advantages of RAID?⠀
- NAS vs External Hard Drive: Comprehensive Guide to Choosing the Best Data Storage Solution
- RAID-1 vs RAID-5: Performance, Cost, and Data Protection Compared
- RAID 3 vs RAID 5: which one would you prefer?
- RAID 10 vs RAID 01: Is There Any Difference?
- RAID vs JBOD: performance and cost comparison⠀
- What are RAID 01, RAID 1+0 and RAID 0+1⠀
- Mdadm RAID 1 not activating a spare disk Linux⠀
- NAS vs SAN storage - Detailed Comparison⠀
- Perform RAID 50 Data Recovery Today!
- Basic Disks vs Dynamic: What is the Difference
- What to do if RAID array doesn't reassemble after reboot
- RAID levels 0, 1, 5, 6, and 10
- Minimum disks for RAID 10⠀
- RAID Consistency Check: Ensure Data Integrity & Recover Lost Data
- What Is a Hot Spare? Peculiarities of Usage
- Global Hot Spare vs Dedicated Hot Spare: Find the Difference
- Differences Between Software RAID and Hardware RAID
- What Are Some Common Symptoms of RAID Array Failures?⠀
- RAID status degraded - fix it⠀
- How to check RAID status? 4 different methods!
- RAID 50 vs RAID 10 - What is the difference
- RAID Array Growing: How to Perform It
- How to downsize hardware RAID partition and protect data
- How About RAID 1 Reliability?
- What is RAID-Z? Its Difference Between RAID-Z2 vs RAID-Z3
- Can RAID array have snapshots?
- RAID Array Metadata: What Is Inside?
- RAID 6: Replace Two Dead Drives
- Do You Need to Defragment RAID?
- How to Recover RAID partition - step by step guide⠀
- RAID 5: How Big Should an Array Be?
- Does chunk size influence the speed of RAID?
- RAID 0, 5, 6, 10 Performance
- How Does RAID 5 on Windows 10 Work?
- RAID Configuration Explained: Types, Setup, and Best Practices
- What is FakeRAID?
- Which RAID is Better to Use for 4 Drives
- What Is RAID Redundancy? | RAID Redundancy Explained for Data Protection
- RAID Array for Video Editing: How to Choose
- Perform Hyper-V Data Recovery Today
- How to Install Hyper-V in Your Environment in 2025
- Hyper-V Manager - what is it?⠀
- Hyper-V: Generation 1 vs Generation 2
- Hyper-V Live Migration - what is it?⠀
- Hyper-V Snapshot Merge
- Hyper-V Virtual Machine Replication⠀
- About Hyper-V clusters
- Difference Between Type 1 and Type 2 Hypervisor?⠀
- Hyper-V Server Core installation vs GUI - let's compare⠀
- How to Run Linux on a Hyper-V VM in 2025
- Back up Active Directory Guide - Step-by-step Instructions⠀
- What is nutanix ahv?⠀
- What is System Center Virtual Machine Manager⠀
- Make Sure Your Data is Safe While Using Microsoft Storage
- What is Microsoft SQL Server and How Can You Use it Safely?
- Set Up and Use Microsoft SQL Server Management Studio
- Microsoft SQL Server Express Guide
- Use Microsoft Windows Server Safely
- What to do if you get Microsoft SQL Server error 18456?
- Microsoft Storage Spaces
- Xserve RAID data safety
- Apple RAID Card Data Recovery
- Guide: Linux Raid and Disk Data Safety
- Here is Everything You Need to Know About RAID-Z Technology
- What is JBOD?
- Btrfs vs. EXT4: A Comprehensive Comparison of File Systems in Linux (2025)
- RAID Redundancy - best performance solutions⠀
- Is it worth using RAID 5E/5EE?
- Let's compare: Synology vs QNAP
- Here is How to Backup RAID in 2025
- No hard drive detected or disk controller not supported in RAID
- Issue with the RAID after the BIOS update
- Using SSD in RAID Array
- Synology RAID Set That Is Broken or Crashed? RAID data recovery
- Here is How to add drive to RAID 5 in 2025
- ZFS Recovery software - How to recover deleted ZFS files
- Raid Recovery Qnap⠀
- RAID recovery software for Mac⠀
- Best FREE RAID Data Recovery Software (2026)
- Best NAS hard drive recovery in 2026 | Top RAID network-attached storage Hard Drives
- SQL Server Database in Recovery Pending - How to fix it (2025)
- RAID Hard Disk Data Recovery Software (2025)
- How to Recover RAID Array Configuration
- How to Rebuild RAID Without Losing Data
- How to rebuild RAID 1 without losing data
- How to Rebuild RAID 0 Without Losing Data
- Difference and Comparison - RAID 1 and RAID 2
- Difference between RAID 2 and RAID 3
- Difference between RAID 3 and RAID 4
- Difference between RAID 4 and RAID 5
- Buffalo Data Recovery
- Rapid RAID Recovery Software
- What is Synology Hybrid RAID (SHR). How to Recover Data from Synology Hybrid RAID
- RAID Server Data Recovery
- Recover Data from RAID on Linux
- RAID Foreign Disk: Causes, Solutions, and Best Practices
- How to Recover RAID Crash Data
- Forensic RAID Recovery
- RAID Data Recovery evaluation. What is RAID data recovery?
- Raid Drive Array Recovery
- How to Setup Raid 0 Windows 10 (11)?
- How to set up RAID 1 on Windows 10 and Linux
- How Many Disks Can Fail in RAID 5?
- What is RAID 5? Overview and Key Functions
- What Is a RAID Controller and What Are the Benefits of It?
- Recover Data from Broken/Failed RAID Set
- How to Clone RAID 0, 1, 5 Disk
- How to Remove software RAID device using mdadm
- Raid Rebuild Vs. Raid Recovery
- RAID vs. backup - differences and benefits (RAID is not a Backup)
- How to Rebuild RAID array
- What is Synology Hybrid RAID? What is the difference between SHR and RAID Drives?
- AHCI vs. RAID: Pros, Cons & Differences
- Recover Data from RAID 1 on mdadm (Linux)
- Difference & Comparison: RAID vs. non-RAID System
- Ultimate Guide to RAID Data Recovery: Tips & Techniques
- RAID Rebuild Time: What is and How to Optimize It?
- RAID Disaster Data Recovery: Techniques and Strategies for Handling Catastrophic Events
- How to Repair a Failed RAID?
- How to Set Up RAID in Windows 11: A Step-by-Step Guide
- RAID 50 vs. RAID 60 – Key Differences
- Guide to Recovering a Failed RAID Array | Step-by-Step Recovery Process
- HDD RAID vs SSD RAID and Combining Both: Everything You Need to Know
- How to Set Up and Configure RAID 10: Step-by-Step Guide
- What Is RAID 6? Definition, function
- RAID 10 vs RAID 6: Which Better?
- RAID 0: How Many Drives Are Needed?
- RAID 10: How Many Disks Are Needed and How to Set It Up
- How to recover data from a corrupted RAID?
- What is RAID 1? RAID Mirroring
- Recovering RAID 5 After Controller Failure
- NTFS RAID Recovery: Comprehensive Guide to Data Retrieval
- What is Xserve RAID? Comprehensive Guide and Overview
- Comprehensive Guide to RAID in Cyber Security: Levels, Recovery, and Best Practices
- Complete Guide to RAID Controller Failure and Recovery: Expert Tips
- Understanding Hardware RAID: Comprehensive Guide to RAID Levels and Benefits
- What is software RAID? - Comprehensive Guide
- Understanding RAID 0: Benefits, Risks, and Applications
- RAID 3 Explained: Benefits, Limitations, and Data Recovery Guide
- How Many Drives Are Needed for RAID 5? Minimum & Maximum Explained
- Understanding RAID 60: Architecture, Advantages, and Data Recovery
- Understanding RAID Striping: A Comprehensive Guide to Disk Striping and Its Variants
- RAID 10: How Many Drives Can Fail? | Comprehensive Guide to Failure Tolerance
- ZFS vs Btrfs vs RAID: Comprehensive Storage Comparison for Performance, Reliability, and Scalability
- How to Resize RAID Partitions: Step-by-Step Guide for RAID 1, 5, 6 & 10
- Comprehensive Guide to ZFS RAID Levels, Types, and Configurations
- ZFS vs RAID: Comprehensive Comparison of Performance, Reliability, and Features
- RAID 1 Minimum Drive Requirement: How Many Drives Do You Need?
- Bootable RAID Recovery Software: Complete Guide for RAID 0, 1, 5, 10 Recovery
- RAID Hard Drives Explained: What Is RAID for HDDs and External Drives
- RAID 5 Rebuild Failure Probability: Risks, Factors, and Solutions in 2025
- Understanding RAID 6 Performance: A Comprehensive Guide
- RAID Drives Explained: Learn How RAID Storage Enhances Performance
- HP RAID Recovery Tool | How to Recover Data with DiskInternals RAID Recovery Software
- Recovering Data from RAID Drives: Step-by-Step Guide to RAID Recovery
- Recover Striped RAID: Professional RAID 0 Data Recovery with DiskInternals RAID Recovery™
- BTRFS Restore File: How to Undelete Files and Restore Deleted Data Easily
- Recover Data from a RAID Array: Effective Solutions for Fast and Secure Data Retrieval
- Windows 7 RAID Recovery: How to Recover Data from RAID 1, RAID 5, and RAID 10 Arrays
- Adaptec RAID Recovery: Restore Data from Failed Arrays with DiskInternals RAID Recovery™
- What is RAID Data Recovery? | Recover RAID Arrays with RAID Recovery Software
- SAN RAID Data Recovery: Recover RAID Arrays with Professional SAN Recovery Solutions
- What is a RAID Volume? Understanding RAID Volumes and Recovery Solutions
- What is a RAID? RAID Systems Explained & How to Recover RAID Arrays with Professional Tools
- Best RAID Software for Mac | Top Free & Paid RAID Tools for macOS 2026
- Top 10 RAID Recovery Services: Best Solutions for Data Recovery
- RAID Server Data Recovery: Recover and Restore RAID Arrays Fast with Professional Tools
- RAID System Recovery: Essential Steps & Best Software for Safe Data and File Restoration
- RAID Recovery Volume: Effective RAID Array Recovery Solutions for Data Loss Prevention
- What is RAID Connectivity? Essential Guide to RAID Array Setup
- Intel RAID 0 Recovery & RAID 1 Recovery: Solutions for Data Loss & Recovery Tools
- How Many Drives for RAID 6?
- Optimize RAID for Redundancy and Performance - Expert Guide
- How to Read RAID Drives & Recover RAID Arrays on Windows: A Guide
- RAID 0 vs RAID 5: Speed, Performance & Key Differences (2026)
- Synology RAID 5 Recovery: Recover Your RAID Array with Expert Tools and Tips
- Synology RAID 1 Recovery: Recover RAID Array with Trusted Tools and Expert Solutions
- X-RAID Recovery: Expert Guide to Netgear X-RAID and ReadyNAS Data Recovery
- Interim Recovery RAID 5: Expert Guide to Data Recovery and RAID Array Repair
- MDADM RAID 0 Recovery: Expert Guide to Fix and Recover Your RAID Array
- SCSI RAID Recovery Software: Effective Solutions for SCSI RAID Data Recovery
- RAID Data Recovery for Deleted Arrays: Recover RAID Array Safely & Effectively
- What is RAID in Linux? Learn About Software RAID & Recover RAID Arrays Easily
- Change log for RAID Recovery™
- Intel Matrix RAID Recovery: Restore RAID 0, 1, 5, 10 with Reliable Solutions
- RAID Level 4: What Is RAID 4, How It Works
- RAID Restorer – Recover Data from Failed RAID Arrays with Reliable Software
- ZFS RAID with Different Size Drives – Setup, Limitations, and Best Practices
- RAID 0, 1, 5, 10 Explained: Performance, Redundancy & Best RAID Configurations
- How to Recover Data from a Broken RAID 1 Set – Step-by-Step Guide
- ZFS RAID Expansion: How to Expand RAIDZ and ZFS Pools Safely
- RAID 6 Drive Failure Tolerance: How Many Drives Can Fail?
- RAID 50: Drive Failure Tolerance and Data Recovery Solutions
- Windows Storage Spaces vs RAID: Performance, Speed, and Data Protection Comparison
- RAID 2 Array Explained: What Is RAID Level 2, Setup, and Performance Comparison
- RAID 5 RAID 6 RAID 10 - Key Differences and Performance Comparison
- RAID 5 with 3 Disks: Configuration, Benefits, and Performance Insights
- How to Create RAID 5 with 6 Disks: Complete Setup Guide and Performance Tips
- RAID 6 Double Parity Calculation Explained – Data Protection Insights
- How to Add a Disk to mdadm RAID 5: Step-by-Step Guide
- RAID 0 vs RAID 10 and RAID 10 vs RAID 0 Performance Comparison
- How to Fix Degraded RAID 1: Step-by-Step Guide to Restore RAID 1 Degraded Arrays
- RAID 5 vs RAID 0+1: Key Differences Explained
- Why RAID 1 Is Not a Good Substitute for a Backup
- How to Check Which RAID Is Configured: A Complete Guide for Windows and Linux
- RAID 50 vs. RAID 5 – Performance, Speed, and Data Protection Comparison
- RAID 50 vs. RAID 6 – Key Differences
- Configuring RAID 5: Step-by-Step Guide on How to Configure RAID 5 for Performance
- Cannot Format Old RAID Drive? Effective RAID Data Recovery Solutions
- RAID 6 with 5 Drives: Configuration, Performance, and Data Protection
- Best RAID for 6 Disks: Compare RAID 0, 5, 6, 10, 50 & 60 for Performance & Redundancy
- RAID 6 with 8 Drives: Configuration, Failures, and Performance Explained
- RAID 6 with 6 Drives: Performance, Redundancy, and Best Use Cases
- RAID 0 vs. JBOD – Key Differences, Performance, and Speed Comparison
- RAID Array Rebuild: How to Rebuild a RAID Array Safely and Recover Lost Data
- Recover Data from Old RAID Drives | Best Methods & Software for RAID Recovery
- RAID 5 with 5 Drives: Configuration, Performance & Recovery | RAID 5 5 Drives Guide
- 15 Best External Hard Drives for RAID in 2026
- Dell RAID 1 Recovery: How to Recover Data from RAID 1 on Dell Servers Safely
- Dell RAID 5 Recovery - Safely and Fast
- RAID 1E vs RAID 10: Performance, Capacity, Cost & Failure Risk Guide
- What Is RAID 1E? Performance RAID 10 1E vs RAID-1E Guide for Power Users
- RAID 1E vs RAID 5: Performance, Capacity and Failure Risk Compared
- RAID 1 Speeds: Read, Write & Disk Performance | Speed Up RAID 1 Guide
- Ext3 RAID Recovery Guide - Data Recovery RAID Ext3
- XFS RAID Recovery Guide & Best XFS RAID Recovery Software
- ASUS RAID Recovery Guide - Fix Failed ASUS RAID
- RAID Data Recovery Cost: Affordable Solutions for RAID 0, RAID 1, RAID 5, and RAID 10 Failures
- NAS as a File Server: NAS vs. File Server Comparison for Storage and Sharing
- QNAP RAID 5 Recovery Failed? Safe Data Recovery Steps for NAS Users
- ReiserFS RAID Recovery: How to Restore Data from Failed RAID Arrays
- RAID 0 vs RAID 1 vs RAID 5 vs RAID 10 — Performance, Capacity & Recovery
- ZFS Recovery Tools — Data Recovery ZFS Guide & Best Software
- RAID 1 vs RAID 5 vs RAID 10 Performance Management, Speed & Capacity Guide
- RAIDZ1 vs RAID 5 — Performance, Integrity & Recovery Comparison
- ZFS Mirror vs RAIDZ — Performance, Capacity & Recovery Guide
- ZFS Minimum Drives — How Many Disks You Need for RAIDZ1, RAIDZ2, RAIDZ3
- RAID Degraded — What to Do | Warning Fixes & Rebuild Failed Steps
- RAID 7 — What It Is? Origins, Risks & Recovery Options
- ZFS vs mdadm RAID — Why choose ZFS instead of RAID
- RAID in Cloud Storage Systems — SDS, Virtual RAID & Erasure Coding Guide
- Best RAID for OLTP: RAID Configuration for OLTP Workloads & Transactional Databases
- Best RAID for MySQL: RAID Configuration & RAID Setup for MySQL Databases
- Best RAID for NVMeoF: NVMe RAID Configuration & NVMe over Fabrics RAID Setup
- Is RAID 0 Worth It in 2026? Risk, Performance, SSD & NVMe Guidance
- Fault Tolerance in NVMe-oF RAID — Rebuild Time, Data Protection & Redundancy
- Best Practices for RAID over NVMe-oF — Tuning, Monitoring & DR
- RAID 0 vs Single Drive — SSD, NVMe & HDD Comparison (Performance vs Risk)
- RAID 0 vs Single Drive Reliability — Failure Risk, SSD Comparison & Recovery
- RAID 0 for Gaming — Is RAID 0 Good for Gaming? Performance & Risk Guide
- RAID 0 for 4K Editing — Is RAID 0 Good for 4K Video Editing?
- RAID 0 for Large File Workloads: Scratch Disks, NVMe, When It Makes Sense
- Is RAID 0 Obsolete? RAID 0 with SSD and NVMe — Still Worth It?
- RAID 0 vs. SSD Performance: PCIe 4.0, PCIe 5.0 Speed Compared
- RAID 0 Redundancy vs No Redundancy — Does RAID 0 Have Redundancy?
- Does RAID 0 Increase FPS? — RAID 0 vs Single Drive FPS Guide
- RAID 5 Interrupted Rebuild Recovery: Fix Stopped or Aborted Rebuilds
- RAID 0 Failure Probability with N Disks Explained
- RAID 5 Two-Disk Failure Recovery: Parity Recovery Beyond Tolerance
- RAID 1 Corrupted Mirror Recovery: How to Recover a Damaged RAID 1 Mirror
- When RAID 0 Is Acceptable: Use Cases, Risks, and When You Should Use RAID 0
- RAID Best Practices for VMware: Best RAID Configuration for VMware ESXi
- RAID 0 Backed by Versioned Backup: Is RAID 0 Safe with Versioned Backups?
- RAID 10 Best for VMware: Why RAID 10 Is the Recommended RAID for ESXi
- Best RAID Controller Guide: Hardware RAID Cards Compared for Servers and SSDs
- Best PCIe RAID Controller: Top Hardware PCI Express RAID Cards Compared
- RAID Controller for ESXi: VMware ESXi RAID Controller Recommendations
- RAID Controller for Linux: Best Linux-Compatible Hardware RAID Controllers
- SATA RAID Controller for ESXi: VMware ESXi Compatible SATA RAID Options
- SAS RAID Controller for VMware ESXi: Best Hardware RAID Options
- NAS Data Recovery Software & Tools for RAID Recovery
- Features
- RAID 0 Data Recovery
- RAID Reconstructor on Broken RAID Arrays
- RAID Recovery Software
- Hyper-V network adapters⠀
- Open Source RAID Recovery Software Explained and Comparison
- RAID 1: How Many Drives Are Needed for Data Redundancy?
- RAID 1 with 3 Drives: Everything You Need to Know
- RAID Calculator For Geeks – Estimate Usable Space & Drive Size
- RAID Calculator Online – Usable Space & Disk Size Calculator for RAID