RAID 0 Data Recovery Step-By-Step
Have you got a multi-disk NAS unit running a RAID 0 configuration? Whether it’s a Synology, QNAP, WD My Cloud, Buffalo Diskstation or other NAS appliance, you may still lose access to the data.
RAID 0 Data Recovery
If your computer runs on Windows, you may try to recover your files using the special RAID recovery software. In this article, we’ll discuss the common points of failure in NAS units and RAID 0 disk arrays. You’ll see how to perform RAID 0 data recovery with RAID Recovery by DiskInternals.
Introduction. RAID 0 array
Remember that the RAID 0 mode requires a full data backup because RAID 0 is free from data redundancy. RAID 0 data recovery is hard, even impossible sometimes, to do. When using a multi-disk NAS, you can go for more storage or better reliability. The RAID 0 displays the many hard drives’ capacity as a single volume. The data written to a RAID 0 array turns into chunks and is distributed (“striped”) across RAID array disks.
RAID 0 failures without the loss of the member disks
First, check if your NAS appliance is still at the same IP address. To discover the IP address of your NAS unit, check the settings of your home router. Once you have discovered the IP address of your NAS, open it again. Check the device for power and the Ethernet cable; check if your home router has a light on the Ethernet port.
If you’ve done all the checks, and it is the NAS unit that isn’t working, it is possible to perform the RAID 0 data recovery. Pull the disks out and follow our step-by-step guide.
Tip: Learn how to clone RAID 0, 1, 5 disk!Step-by-Step RAID 0 recovery
While performing a RAID 0 data recovery with your NAS built-in recovery, its controller can stumble upon the same bad sector and knock the “faulty” disk out. There are two ways to repair RAID 0: the manual one and the software one. Let’s look at what the pros of recovery use with Diskinternals RAID Recovery.
Our software works with all types of arrays and recognizes all common NAS models built by WD, Buffalo, Synology, QNAP and others. The RAID recovery software supports ext2, ext3, and ext4 file systems, as well as NTFS, ZFS recovery, and XFS. The software determines RAID configuration, disk order, and stripe size. Below you’ll see the step-by-step guide to the recovery.
- 1. Shut down and power off your NAS unit and remove the hard drives.
- 2. Shut down and power off your computer. Insert the hard drives there. Use SATA, SCSI or SAS ports.
- 3. Turn on your computer. Make sure the system recognizes all hard drives. If any hard drive isn't recognized by your computer, the recovery is impossible.
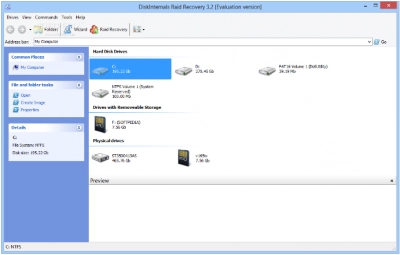
- 4. In the software, specify physical hard drives that used to be part of the failed RAID 0.
- 5. Once the process finishes, proceed to data recovery. You will need a local or network storage of the same or greater capacity.
Determination of the disk order
If you have a failed RAID 0 array, the last thing you’re interested in is whether or not your network appliance is UNIX-based. The operating system will not automatically recover faulty disks with any file system that your Windows computer can read.
NAS appliances are usually formatted with ext3, ext4 or XFS, which are the different file systems in UNIX land. RAID Recovery by DiskInternals determines the correct disk order before restoring your data.
Determination of the first disk
The RAID Recovery by DiskInternals determines the first disk of the RAID array after the initial scanning. The process goes on within the software, so you don’t have to spend your time resolving this. The RAID 0 data recovery software will display the stripe size of your RAID 0. To check it out, find the “Size” section on the menu.

Determination start offset on the member disks
The number and start offset of the member disks is in the array configuration section. Only if this is necessary, set this parameter manually in RAID Recovery by DiskInternals.
Note: more about repair software RAID!About DiskInternals RAID Recovery
The RAID Recovery by DiskInternals Software is free to try. We don’t ask for any sort of pre-payment or credit card to “guarantee” anything. We don’t even ask for your email address.

Head to our website and download the software by clicking an appropriate link. Launch the installer and follow the instructions telling you how to install the best RAID software for Windows 10, and recover RAID 0. If something goes wrong, contact our technical support staff for advice on how to recover RAID 0 data from the drive.
The RAID Software reassembles your array and displays the list of files and folders. After this, you are welcome to check your files consistency: it would be nice if you have an image of 2Mb in size among your files - this makes checking easier. When you see your data, please purchase a license to complete recovering files from your RAID 0. Learn more about RAID Server failure recovery.
Learn more about RAID 0 versus RAID 1 recovery here!Are there any hidden costs? No. Recovery software free preview function is here for you to be sure in recovery success. You only pay for the license if you already get access to your files in a preview-mode and you want to perform the recovery process. Try the RAID Recovery by DiskInternals for free to check if recovering your data is possible. Need a solution for RAID 1 or RAID 0? DiskInternals RAID Recovery is here to help!
Note: learn more about Buffalo recovery!FAQ
How to Recover striped RAID?
Recovering striped RAID involves restoring data from a RAID 0 array after a failure or loss. Here are the steps involved:
- Issue Identification: Ascertain the cause of the RAID array's failure, which might be due to disk failure or accidental data deletion.
- Array Rebuilding: Restore the RAID array by either replacing the failed disk or using data recovery software to reclaim lost data.
- Data Recovery: Utilize RAID recovery tools or services to recover data from the striped RAID setup.
Is it possible to recover RAID 0?
Recovering data from a RAID 0 array can be quite challenging, primarily because RAID 0 does not include any redundancy or fault tolerance. This means that if any single drive in the array fails, the data on the entire array is potentially lost, as the data is striped across all drives without any form of backup.
However, recovery is not impossible under certain conditions. Here are a few scenarios where recovery might be feasible:
- Software Errors: If the RAID 0 failure is due to a software issue, such as corrupt data or a misconfigured array, recovery software might be able to reconstruct the array and recover the data.
- Physical Drive Failure: If a physical drive fails but is not completely destroyed (for example, specific sectors are damaged), professional data recovery services may be able to make partial or full recoveries by repairing the drive or reconstructing the data from the remaining good sectors.
- Accidental Deletion: If data is accidentally deleted from a RAID 0 array, recovery software may be able to restore it, provided that the data hasn't been overwritten.
Given the complexity and the lack of redundancy in RAID 0, the success of recovery efforts highly depends on the nature of the failure and the intervention steps taken immediately after the failure occurs. It’s often advisable to consult with professional data recovery services for the best chance of retrieving lost data.

