How set up allocation unit size? Here is everything you should know!
Here you will find out:
- what option should you set
- how DiskInternals can help you
Are you ready? Let's read!

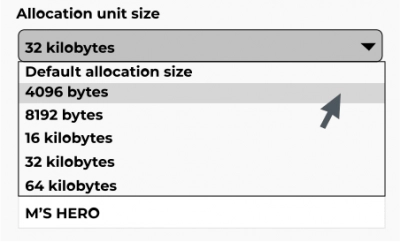
When formatting a disk, several logical questions may arise, for example: What exactly should be placed in the selection section when formatting a disk? How do you choose options to customize the allocation unit size, since options range from 512KB to 64KB? Are there any helpful guidelines that can be applied to other types of discs? Maybe you should just leave the default value?
Usually, the default setting is the best choice for most users because of its convenience and ease of use. But, in the choice of format allocation unit size, there are some nuances. Let's look at them.
If you are a regular Microsoft user, don't be smart; just leave the default 4096 bytes. Let's try to explain this opinion: the allocation block size is the block size on your hard disk when formatting NTFS. If there are many small files on the disk, it is recommended to keep the allocation size small to avoid wasting hard disk space. Conversely, if you have a large majority of files, a higher value will increase system performance by reducing the number of blocks to search. At the same time, do not forget that the volumes of modern hard drives are impressive in size and, in fact, does not really matter how to choose the right distribution size. This is precisely why you should not think long, and it is recommended to just leave the default value.
You may also wonder how best to choose the NTFS allocation unit size in terms of space efficiency. It is logical that smaller distribution block sizes work better, and the average space wasted per file is half of the selected AUS (for example, at 4K, 2K is lost per file, and at 64K - 32K). But there is no reason to panic here either, since, as mentioned above, modern drives are huge, and a little wasted space should not be a determining factor in choosing parameters. Naturally, this does not apply to the small SSD.
If your disk is intended for storing media files (here, your photos, music, and videos are stored), then the size of each file is at least 1 MB. In such a case, it is also best to use the Windows default setting for the Windows boot partition, which is 4KB for any NTFS drive smaller than 16TB.
If suddenly, you had a bad look at your disk before formatting and important data were still lost, you can use the DiskInternals Uneraser data recovery application
This application cannot be compared to any other software because of its ease of use and quality of recovery. DiskInternals Uneraser has been on the market for over 15 years and has established itself as the best.
Key advantages and characteristics of DiskInternals Uneraser:
- All file types are supported.
- The program extracts deleted and damaged files from classic hard drives of computers, SSD and eMMC, SD memory cards, digital cameras, and other media.
- Built-in recovery wizard to help you recover deleted images, photos, music, documents, etc., even if this is your first time.
- Free preview; after viewing the data, you can be sure that it will be restored correctly.
- here is a function - Metadata for previous names. This is a new search technology: you will not only be able to preview your files, but also find them by their original/previous name. The friendly and intuitive, simple interface will surely delight you.
Using DiskInternals Uneraser, you will learn how easy it is to recover deleted or damaged data from the comfort of your home and without additional training.
The following guide for DiskInternals Uneraser software will help you recover formatted and corrupted data.
Step 1. Download DiskInternals Uneraser, run the program, and click Next until the installation is complete.
Step 2. Open DiskInternals Uneraser and left-click on the wizard icon; click "Next.
Step 3. On the screen, you will see all the storage devices that are present and connected to your computer (hard drive, USB, SD card, etc.). Left-click on the formatted drive and click "Next".
Step 4. Select the type of file you want to recover and click Next.
Step 5. Scan the disk: fast and full, and then select the desired scan option with the left mouse button. After a while, you will see files that can be recovered; they will be marked with a red cross in the upper left-hand corner.
Step 6. Preview - press Ctrl + P hotkeys. After that, you know for sure that you can recover data.
Step 7. To save the found files in a safe place other than the original, you just need to purchase a license and enter the license key.
Recovering formatted data is easy if you choose the right tool. With DiskInternals Uneraser, you're a thousand times more likely to get your data back.
