How to Recover Deleted Photos on Various Devices
Are there solutions to recovering lost photos and pictures from phones, digital cameras, and other devices? For sure, there are many ways to recover photos from any device you store them on. In this article, you will discover the possible ways to recover pics from Windows computers, Macs, mobile devices, and digital cameras. It’s going to be a long read but still concise in detailing each method covered. Let’s go.
How to Recover Deleted Photos on Windows
The most popular operating systems for computers are Windows, which also supports HDD and SSD storage. On a Windows computer, whether you use an HDD or an SSD, there are still possibilities that you may lose some crucial files (in this example, images) at some time for a variety of reasons, such as accidental deletion, virus assaults, OS or storage media crashes, and others. But if you later find that any of the photographs on your Windows Computer are gone, here's how to retrieve them.
1. From the Recycle Bin
When a picture file is deleted on a Windows computer, the file goes straight to the recycle bin, where it stays for up to 30 days before getting erased. Within this 30-day grace period, you can always go to the recycle bin and retrieve the picture file back to its original directory. To do this, follow the guide below.
Guide:
- Open the Recycle Bin folder and search for the picture file
- When you find the file, click on it and select “Restore” from the top menu
- You may also double-click on the file and select “Restore”
- Once you confirm the action, the file will be sent back to its original folder/directory.
2. From Backup Files
If you activated cloud backups or backup to any other alternative drive, you can check for the backup copy of the lost pictures and get them back. Here’s how to restore your pictures from backup if you have activated the “Backup & Restore” on Windows OS.
Guide:
- Connect the alternative backup storage drive you’ve been using for the backup
- Right-click on the Start icon and select Control Panel
- Go to System and Maintenance 🡺 Backup and Restore 🡺 Restore tab
- Choose either “Restore my files” or “Restore all users’ files.”
3. By Photo Recovery Software
A photo recovery software would be your best bet if you didn’t back up the lost pictures earlier. With a professional photo recovery software, you can launch a deep scan on the drive where the pictures were saved earlier and recover them – DiskInternals Uneraser can help with this task.
Steps:
- Download and install DiskInternals Uneraser
- Launch the software and select the primary drive where the pictures were saved earlier
- Select Fast Recovery or Full Recovery mode; choose the file types you want to recover
- Wait for the scanning to run completely
- Preview the recovered images and photos and recover them to your computer
How to Recover Deleted Photos on Android
If your pictures are missing from your Android device, you can still get them back in some simple steps.
1. From the Cloud
Since it is a mobile device, there are quite many cloud storage services available for use on mobile devices; if you use any of them, recovering your photos is quite easy. Here’s how to recover files from the most popular cloud storage apps used on mobile devices.
1. Google Photos
Google Photos is one of the best options for Android device users; you can set it up to automatically back up your photos and videos once connected to a WiFi network. The Google Photos app can also serve as your default Gallery app with a built-in media editor. If you deleted an image from your Google Photos app, here’s how to recover it:
- Open the Photos app and open the Menu options
- Go to the Trash folder and look for the deleted images
- Google Photos saves deleted photos for 60 days before erasing them; you can find the pics you’re looking for in there.
2. Microsoft OneDrive
OneDrive also has a “Bin” feature where deleted files are temporarily stored before getting erased completely. Here’s how to recover pics from OneDrive.
- Open the OneDrive app
- Tap “Me” on the bottom menu and Recycle Bin
- Find the lost photos and recover them back.
3. Dropbox
For people using DropBox as their preferred cloud storage service, the pics recovery method is almost similar.
- Open a web browser on your device and visit dropbox
- Set the browser in “Desktop View”
- Sign into your Dropbox account
- Tap on the “Files” tab on the left sidebar and select “Deleted files”
- Now, select the files you want to recover.
How to Recover Deleted Photos From an SD Card
Some people save their pictures and videos on SD cards, so they easily transfer them by inserting the SD into a new PC or device. But then, SD cards can get corrupted, or the files saved inside could get lost due to quite many possible reasons. If your pictures are saved on an SD card, and you later discover that they are missing, hereunder are some possible ways to get them back.
1. Check If Your SD card Is Corrupt
Another possible reason why you can’t access the media files stored on your SD card could be because the card is corrupt. Here is how to check if an SD card is corrupt:
- Put the SD card into a card reader and insert it into a computer system
- If the computer throws a “Please insert a disk into drive G:” error message, then the SD card is corrupt and needs to be repaired
- You should try repairing the SD card using the Windows CMD terminal or assign a new drive letter to it and see if the issue is fixed.
2. Clean the SD Card
SD cards are easily attacked by viruses, especially if you frequently remove them from the primary device to transfer files. Cleaning an SD card doesn’t mean wiping the surface with a cloth or rag; it means scanning the card and removing the virus that has corrupted the data stored inside.
1. Using an Antivirus App
Remove the SD card from the device and put it into a card reader, then insert it into a computer that has an antivirus software installed and activated.
- Launch the antivirus software app
- Select the SD card and scan it for viruses/malware
- Delete all detected malicious/virus threats
- Remove the SD card, reinsert it into your device, and check if you can access your photos.
2. Using Command Prompt on Windows
With this method, you need admin access on the computer you’re using to perform and scan.
- Connect the SD to a Windows computer
- Right-click on Start and select Windows PowerShell (Admin)
- Run the following command: attrib -h -r -s /s /d G:\*.*
- Replace G with the SD card’s drive letter
- The above command will instruct Windows to attempt repairing the card, and by so doing, you may recover your lost photos from the SD card.
3. Look Into the Temp Storage
Some mobile devices have a hidden “temp” or “LOST.dir” folder where deleted files are saved temporarily before getting erased from the device. If you can’t find such folders on your device, remove the SD card and put it into a computer system to check the temp folder.
For Mac
Launch the Terminal application and run the following command - open $TMPDIR - to view what’s lurking in the temp folder.
For Windows
Click on the “Search” icon on the taskbar and search for %temp%. Open the corresponding folder and view its contents.
4. Restore From a Backup
Well, not everyone does that, but if you had backed up your SD card before the data loss occurred, you can simply refer to the backup copy and retrieve your files from there.
The most common type of SD card backup most people do is to create a folder on their PC to save the SD card files; if you do the same, simply connect the SD card to the PC and copy back your files from the backup folder.
Notwithstanding, there are built-in utilities you can use on macOS and Windows systems to attempt to recover your photo files.
macOS
- Connect the disk containing Time Machine backups to your computer
- Open the backup folder(s)
- Launch Time Machine by clicking the clock icon on the menu bar
- Find the image files to recover
- Press the Space Bar to preview the file
- Click Restore to recover the selected file.
Windows OS
On Windows OS, you can use File History or Windows Backup & Restore (both accessible from the Control Panel) to retrieve previous versions of lost files.
5. Use Data Recovery Software
If none of the methods above seem to work for you, a professional data recovery software app should be your next resort. There are practically many data recovery solutions that can recover image files, and the DiskInternals Uneraser is one of the very best to use on Windows OS computers.
DiskInternals Uneraser can recover files from SSDs, HDDs, external storage media, SD cards, flash drives, and many other types of storage. It is fast and supports all popular file system formats for macOS, Linux, and Windows OS. The software runs on all Windows OS versions from XP to the latest Windows 11.
- Connect the SD card to a computer; download and install DiskInternals Uneraser on the same computer
- Launch the software and select the SD card storage

- Select Fast Recovery or Full Recovery mode; choose the file types you want to recover
- Wait for the scanning to run completely
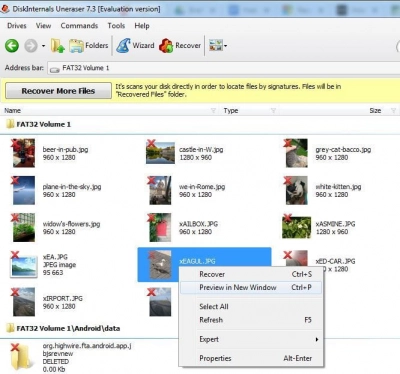
- Preview the recovered images and photos and recover them to your computer or another storage drive.
How to Recover Deleted Images From the Main Hard Drive
Instead of saving important images and photos on their mobile phones, many people will prefer to save such files on their PC’s main drive, where they believe it’s safer and more easily accessible. Well, even a computer’s main hard drive is not formidable against data loss – the files saved on such drives could also get lost or go missing for various reasons. Here are some handy tips on how to get back your lost images from a computer’s main drive.
1. Using Built-In Utilities
Both Windows OS and macOS come with several built-in utilities that allow you to recover files that have been lost from the operating system; Windows OS offers a Recycle Bin, while macOS offers a Trash folder.
Recover From Windows Recycle Bin:
- On the desktop screen, locate the Recycle Bin icon/folder and open it
- Look for the photo file you want to restore
- Double-click or right-click on the file and select “Restore” to retrieve the file and send it back to its original directory
Recover From macOS Trash Folder:
- Open the Trash folder from your MacBook’s home screen
- Find the photo you want to recover and right-click on it
- Select Put Back from the context menu options
2. Search The Entire System
Sometimes the file isn’t lost; maybe you mistakenly moved it to another folder or partition. So, launching a system-wide search may help you phish out the picture file from wherever it is saved on the computer.
For Windows
- Open File Explorer and click on the search bar
- Type the name of the photo file (if you can still remember it)
- Wait for Windows to search all directories to find files with the name you searched – look for the image file among the search result and preview it to confirm.
For Mac
- Use the Finder option on your MacBook to find the file you seek
- Click on the magnifying glass icon on your MacBook’s screen and search for the file name
- Select the missing file from the search results.
3. Enable Hidden Files
Both windows and macOS have a “hidden file” feature that is unchecked by default. This means that files with “hidden” attributes won’t show up when you open the folders or directories they are saved in; disabling this feature is a form of privacy, but since you’re looking for some important files, it is important to enable this feature, who knows, maybe the file(s) you are looking for were mistakenly saved as “hidden files.”
On Windows
- Open File Explorer and navigate to the “View” tab
- Look for the “Hidden Files” box and check it
- All hidden files will now be shown on any directory or folder you open.
On macOS
- Open the folder where the picture files were previously saved and press Cmd + Shift + . (dot). Pressing down these keys at a go will show you the hidden files in the current folder you’re viewing.
4. Using Command Prompt (PowerShell)
A lot of actions can be done via the command line terminal on Windows and macOS computers.
On Windows
- Right-click on the Start icon and select Windows PowerShell (Admin)
- First, run this Check Disk command: chkdsk E: /f (remember to replace E with your main drive’s drive letter)
- Press Y until the command line reappears
- Retype your main drive’s drive letter and hit Enter
- Now, run this command: attrib -h -r -s /s /d E:*.* (replace E with the actual drive letter for your main hard drive)
- Go back and check if the files have been restored.
On Mac
- Launch the macOS Terminal app and run this command: cd .Trash
- Hit Return
- Run this command replacing “filename” and “Destination Folder” with the information: mv Filename “destination folder”
- Hit Enter
- Close the Terminal after the command executes successfully
- Open Finder and search for the file; if it was recovered, drag it to your preferred location.
5. Use a Professional Photo Recovery Software
Again, if the methods explained above did not work for you, look for a professional third-party solution. There are a number of software apps that can allow you to recover photo files from Windows and macOS computers. DiskInternals Uneraser is a professional data recovery software that supports various file formats, including image formats like JPG, PNG, and others.
How to Recover Deleted Images From External or USB Drives
Of course, many people use external drives as their backup storage, so they save a copy of their important files on those external/USB drives. But, as long as data storage is concerned, data loss is almost inevitable. In essence, your files can go missing from the external drive or USB flash storage device.
If you were saving your pictures and client photos on an external hard drive or USB device only to discover that the files are no longer on the drive, don’t panic; you can retrieve them easily – you only need a superior photo recovery solution, and the DiskInternals Uneraser fits perfectly for the need.
1. Get a Reliable Data Recovery Software
DiskInternals Uneraser is a professional data recovery software that supports various file formats, including image formats like JPG, PNG, and others. This software runs on all Windows OS versions and packs a ton of handful features for effective and efficient data recovery.
Step 1.Download DiskInternals Uneraser.
Step 2.Run the program and press the Next button until installation is done.

Step 3.Open DiskInternals Uneraser and left-click the wizard icon. Press Next.
Step 4.On the screen, you will see all the storage devices that are on your computer (hard disk, USB, SD card, etc.). Left-click the disk that contained the deleted photo. Click Next.
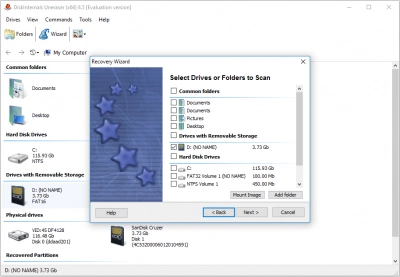
Step 5.Select the type of file you want to restore. These can be BMP, GIF, PSD, CRW, CR2, NEF, JPG / JPEG, TIFF / TIF, PNG, ORF, RAF, and others.
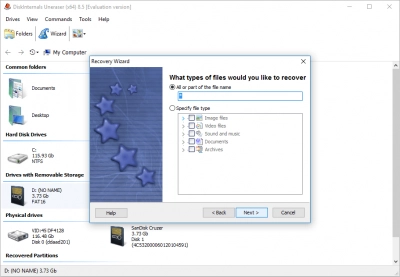
Step 6.Scan the disk. DiskInternals Uneraser offers two scan options: fast and full. Select the desired scan option with the left mouse button.
Step 7.After a while, you will see files that can be recovered. They will be marked with a red cross in the upper left-hand corner.

Step 8.Preview. Select the photo you want to check and right-click "Preview in a new window" or press the Ctrl + P hotkeys. Now you know for sure that you can restore the photo. The process to restore deleted pictures and images is automatic.
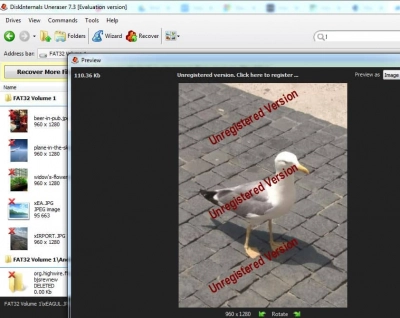
Step 9. To save the found files, you just need to purchase a license and enter the license key. Save the photo in a safe place, different from an original. That will make sure your photos are protected from overwriting.
2. Recover from Backups
Mainly, external drives are used as backup drives, but if you’ve got another backup drive to where you still copy your files to, check that backup drive and recover from there. Also, check your computer’s main drive to see if the pictures files are on your local storage.
How to Recover Deleted Photos from a Digital Camera
Is it possible to recover images from a digital camera? Yes, it is very possible. Most high-end cameras have a Bin folder where you can find recently deleted images. But, if you can’t find the images you seek in the bin folder, remove the memory card on the camera and put it into a computer system using a card reader, then use a data recovery software to search for the files.
Well, if you wouldn’t want to remove the SD card, you can connect the camera directly to your computer as you’d connect an external HDD or flash drive, then scan the storage using a data recovery software to retrieve the lost image files. The procedures for these actions have been discussed earlier in this article. DiskInternals Uneraser can help in this situation too.
Conclusion
This article carefully detailed every possible means of recovering deleted photos and images from a wide variety of devices. It doesn’t matter how the pictures were lost; you can get them back through any of the many methods discussed here.
Mainly, there are built-in tools on Windows and macOS computers that can help with data recovery attempts without you installing any new third-party app, but in most cases, using a third-party data recovery software is what guarantees a higher successful recovery possibility.
FAQ
How to restore permanently deleted photos on Windows 10?
1. Open the Start menu.
2. Type “restore files” and hit Enter on your keyboard.
3. Look for the folder where you deleted files were stored.
4. Select the “Restore” button in the middle to undelete Windows 10 files to their original location.
How to recover permanently deleted photos on macOS?
In the Photos app on your Mac, click Recently Deleted in the sidebar. If the Recently Deleted album is locked, use Touch ID or enter your password to unlock it. Select the items you want to restore. Click Recover.
Can I restore deleted pictures from my Android phone?
If you deleted an item and want it back, check your trash to see if it's there. Touch and hold the photo or video you want to restore. At the bottom, tap Restore.
How to recover permanently deleted photos on Windows 11?
1. Where do deleted files go on Windows 11?
2. Find the Recycle Bin icon on your desktop.
3. Right-click Recycle Bin and select "Open".
4. Find the files you want to restore.
5. Right-click the file and choose "Restore" to recover the deleted file to its original location.
How to recover permanently deleted photos from an iPod?
1. Tap Albums, then tap Recently Deleted under Utilities.
2. Tap Select, then choose the photos and videos you want to recover or delete.
3. Choose Recover or Delete at the bottom of the screen.
How to recover deleted photos on Chromebook?
Open your Chromebook's Trash, right-click the file/folder you want to restore, and select Restore from trash. Alternatively, select the file(s) and press Alt + Backspace. ChromeOS will restore the item to its original location in your local storage.
How can I recover permanently deleted photos?
Use DiskInternals Uneraser. DiskInternals Uneraser is a professional data recovery software that supports various file formats, including image formats like JPG, PNG, and others. This software runs on all Windows OS versions and packs a ton of handful features for effective and efficient data recovery.

