ESXI to format hard drive
Backup VMware ESXi Server and with DiskInternals. Then create a new datastore for VMware ESXi, you may need to delete partitions from the storage device. I outline three GUI-based techniques for partition removal in VMware ESXi 6 in this post.
The following error message might have shown if you attempted to build a new datastore: The argument was presented incorrectly:
Vim.Host.DiskPartitionInfo.spec - Call "HostDatastoreSystem.QueryVmfsDatastoreCreateOptions" for object "storageSystem…"
If a partition already exists on the storage media, you cannot create a VMFS-formatted datastore.
Tip: Learn more about VMDK file format here!Partitions could not be easily deleted in earlier versions. It wasn't always easy to do this; to clear the partitions, one had to use the CLI and input commands. If you simply had a few hosts to manage, deleting old partitions wasn't too challenging, but you would still need to install a vMA or utilize a command-line Putty session (VMware vSphere Management assistant).
The required command has the following format:
partedUtil delete "/vmfs/devices/disks/DeviceName" PartitionNumber
partedUtil delete "/vmfs/devices/disks/mpx.vmhba0:C0:T0:L0" 2
Utilizing the command terminal won't be enjoyable for VMware beginners. There is another another error in these directions. If you accidentally choose the wrong volume, there is no going back; all of your data will be gone.
When using a GUI, there are three faster ways to wipe existing partitions. But, at first, let’s take a look at adding a new local disk to ESXi and formatting it with VMFS.
Add a new disk to ESXi and format it with VMFS
On an ESXi 5x server, do you need to install a drive and format it as VMFS? Using the ESXi CLI, you may achieve it in this way. Once ssh has been enabled on the ESXi host in vCenter, log in as root using xterm or putty. This was finished on an HP DL360.
1) First, locate your disks
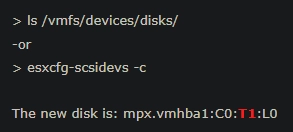
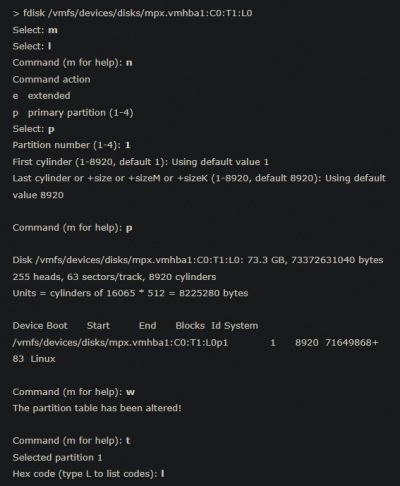
2. Create a partition
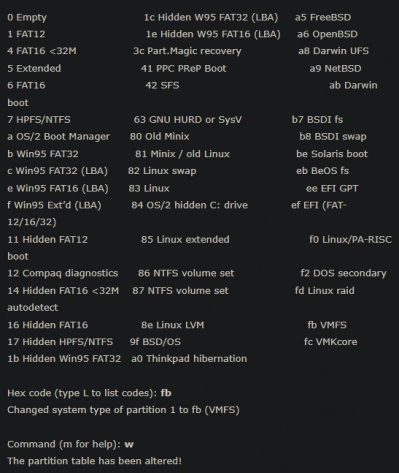
3. Create the filesystem
Delete partitions using GUI
1) Try GParted ISO
Administrators can use the application Diskparted as a workaround. To format the local drives before starting the ESXi hypervisor, you can mount an ISO and boot the host from it. To remotely manage your host, use IPMI (Intelligent Platform Administration Interface) or a Dell Remote Access Card (DRAC).
This method's drawback is that it requires three restarts: the host, the partitions that need to be erased, and the host again. On gparted.org, the Gparted Live CD may be purchased.
2) Use HTML 5 web client
A few months back, VMware unveiled a brand-new web client that comes with ESXi. An HTML 5 client is essentially an HTML 5 web client, also referred to as this VMware Fling. Remember that because the HTML5 online client is still in its early stages, not all of the functionality previously provided by the Windows client or the vSphere web client (a Flash-based client) is yet enabled.
However, the precise ability to remove partitions that we need in this situation is already there. Simply go to the VMware Labs website and download the latest recent HTML 5 client. The new version must then be installed once the old one has been deleted. You may connect to the ESXi computer using the https://IP_of_ESXI/UI
Partitions must be eliminated using the following procedures:
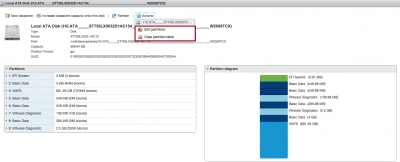
Select Storage > Devices > Actions button > Clean Partition Table
3) vSphere web client
Making sure that all data and existing partitions have been entirely removed is one of the major obstacles when attempting to recycle obsolete storage devices. Customers frequently use third-party applications like GParted, thus your server must boot into the LiveCD before you may delete any existing partitions. This is not the ideal scenario, especially if you have to perform this task across many platforms.
A new UI option was added to the vSphere Web Client with the release of vSphere 6.0 Update 1 to assist customers who want to use their current storage devices for VSAN and other reasons. I decided to provide some information because past clients have desired this functionality and I have not yet heard anybody discuss it. As seen in the image below, you may access this new feature by selecting Manage->Storage Adapters, then selecting the particular storage device you want to get rid of (icon with disk and eraser).
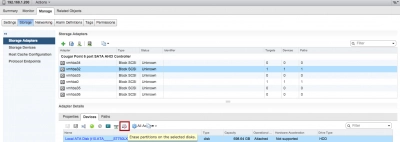
After choosing the "Erase Partition" button or action, you will first view a list of the disk's present partitions, and you will then be asked to confirm your choice to delete EVERY partition.
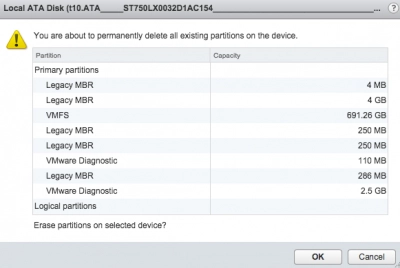
If everything works as planned, you are free to utilize the storage device for any other purpose, including VSAN!
For those of you who are interested in automation, this UI function truly makes use of the updateDiskPartitions() method found in the StorageSystem management of an ESXi host. This function has long been accessible. Just give an empty spec to the API request to completely delete all partitions.
Additionally, I want to quickly add that a future edition of the ESXi Embedded Host Client Fling will allow you to edit and remove disk partitions. A short screenshot of what it might seem like is shown below.
