How to Install Kali Linux on VirtualBox
Here you will find out:
- Kali benefits on VirtualBox
- how to install Kali Linux Virtualbox
- when DiskInternals can help you
Are you ready? Let's read!
How to install Kali Linux on Virtualbox?
The Linux operating system Based on Debian, Kali Linux is developed for penetration testing. One of the best operating systems for security testing, it comes with over 600 preloaded penetration-testing apps. Kali works best when set up on VirtualBox as a virtual computer for security testing.
Kali uses a rolling release methodology to ensure that you have the most up-to-date tools on your machine. In addition, there is an active user community that provides continuing assistance.
This guide will teach you how to install Kali Linux on VirtualBox step by step.
Prerequisites
- At least 20 GB of disk space
- At least 1 GB of RAM (preferably 2) for i386 and amd64 architectures
- VirtualBox (or alternative virtualization software)
Steps For Installing Kali Linux on VirtualBox
You must have a virtual environment set up on your PC because these instructions take you through the installation procedure in one. We'll be utilizing VirtualBox in this tutorial since it's an easy-to-use, open-source virtualization solution.
So, how to install Kali Linux in Virtualbox?
Step 1: Download Kali Linux ISO Image
Kali Linux.iso images may be found in the downloads section of the official Kali Linux website. Every few months, these photos are updated to reflect the most recent official releases.
Find the packages available for download on the Kali Linux Downloads page. Download the 64-Bit or 32-Bit version, depending on your setup.
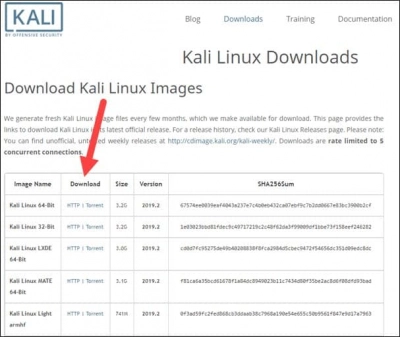
Step 2: Create Container for Kali Linux in Virtual Machine
The next step of Kali Linux installation Virtualbox is to create a new virtual machine and import Kali as the operating system after downloading the.iso image.
- 1. Open VirtualBox Manager and select New from the menu.
- 2. Your name and the operating system you're using. A pop-up box displays with instructions for building a new virtual machine. Give the file a name and a location. Based on the name you enter, the Type and Version update automatically. Click Next after double-checking that the information matches the package you downloaded.
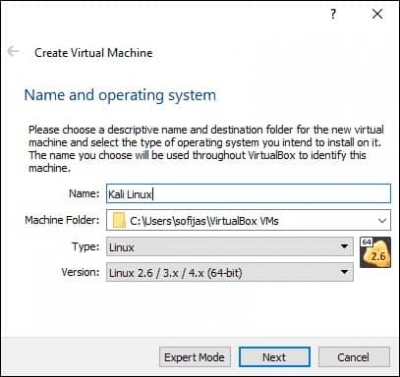
- 3. The amount of memory. Select the amount of RAM to provide the virtual machine and then click Next. For Linux, the default option is 1024 MB. This, however, varies based on your specific requirements.
- 4. A hard drive. For the new VM, the default choice is to construct a virtual hard disk. To continue, click Create. You may also choose to use an existing virtual hard drive file or not add one at all.
- 5. The type of file on a hard drive. For the new virtual hard disk, VDI, stick to the default file type (VirtualBox Disk Image). To continue, click Next.
- 6. Physical hard disk storage. Choose between Dynamically allocated and Fixed size allocations. The first option permits the new hard drive to expand and fill the available space. The second, fixed size, starts with the maximum capacity. Next should be selected.
- 7. File size and placement. Give the virtual hard drive a name and a location to save it. Set the maximum amount of file data that the VM can store on the hard drive. We recommend providing it at least 8 GB of space. To complete, click Create.
Now you created a new VM. The VM appears on the list in the VirtualBox Manager.
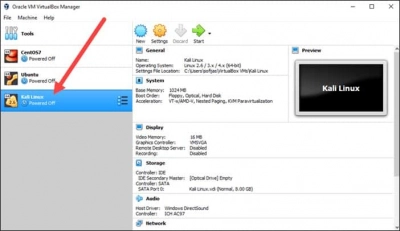
Step 3: Configure Kali Linux Mirtual Machines Settings
The default virtual machine parameters must be adjusted next.
- 1. Click the Settings button next to a virtual machine. Make sure you've selected the correct VM and that the Kali Linux information are displayed on the right-hand side.
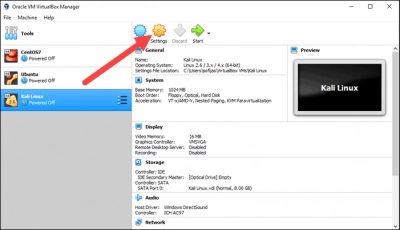
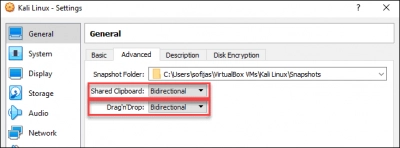
- 2. Go to the General > Advanced tab in the Kali Linux – Settings box. Change the settings for the Shared Clipboard and Drag'n'Drop to Bidirectional. You may copy and paste between the host and guest machines using this capability.
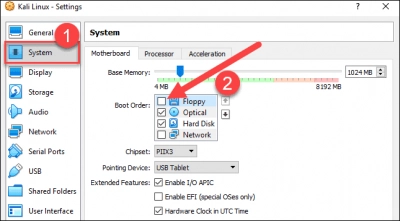
- 3. Select Motherboard from the System menu. Set the boot order to Optical, Hard Disk, Optical, Hard Disk, Optical, Hard Disk, Optical, Hard Disk, Optical, Floppy should be unchecked since it isn't required.
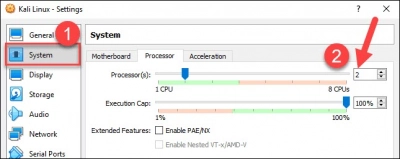
- 4. In the same window, go to the Processor tab. To improve performance, increase the number of processors to two (2).
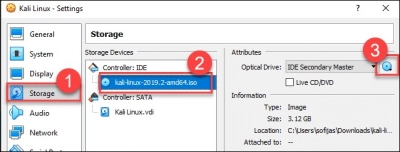
- 5. Finally, go to the Storage settings page. Under Controller: IDE, save the downloaded Kali image to a storage device. To find the image, click the disk symbol. Close the Settings window when you're done.
- 6. Click the Start icon to begin installing Kali.

Step 4: Installing and Setting Up Kali Linux
A new VM VirtualBox window with the Kali welcome screen displays after you launched the installation menu by selecting Start.
To install Kali Linux in VirtualBox, choose the Graphical install option and follow the installation procedures below.
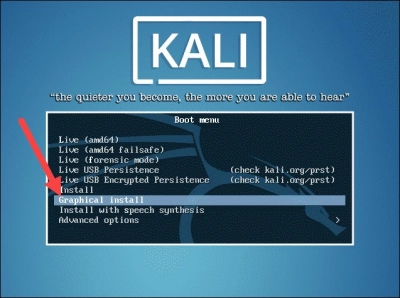
1. Decide on a language to use. Select the system's default language (which will also be the language used during the installation process).
2. Decide on a site. Choose your nation from the drop-down menu (or "other").
3. Set up the keyboard. Choose a keymap to use. In most circumstances, choosing American English is the best option.
4. Set up the network. To begin, give the system a name and click Continue.
5. Create a domain name next (the part of your internet address after your hostname). The most common domain endings are.com,.net,.edu, and so forth. Ensure that all of your machines have the same domain name.
6. Create user accounts and passwords. For the system administrator account, create a strong root password.
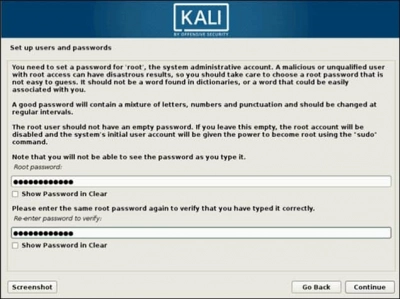
7. Set up the clock. Choose your time zone from the drop-down menu.
8. Disk partitions Choose how you want to partition the hard drive. Unless there's a compelling need to do it manually, choose Guided –use whole disk.
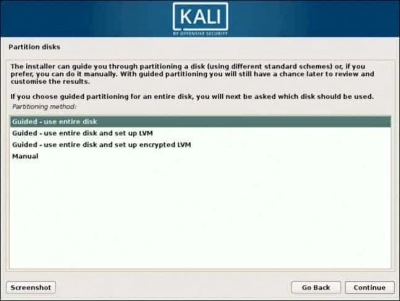
9. After that, choose the disk you wish to partition. You don't have to worry about data loss because you constructed a single virtual hard disk in Step 3: Adjust VM Settings. SCSI3 (0,0,0) (sda) – 68.7 GB ATA VBOK HARDDISK is the only choice available (the details after the dash vary depending on your virtualization software).
10. Next, choose a partitioning strategy. Choose All files in one partition if you are a new user.
11. The wizard displays a summary of the partitions that have been set. Navigate to Finish partitioning and write changes to disk to continue. Click Continue and then Yes to confirm.
12. The wizard begins the installation of Kali. Additional setup settings show while the installation bar loads.
13. Set up your package management. Choose whether or not to utilize a network mirror, then click Next. If you're using an HTTP proxy, fill in the proxy information. Otherwise, click Continue and leave the entry blank.
14. Download and install the GRUB boot loader on a hard drive. Continue by selecting Yes. Then, to confirm that the newly installed system can be booted, choose a boot loader device.
15. When you get the message, When the installation is finished, click Continue to reboot your virtual machine.
You've now completed the installation of Kali Linux on VirtualBox. The Kali login screen displays after restarting. Fill in your username (root) and password from the previous stages.
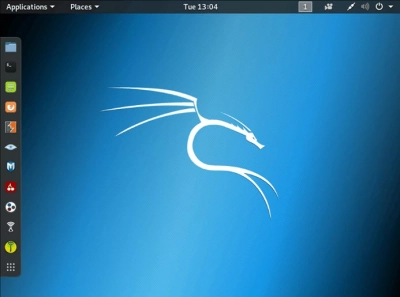
Finally, the Kali Linux interface displays on your screen. This is how to install Kali Linux in VMware.
Need to install Kali Linux VMware? Use VMFS Recovery for VM data safety
If there is something wrong with your virtual machine (if .vmdk files are missing or deleted), you can restore them and rebuild the virtual machine using DiskInternals VMFS Recovery.
The application immediately recovers VMFS disks stored on damaged or inaccessible hard drives. Every step of the process is supported by the Recovery Wizard, so it's unrealistic to make a mistake when recovering data. Virtual disks can be mounted as local disks, and are accessible from Windows Explorer. All Windows restrictions are bypassed by the VDI recovery process. When you view the recovered data for free and make sure it is in place, purchase a license to access files or export selected files. It doesn't take long, and the result will pleasantly surprise you.
In addition, by purchasing a license, you receive not only the ability to do unlimited exports, but also round-the-clock and year-round technical assistance from the company.
Conclusion
You've now learned how to install Kali Linux in VirtualBox using this method. We also went through how to get started with penetration and security testing by setting up and configuring everything.
