
How to work with VMware snapshot: best practices
Here you will find out:
- what are VMware snapshots
- tips of correct VMware snapshots usage
- when DiskInternals can help you
Are you ready? Let's read!
Introduction to VMware Snapshots
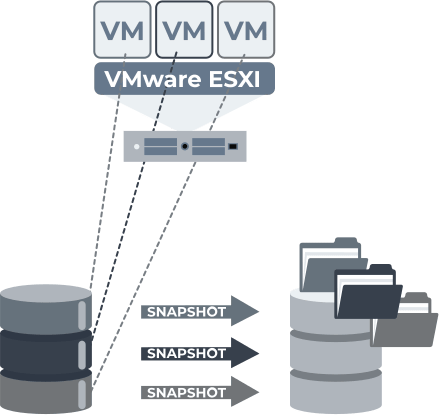
What is VM snapshot? Snapshots are an essential feature in VMware environments, allowing administrators to capture the state of a virtual machine (VM) at a specific point in time. This powerful tool provides a fast and convenient way to revert VMs to previous states, whether for testing configurations, patching, or as a precautionary measure before performing risky operations.
Overview of VMware Snapshots
VMware snapshots store the VM’s entire state, including disk data, memory, and configuration. Unlike backups, which are long-term solutions, snapshots are meant to be temporary and lightweight, serving as a short-term safety net during system changes. Understanding how snapshots work and their impact on your environment is key to leveraging their full potential.
When and Why to Use Snapshots
Snapshots are invaluable for testing, troubleshooting, and ensuring system stability. They provide a fallback point when rolling out updates, making system changes, or experimenting with new software. However, improper use or prolonged reliance on snapshots can lead to performance degradation and increased storage consumption. Knowing the best scenarios for using snapshots—and when to avoid them—helps maximize performance and optimize storage efficiency in your VMware environment.
Tip: VM snapshot vs backupKey Considerations Before Taking a VMware Snapshot
While VMware snapshots offer a convenient way to manage virtual environments, they are not without their complexities. Before utilizing snapshots, it’s essential to consider their impact on both performance and storage, as well as the limitations surrounding their use. Proper planning and management of snapshots can help prevent common pitfalls like performance degradation or excessive disk usage, ensuring your VMware environment operates efficiently.
Impact on Performance
Taking a snapshot creates a new file that stores any changes made to the virtual machine from that point forward. As these changes accumulate, the system must track and manage them, which can result in additional overhead. Each snapshot introduces a layer that the hypervisor has to read and write through, potentially leading to slower disk I/O operations, longer response times, and increased CPU usage. Over time, these performance hits can become more pronounced, particularly in VMs that handle a high volume of read/write operations or run resource-intensive applications.
Leaving snapshots active for too long compounds these issues, as the snapshot file grows larger and requires more processing power to maintain. It’s advisable to only use snapshots for short-term needs, such as before performing software updates or testing new configurations, and to delete or consolidate them as soon as their purpose has been fulfilled. Regular monitoring of VM performance when snapshots are active can help administrators detect early signs of performance impact and take corrective action.
Snapshot Disk Space Consumption
Snapshots consume additional storage space by capturing the changes made to the VM since the snapshot was taken. This space consumption can escalate quickly in environments with heavy disk writes, as every block that changes after the snapshot must be recorded. For example, if the VM is running database applications or other high-write workloads, snapshot files can grow large, fast. If left unchecked, this can lead to disk space exhaustion, potentially causing VM failures or degraded performance across the environment.
In addition to the direct disk space used by snapshots, their existence can also complicate storage management tasks, such as backups and replication. Snapshots can interfere with these processes, making them less efficient and, in some cases, requiring more storage for backups than necessary. For this reason, it is critical to limit the number of snapshots taken, regularly monitor their size, and ensure they are deleted once no longer needed.
Maximum Number of Snapshots: What to Know
VMware allows administrators to take multiple snapshots of a VM, which can be useful for tracking different stages of development or configuration changes. However, the platform has a practical limit for how many snapshots can be effectively managed without negatively impacting system stability. While the theoretical maximum number of snapshots is 32, VMware recommends using far fewer—typically no more than 2 to 3 active snapshots at a time. Each additional snapshot introduces more overhead, and too many can cause system instability, slow performance, and increased complexity when reverting or consolidating snapshots.
Exceeding these recommended limits can make it difficult to revert changes or consolidate the VM’s data, increasing the risk of errors or corruption. Additionally, having too many snapshots increases the administrative burden of tracking their status and deciding which ones to keep or remove. By keeping the number of snapshots low and managing them proactively, administrators can avoid common problems while ensuring snapshots remain a useful tool rather than a liability.
Tip: how to install VMware tools on UbuntuCreating a VMware Snapshot: Step-by-Step Guide
Taking a VMware snapshot is a straightforward process, but it requires careful preparation to ensure that it is done correctly. This section will walk you through the key steps to create a snapshot, from preparing your virtual machine to verifying that the snapshot was successful.
Preparing the Virtual Machine
Before creating a snapshot, it’s essential to ensure the virtual machine (VM) is in a stable state. Here are some preparatory steps to follow:
- 1. Verify VM Performance: Ensure the VM is functioning properly, with no ongoing performance issues or heavy workloads that might affect the snapshot process.
- 2. Quiesce the Filesystem (if applicable): For VMs running critical applications or databases, it’s recommended to quiesce the filesystem. This ensures that the data is consistent and no files are being written to disk at the moment the snapshot is taken. VMware Tools can be used to perform this task.
- 3. Ensure Sufficient Disk Space: Make sure there is enough available disk space on the datastore to accommodate the snapshot, as it will consume additional storage for every change made to the VM after the snapshot is taken.
- 4. Pause Intensive Applications: If the VM is running applications with high disk I/O or CPU usage, consider pausing these tasks temporarily to avoid interference with the snapshot process.
The Snapshot Process Explained
Once the VM is prepared, follow these steps to create a snapshot:
1. Open the VMware vSphere Client: Log in to the vSphere Client and navigate to the VM you want to snapshot.
2. Select the VM: Right-click on the virtual machine’s name in the inventory and select Snapshots from the context menu, then click Take Snapshot.
3. Configure Snapshot Options:
- A dialog box will appear. Enter a Name for the snapshot that describes the purpose or current state of the VM.
- Add a Description to provide further context for the snapshot, such as “Before patch update” or “Pre-upgrade state.”
- You can choose whether to capture the VM’s memory by selecting the Snapshot the virtual machine's memory option. Keep in mind that capturing memory will increase the size of the snapshot but allows you to restore the VM to its exact running state.
- If your VM requires application consistency, check the Quiesce guest file system option to pause I/O operations during the snapshot process (requires VMware Tools installed on the VM).
4. Initiate the Snapshot: Once you’ve configured the snapshot settings, click OK to initiate the snapshot process. VMware will begin capturing the state of the VM.
5. Monitor Progress: The snapshot creation process will start, and you can monitor its progress in the Tasks and Events tab of the vSphere Client. Depending on the size of the VM and the snapshot options selected, this process could take a few seconds to a few minutes.
Verifying Successful Snapshot Creation
Once the snapshot has been created, it’s important to verify that it was successful and the VM is functioning as expected:
- 1. Check Snapshot Status: Go to the Snapshots tab under the VM in the vSphere Client to confirm that the snapshot appears in the list. The newly created snapshot should display with the name and description you provided.
- 2. Validate VM Health: Ensure the virtual machine is still operational and performing normally. Check for any unusual behavior, such as performance degradation or errors, that may indicate issues with the snapshot process.
- 3. Test Reversion (Optional): If desired, you can test the snapshot by reverting the VM to the newly created snapshot to confirm that the VM returns to its exact state as intended. This step is optional but can be useful in environments where the reliability of snapshots is critical.
- 4. Consolidation Check: After verifying that the snapshot is functioning correctly, check if the snapshot requires consolidation. Large or complex environments sometimes generate excess delta files that need to be consolidated. You can do this by selecting the Consolidate option in the Snapshots menu if necessary.
Best Practices for Managing VMware Snapshots
Effectively managing VMware snapshots is critical to maintaining performance and preventing unnecessary storage consumption. Improper snapshot management can lead to degraded VM performance, storage shortages, and increased administrative overhead. Following best practices for retention, limiting active snapshots, and regular maintenance will help ensure that your VMware environment remains efficient and stable.
Snapshot Retention: How Long is Too Long?
VMware snapshots are designed to be temporary solutions for short-term tasks, such as testing, updates, or backups. Retaining snapshots for extended periods can cause significant performance issues and increase storage consumption. As snapshots grow, the VM must work harder to manage the delta files, which track changes since the snapshot was taken. This additional processing can negatively impact performance, particularly in VMs that perform heavy write operations.
Best Practice:
- Short-Term Use: Only keep snapshots for as long as necessary to complete a task, typically no more than a few days or weeks, depending on the complexity of the environment.
- Monitor Growth: Regularly monitor the size of snapshots and avoid letting them grow too large, which can risk filling up the datastore and negatively affect VM performance.
If a snapshot is needed for longer-term use, consider alternatives like creating a backup or cloning the VM instead. These methods are more suited for long-term storage and do not carry the same performance risks as snapshots.
Limiting the Number of Active Snapshots
Although VMware allows multiple snapshots to be taken for a VM, having too many active snapshots can lead to system instability and decreased performance. Each snapshot introduces a new layer of data that the system must track, adding overhead to disk operations. Additionally, managing multiple snapshots can complicate the process of reverting or consolidating the VM, increasing the likelihood of errors or data loss.
Best Practice:
- Limit Snapshots to 2-3 Active Ones: For optimal performance, aim to keep no more than two or three snapshots per VM at any given time. This ensures that the system can efficiently manage changes and reduces the complexity of managing snapshots.
- Organize Snapshot Usage: Develop a naming convention and snapshot schedule that clearly outlines the purpose of each snapshot, so they can be easily identified and deleted once no longer needed.
By limiting the number of active snapshots, you minimize the risk of performance issues and ensure that your VMware environment remains manageable.
Regular Maintenance: Deleting Unused Snapshots
Snapshots can easily be forgotten, especially in environments where multiple users or administrators are involved in managing virtual machines. Over time, unused or obsolete snapshots can accumulate, consuming valuable storage space and creating unnecessary strain on system resources. Regularly cleaning up old or unused snapshots is essential to maintaining optimal performance and preventing storage issues.
Best Practice:
- Set a Maintenance Schedule: Establish a regular maintenance routine to review and delete unused snapshots. This could be weekly or monthly, depending on the size and activity level of your virtual environment.
- Automated Alerts: Configure automated alerts in VMware to notify you when snapshots exceed a certain age or size, ensuring that old snapshots don’t linger unnoticed.
- Consolidation of Snapshots: After deleting old snapshots, ensure that VM disks are properly consolidated to merge delta files with the base disk. This helps prevent disk bloat and ensures the VM operates efficiently.
By proactively deleting unused snapshots and consolidating VM data, you prevent storage shortages and keep your VMware environment running smoothly.
Ready to get your data back?
Need to restore VM? To start VMware data recovery, press the FREE DOWNLOAD button below to get the latest version of DiskInternals VMFS Recovery® and begin the step-by-step recovery process. You can preview all recovered files absolutely for FREE. To check the current prices, please press the Get Prices button. If you need any assistance, please feel free to contact Technical Support. The team is here to help you get your data back!
VMware Snapshot Performance Impact: What You Need to Know
Snapshots are a powerful feature within VMware, but they can have a significant impact on the performance of your virtual machines (VMs) if not managed carefully. Understanding how snapshots affect performance and implementing strategies to mitigate potential issues is crucial to maintaining a healthy virtual environment.
How Snapshots Affect VM Performance
VMware snapshots are designed to capture the state of a VM at a given moment, allowing administrators to revert to that state if needed. However, when a snapshot is taken, the VM continues to operate on a separate delta file that tracks changes, while the original virtual disk (VMDK) remains static. Over time, as the delta file grows, the system must manage an increasing amount of data, which can degrade VM performance.
Here’s how snapshots can negatively impact VM performance:
- 1. Increased Disk I/O Latency: As more data changes and is written to the delta file, the system needs to process both the base disk and the delta disk, leading to increased disk read and write latency. The more snapshots a VM has, the more layers of data the system must manage, further slowing down performance.
- 2. Slower VM Operations: Snapshots require the hypervisor to track and manage changes in real-time, adding overhead to every operation the VM performs. This can result in slower response times for applications and prolonged execution of tasks.
- 3. Snapshot File Growth: The longer a snapshot is active, the larger the delta file becomes. If left unchecked, this can lead to high disk usage, which in turn can slow down the VM as it struggles to manage large amounts of data across multiple files.
- 4. Backup and Restore Delays: Snapshots increase the complexity of backup and restore processes, as each additional snapshot requires the system to track more data. This can cause backups to take longer, particularly when dealing with large or complex VMs.
Mitigating Performance Issues: Practical Tips
While snapshots can have an impact on VM performance, there are several strategies you can implement to mitigate these issues and optimize your environment.
- 1. Limit the Duration of Snapshots: Snapshots are intended to be a short-term solution for system changes or testing. Aim to delete snapshots as soon as they are no longer needed. The longer a snapshot is kept, the larger the delta file grows, which amplifies performance issues. Regularly review and clean up snapshots to minimize their impact.
- 2. Avoid Stacking Multiple Snapshots: Keep the number of active snapshots to a minimum, ideally no more than two or three at a time. Each additional snapshot adds another layer of complexity and can significantly increase disk I/O latency. Consolidating snapshots frequently helps reduce the performance load on the VM.
- 3. Use Snapshot Tools Carefully: If your VM has a high workload or requires consistent data, consider using quiesced snapshots with VMware Tools. Quiescing pauses I/O during the snapshot process, reducing the risk of performance issues, particularly for VMs running critical applications like databases.
- 4. Monitor Snapshot Growth: Regularly monitor your snapshots and their associated delta files. Large delta files can consume substantial disk space and slow down the VM. Use built-in VMware tools or third-party monitoring software to keep an eye on the size and impact of snapshots in real time.
- 5. Consolidate Snapshots: After deleting a snapshot, make sure to consolidate the VM’s disks to merge the delta file with the base disk. Failing to consolidate can leave fragmented delta files, further slowing down the system. Consolidation should be done promptly after snapshot deletion to maintain optimal VM performance.
- 6. Allocate Sufficient Disk Space: Ensure that your datastore has sufficient disk space to accommodate the growing delta files. Running out of disk space due to uncontrolled snapshot growth can lead to VM crashes or other system failures. Proactively managing disk space helps prevent these issues.
- 7. Automated Snapshot Policies: Consider setting up automated policies to manage snapshot creation and deletion. This can help prevent snapshots from remaining active for too long and becoming a burden on your system. Automated tools can also notify you when snapshots exceed a certain age or size, allowing for timely intervention.
Snapshot Consolidation: Keeping Storage Under Control
Snapshots are a valuable tool in VMware, but their use can lead to storage inefficiencies if not properly managed. Consolidation is the process that merges snapshot data back into the base disk, ensuring that your storage remains organized and efficient. Understanding when and how to perform consolidation is critical to maintaining a healthy VMware environment.
What is Snapshot Consolidation?
Snapshot consolidation is the process of merging the changes recorded in snapshot delta files back into the original virtual disk (VMDK). Each time a snapshot is taken, VMware creates a delta file that stores all changes made to the VM after the snapshot was created. Over time, these delta files grow, consuming more and more disk space. If a snapshot is deleted but not properly consolidated, the VM continues to rely on fragmented delta files, which can lead to performance degradation and storage issues.
Consolidation ensures that all data recorded in these delta files is written back to the base disk, cleaning up the VM’s disk structure and freeing up storage space. It is especially important after deleting old or unused snapshots, as failing to consolidate can leave orphaned delta files that consume unnecessary resources.
Tip: fix VMDK corruption with ease!When and How to Perform Consolidation
Snapshot consolidation should be performed regularly as part of your routine VMware maintenance. Here are the key scenarios where consolidation is necessary:
- 1. After Deleting a Snapshot: Whenever a snapshot is deleted, it’s crucial to consolidate the VM’s disks to merge the changes back into the base disk. Failing to do so can lead to orphaned delta files that continue to consume disk space and impact performance.
- 2. When Snapshots Become Large: If snapshots are kept for too long, their associated delta files can become large, making the consolidation process more difficult. In such cases, perform consolidation to ensure the VM’s disk structure remains optimized and storage is not wasted on outdated delta files.
- 3. After a Failed Snapshot Deletion: Sometimes, deleting a snapshot may fail due to issues like insufficient disk space or system errors. In such cases, performing consolidation can help resolve these issues by merging the delta files and cleaning up the disk.
Steps to Perform Consolidation:
- 1. Check the VM’s Snapshot Status: In the vSphere Client, navigate to the virtual machine and check the Snapshots tab to see if there are any active snapshots or if consolidation is required.
- 2. Initiate Consolidation: If consolidation is necessary, right-click on the virtual machine and select Snapshot > Consolidate. This action will merge the snapshot delta files back into the base disk.
- 3. Monitor the Process: Depending on the size of the snapshots and the activity on the VM, consolidation can take anywhere from a few minutes to several hours. You can monitor the consolidation progress in the Tasks and Events tab in the vSphere Client.
- 4. Verify Disk Status: Once consolidation is complete, verify that the VM’s disk status is healthy and that there are no remaining snapshot files consuming extra space.
Avoiding Common Consolidation Pitfalls
While snapshot consolidation is generally straightforward, there are a few common pitfalls that administrators should be aware of to avoid issues:
- 1. Insufficient Disk Space: Consolidation requires additional disk space to merge the delta files with the base disk. If your datastore is running low on space, the consolidation process may fail. Always ensure that you have enough free space on the datastore before starting consolidation.
- 2. Long Consolidation Times: For VMs with large snapshots, the consolidation process can take a long time, especially if the VM is actively running and generating additional changes. To mitigate this, consider performing consolidation during periods of low activity or when the VM can be temporarily paused.
- 3. Avoiding Multiple Consolidations at Once: Attempting to consolidate multiple VMs at the same time can put a heavy load on the storage system, potentially causing performance issues across the environment. It’s best to consolidate VMs one at a time, particularly if they have large or numerous snapshots.
- 4. Failure to Consolidate After Deleting Snapshots: A common mistake is assuming that deleting a snapshot automatically consolidates the VM’s disk. While some snapshots are automatically consolidated upon deletion, others may require manual intervention. Always verify that consolidation has been completed after deleting snapshots.
- 5. Avoiding Fragmented Snapshots: Regular consolidation helps prevent fragmentation in the VM’s disk structure. Fragmented snapshots, where delta files are scattered across the datastore, can cause performance problems and make future consolidations more difficult.
Automating Snapshot Management
Manually managing VMware snapshots can become time-consuming, especially in larger environments with many virtual machines. Automating snapshot management is a key strategy to streamline operations, reduce human error, and ensure your virtual infrastructure remains efficient and well-maintained. By leveraging VMware tools and scheduling strategies, you can automate the creation, deletion, and consolidation of snapshots, saving time while optimizing performance and storage.
Using VMware Tools to Automate Snapshot Tasks
VMware offers several built-in tools and features that allow administrators to automate snapshot management, reducing the need for manual intervention and ensuring snapshots are created and maintained in a controlled manner.
1. VMware vCenter Alarms:
- VMware vCenter comes with a robust alarm system that can monitor various aspects of snapshot management, such as the age or size of snapshots. You can set up alarms to automatically notify you when snapshots exceed predefined limits, ensuring that snapshots do not linger longer than necessary.
- Automated Actions: These alarms can be configured to automatically trigger actions, such as deleting old snapshots or consolidating disks when certain conditions are met.
2. PowerCLI Automation:
- PowerCLI, VMware’s command-line interface for automating tasks, provides extensive control over snapshots. Administrators can create scripts to automate tasks like snapshot creation, deletion, and consolidation.
- Examples of Tasks: Scripts can be scheduled to run periodically, ensuring that snapshots are taken before system updates or testing, and automatically removed after a set period. PowerCLI also allows you to automate the consolidation of snapshots to optimize storage usage.
- Custom Workflows: With PowerCLI, you can create custom workflows to handle more complex snapshot management tasks, such as automated snapshot rotations, where older snapshots are deleted as new ones are created.
3. VMware vRealize Orchestrator (vRO):
- For more advanced automation, VMware vRealize Orchestrator (vRO) offers pre-built workflows that can automate snapshot tasks. These workflows can handle snapshot creation, consolidation, and removal on a schedule or in response to specific events.
- Event-Based Automation: vRO can be integrated with other VMware products to automate snapshot tasks based on specific triggers, such as VM reboots, backups, or system patches. This level of automation helps ensure that snapshots are always aligned with your operational needs without requiring constant manual oversight.
Scheduled Snapshots: Balancing Frequency and Storage Needs
While automation can save time, it’s important to carefully plan how frequently snapshots are taken and retained. Too few snapshots can leave your environment unprotected during critical changes, while too many can degrade performance and consume excessive storage.
1. Determining Snapshot Frequency:
- The ideal frequency for snapshot creation depends on your environment’s specific needs, such as the level of change happening within VMs, the criticality of the VMs, and the risks associated with those changes. For example, environments with frequent software updates, patches, or configuration changes may require more frequent snapshots.
- Best Practices: Consider automating daily snapshots for mission-critical VMs or those undergoing regular updates. For less critical systems, weekly or monthly snapshots may be sufficient.
2. Managing Storage with Retention Policies:
- Automated snapshots can quickly lead to storage bloat if they are not properly managed. Establishing retention policies to automatically delete or consolidate older snapshots is critical to balancing performance and storage.
- Retention Strategies: Use automation tools to automatically delete snapshots that are no longer needed after a predefined period (e.g., after 3 days or 1 week). Ensure that older snapshots are automatically consolidated to free up storage space and keep the VM’s disk structure optimized.
3. Snapshot Rotation:
- Implement a snapshot rotation policy to maintain a rolling history of snapshots without overwhelming storage resources. For example, you can configure automation scripts to retain the last 5-10 snapshots, automatically deleting the oldest snapshot as new ones are created. This approach ensures you always have recent snapshots available for recovery without letting unused snapshots accumulate.
4. Aligning Snapshots with System Events:
- Instead of creating snapshots on a purely time-based schedule, consider aligning snapshot creation with key system events, such as before system upgrades, configuration changes, or backups. Automating event-based snapshots ensures you have protection before critical changes are made without overloading the system with unnecessary snapshots.
Troubleshooting Common Snapshot Issues
While VMware snapshots are a powerful feature, they can sometimes lead to issues that affect system performance, storage management, or even VM stability. Identifying and resolving common snapshot-related problems promptly is crucial to keeping your virtual environment running smoothly. This section will focus on two major snapshot issues: excessive snapshot file growth and snapshot chain errors, offering practical solutions to resolve these problems.
Snapshot File Growth: Identifying and Resolving Problems
One of the most common issues with VMware snapshots is uncontrolled file growth. When a snapshot is taken, VMware creates a delta file to store all changes made to the virtual machine after the snapshot. Over time, as changes accumulate, the delta file can grow significantly in size, consuming large amounts of storage and potentially degrading performance.
Symptoms of Snapshot File Growth:
- Increased Storage Usage: The datastore hosting the VM may run out of space as delta files grow uncontrollably.
- Slower VM Performance: The virtual machine may experience sluggish performance due to the increased size of the delta files, making it more difficult for the hypervisor to manage the disk I/O.
- Backup Failures: Backup jobs may fail if the snapshots become too large, as the backup process has to track additional data across multiple files.
Steps to Identify and Resolve Snapshot File Growth:
1. Monitor Snapshot Size Regularly:
- In the VMware vSphere Client, navigate to the VM’s Snapshots tab and check the size of the delta files. Larger-than-expected files may indicate that the snapshot has been active for too long or is capturing an excessive number of changes.
- Use datastore monitoring tools to track overall storage usage, and set up alerts to notify you when storage utilization reaches critical levels.
2. Delete Unnecessary Snapshots:
- If you find snapshots that have been left active for too long, delete them to reclaim storage space. However, ensure that you consolidate the disks after deletion to prevent orphaned files from lingering on the datastore.
3. Consolidate Snapshots:
- Perform a consolidation to merge the delta file data back into the base disk. This can free up significant storage space and improve performance by reducing the complexity of the VM’s disk structure.
4. Adjust Snapshot Retention Policies:
- To prevent future growth issues, adjust your snapshot retention policies. Limit the duration that snapshots are kept active, and implement automated scripts or alarms to monitor and clean up old snapshots before they grow too large.
Fixing Snapshot Chain Errors
Snapshot chain errors occur when multiple snapshots are taken in sequence, and the data between them becomes fragmented or corrupted. These errors can cause issues when trying to delete, revert to, or consolidate snapshots. A broken snapshot chain may result in VM performance degradation, failed backups, or the inability to restore the VM to a previous state.
Symptoms of Snapshot Chain Errors:
- Failed Snapshot Deletion or Consolidation: When attempting to delete or consolidate snapshots, you may encounter error messages, or the operation may fail entirely.
- Inability to Revert to a Snapshot: The VM may fail to revert to a previous snapshot, often accompanied by errors indicating that the snapshot chain is broken or missing data.
- Performance Degradation: A broken snapshot chain can cause severe performance problems, as the system struggles to track changes across multiple, fragmented files.
Steps to Fix Snapshot Chain Errors:
1. Identify the Error Source:
- In the vSphere Client, navigate to the Tasks and Events tab for the VM. Look for any errors related to snapshot operations, such as failed deletions or consolidations. This will help you pinpoint where the snapshot chain is broken.
- Use VMware logs or diagnostic tools to trace the specific snapshot files causing the issue. A broken chain may manifest as missing or corrupted delta files.
2. Try a Manual Consolidation:
- In some cases, performing a manual consolidation can repair the snapshot chain by merging the delta files into the base disk. Right-click the VM and select Snapshot > Consolidate, then monitor the process in the Tasks and Events tab.
- If consolidation fails, check for additional errors, such as insufficient disk space or corrupted files, that may be preventing the process from completing.
3. Use VMware CLI Tools:
- If the issue cannot be resolved through the vSphere Client, use VMware command-line tools such as vmkfstools or PowerCLI to attempt to manually consolidate or remove problematic snapshots.
- For example, you can use PowerCLI to force a consolidation, which may resolve issues that the GUI cannot fix.
4. Create a New Snapshot and Delete Old Ones:
- In some cases, creating a new snapshot and then immediately consolidating and deleting the entire snapshot chain can resolve broken chain issues. This forces the system to rebuild the chain, effectively repairing any fragmentation.
5. Restore from Backup:
- If the snapshot chain cannot be repaired, and the VM remains unstable, consider restoring the VM from a backup. Ensure that your backup and recovery tools are compatible with VMware snapshots, so you can roll back to a known good state without relying on corrupted snapshot files.
6. Prevent Future Snapshot Chain Errors:
- To avoid snapshot chain errors in the future, limit the number of active snapshots and consolidate them regularly. Using automated tools to monitor snapshot health can also help catch issues before they cause significant problems.
Conclusion: Mastering Snapshots for a Smoother VMware Environment
VMware snapshots are a versatile tool for managing virtual environments, providing a reliable way to safeguard against system changes and unexpected failures. However, to harness their full potential without incurring performance penalties or storage issues, it’s essential to follow best practices for their use, management, and troubleshooting.
By understanding how snapshots affect VM performance and storage, and knowing when to consolidate or delete them, you can maintain a healthy virtual infrastructure. Automating snapshot tasks, setting appropriate retention policies, and resolving common issues such as snapshot growth and chain errors are key strategies for keeping your VMware environment optimized and efficient.
Ultimately, mastering snapshot management helps ensure smooth operation, reduces administrative burden, and enhances the resilience of your virtual machines. With the right balance of automation, monitoring, and regular maintenance, snapshots will serve as a valuable resource in your VMware toolkit, helping you to manage changes, test configurations, and recover quickly from issues without compromising performance or wasting storage.