Create a Virtual Machine Clone of Your Windows Hard Drive
Virtual machines are frequently utilized for these purposes, not just in business settings. You can run many separate operating systems of various sorts on the same hardware platform thanks to environment virtualization. As a result, the price of acquiring and maintaining new equipment is lower. In the event of a failure, the "neighbors" will continue to function since each OS may execute and use its own set of apps without interfering with the others. However, there are risks associated with this technology, such as the loss of or issues with access to crucial virtual data. So, don't forget to implement a backup for virtual machines!
What is a virtual machine?
A virtual machine is a platform that simulates the operation of a physical machine. The virtual machine is located on a real physical host. Using the resources of the physical host, the VM remains completely independent, since it uses its own software components (motherboard, video adapter, network interface, memory, etc.).
The operating system of the virtual machine is called the guest OS, and the operating system in which the virtual machine is installed is called the host OS. Each guest OS runs on the host OS just like a regular program.
The virtual hardware on which the guest OS is running is managed by a hypervisor, which allocates physical resources to each of the systems without interrupting each other.
The most common hypervisors (there are both free and licensed versions) on the market today include:
Microsoft Hyper-V is an advanced software virtualization option that ships with Windows Server 2008, Windows 8 and is used mainly in a server environment, often to create private clouds.
VMware Workstation for Microsoft Windows and Linux, VMware Fusion for macOS, VMware ESXi enterprise hypervisor.
There are some good virtual solutions out there today:
Oracle VM VirtualBox is an open-source virtualization software. It supports a wide range of guest operating systems (Windows, Linux, BSD), and also provides the ability to create multiple virtual machines for simultaneous use.
Xen is an open-source Citrix virtualization software for large ISPs or server hosting.
Parallels Desktop is a premium virtualization solution designed specifically for Apple Macintosh computers.
QEMU is a free open-source virtualization platform for Linux, macOS, and Windows users using custom builds.
Virtual disks
Virtual disks are special files that store the operating system and applications and are presented to the guest OS like a normal physical hard disk. Such a file can be stored on a remote computer, on a host machine, or be part of a virtual machine, or mounted in the OS of a physical computer. A virtual disk usually differs in file extension:
- VMDK format designed for VMware virtualization;
- VHDX format typical for Hyper-V;
- VDI native VirtualBox virtual disk format;
- VHD format designed for Microsoft and Xen virtualization;
- HDD is a format used primarily by Parallels.
What is Physical to Virtual Conversion?
The process of converting a physical machine into a virtual machine is known as physical to virtual (P2V) conversion. This enables you to take advantage of the flexibility and scalability of a virtual environment while maintaining the same state, data, apps, and system settings as your real computer. P2V conversion may be done with the use of specialist software tools that can build a VM from the disk image of a physical computer.
How to convert a physical server to a Hyper-V VM
You've probably heard a lot about virtualization, I guess. Regardless of where you work, I'm sure you'd like to take advantage of a virtualized environment's advantages, particularly those of Hyper-V virtualization. Continue reading if you've already made the decision to discover a how-to manual for transforming your physical computer into a Hyper-V virtual computer (P2V). I'll explain how you can quickly and simply do this!
There are a number of converters available for this procedure, but I'll discuss the simplest and most practical method for creating a VM for your Hyper-V environment. I'm assuming you already have a Hyper-V server operating and ready to start your virtual machines. If not, read this manual first. Learn how to create a virtual hard disk.
Changing a physical server into a Hyper-V virtual machine
You have probably heard a lot about virtualization. You would prefer to take advantage of a virtualized environment, notably Hyper-V virtualization, wherever you work. Continue reading if you've already made the decision to learn how to turn your physical computer into a Hyper-V virtual machine (P2V).
For this process, there are a number of converters available, but I'll explain the quickest and most practical method in this article. My assumption is that you already have a Hyper-V server operating and ready to start your virtual machines. If not, read this guide first.
When is it not worth to convert?
If DC is running on a physical server, conversion is not advised. You would need to start over with a new virtual machine, enable the DC role there, sync it with your primary DC, and then transfer the FSMO role. There are several articles available that can assist you in this circumstance.
Another alternative is to perform a transactional-consistent conversion if you want to run programs like SQL Server, Exchange, SharePoint, or others on a system. The server should ideally be scheduled for maintenance, the network adapter should be turned off, and those services should be terminated before conversion.
Otherwise, you can convert right now if you want to!
P2V conversion guide for Disk2VHD
The best option for this procedure, in my opinion, is the Disk2VHD P2V converter for Hyper-V. It was developed by engineers at Microsoft, doesn't need to be installed, is 0.9 MB in size, and can be downloaded from the official Windows Sysinternals page. Thus, let's immediately begin working!
Step 1. Download Disk2vhd utility
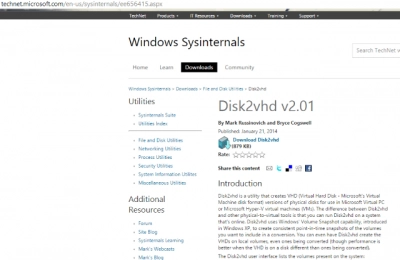
Go to the Windows Sysinternals page and download the utility.
Step 2: Launch Disk2vhd on the physical server you are converting
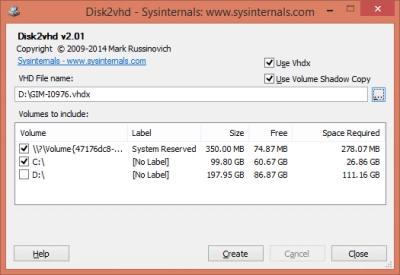
To use the utility, simply unpack it and start a server. The picture demonstrates how user-friendly the interface is. Check Utilize Vhdx to create a VHDX disk.
NOTE: The VHDX disk format is now available thanks to Windows Server 2012. In comparison to normal VHD, VHDX provides a number of benefits, including a greater capacity (up to 64 TB), a tailored internal log to reduce the risk of data corruption, and other great features. VHDX should be used wherever it is practical.
If you prefer a disk that is crash-consistent over one that is transaction-consistent, choose Use VSS. Decide where to put the VHDX file. (Choose a brand-new hard drive; don't use the same disk to prevent a "inception") Include any volume or disk that you want to virtualize. Include a system disk and a boot area if you want the disk to be able to be booted (tick System Reserved label). For the procedure to begin, click Create.
Step 3. Convert disk(s) to VHDX format and copy it to Hyper-V host
You can view the process's estimated completion time while it is running.
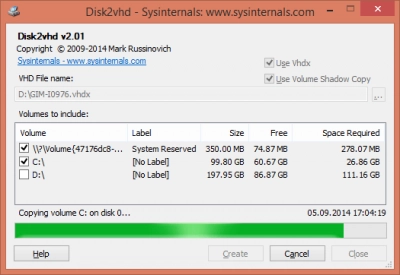
You will receive a VHDX file or disk as a result of the transaction, which you can now copy to your Hyper-V server and put in the folder where your virtual machine drives are.
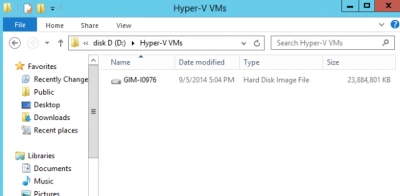
Step 4. Create a new VM on a Hyper-V host
You must first create a virtual machine before using a recently produced disk. In Hyper-V Manager, launch the New Virtual Machine wizard and make the necessary changes. The only difficult configuration choice is choosing the VM generation (appears in Windows Server 2012 R2 only).
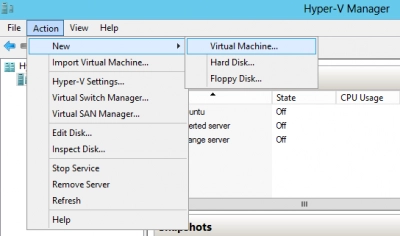
When choosing your VM generation, exercise caution. With Windows 2012 R2, a fresh Hyper-V option called Generation 2 virtual machines was made accessible. Customers now have more options thanks to this enhanced set of virtual hardware and the second release of the VM firmware, including the choice to boot from a SCSI device. This topic will be covered in more detail in later editions. The absence of support for guest operating systems other than Windows 8 or Unix-like is one obvious drawback of Generation 2 VMs. The only 64-bit versions of Windows 8/8.1 or Windows Server 2012/2012 R2 that you should utilize this with are in practice.
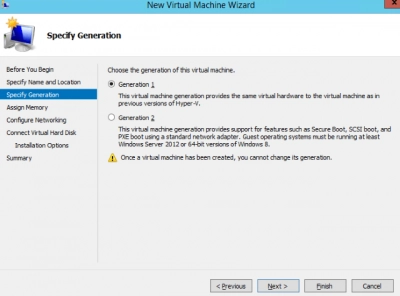
Step 5. Insert the created disk
Complete the remaining wizard instructions after selecting a disk from your collection. You should set up the virtual hard disk on the Connect Virtual Hard Disk stage.
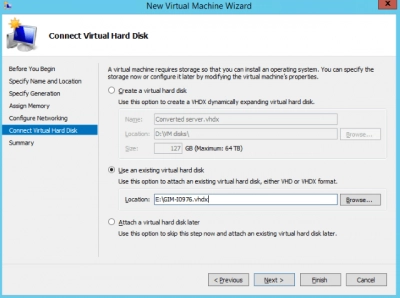
Step 6. Run a VM and enjoy it
Right-click on a VM, select Run, then right-click again and connect to it.
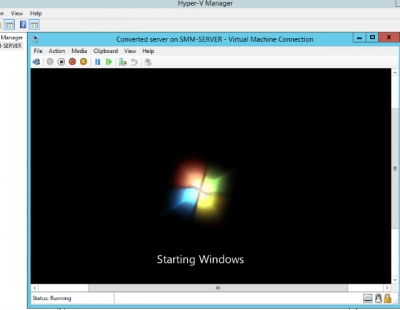
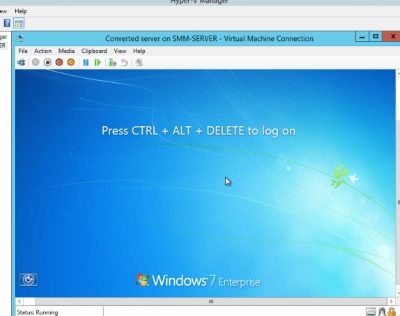
Starting the VM will take some time because of the complex hardware configuration. However, you will soon see the login screen and be ready to log in to the system. Congratulations!
Create a Virtual Machine using PowerShell
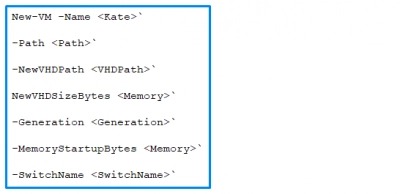
To start, type "PowerShell" in the search bar, right-click on the PowerShell result, and select "Run as administrator".
Next, start typing commands in PowerShell:
New-VM -Name
NewVHDPath
NewVHDSizeBytes
Generation
MemoryStartupBytes
Switch
After entering the last command, check Hyper-V Manager. You should see the newly created virtual machine turned off and then you can continue with the setup process.
Create VHDX (Virtual Machine) File using Hyper-V Manager
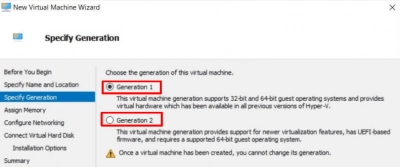
First, in the search box, enter "Hyper-V Manager" and open Hyper-V Manager, then select the "Actions" section and click "Create a virtual machine".
If this is your first time doing this, you can open the “Before You Begin” section for basic guidelines for use.
Then you need to enter the name, then the location of the virtual machine, and in the "Generation" section you can select the generation of the virtual machine.
Next, you determine the amount of memory to be assigned to the virtual machine and select a virtual network to connect to the virtual machine.
This is followed by setting up the virtual hard disk; you can also use an existing VHD or skip this step and connect the VHD later.
In the Summary section, you will see a short description of your new virtual machine, and then, you can click Finish.
Create New VHD or VHDX File with DiskPart
- 1. Press Win + R shortcut keys on the keyboard to open the Run dialog.
- 2. Type diskpart into the Run box and hit the Enter key. Confirm the UAC prompt.
- 3. Type the following command: create vdisk file="Full\path\to\vhd\file" maximum=size type=fixed. This will create a new fixed size VHD.
- 4. To create a dynamically expanding VHD/VHDX file, execute the command: create vdisk file="Full\path\to\vhd\file" maximum=size type=expandable.
- 5. Substitute Full\path\to\vhd\file with the actual full path of the .vhd or .vhdx file for where you want to store it at.
- 6. Substitute size with the maximum size you want for the .vhd or .vhdx file in megabytes. E.g. 1024 for 1GB.
How to set and mount up a VHDX or VHD on Windows 10/11
1. Open the new blank .vhd or .vhdx file created using Option One (Disk Management), Option Two (Hyper-V Manager), Option Three (PowerShell), or Option Four (command prompt).
2. Click/tap on OK in the Couldn't Mount File error message.
3. Open Disk Management (diskmgmt.msc).
4. Right click on the unknown disk (ex: "Disk 3") for the unallocated virtual hard disk, and click/tap on Initialize Disk.
5. In the Initialize Disk dialog, select (dot) MBR or GPT for the partition style you want for virtual hard disk, and click/tap on OK.
6. In the Disk Management, right click or press and hold on the unallocated disk for the virtual hard disk, and click/tap on New Simple Volume.
7. In the New Simple Volume Wizard dialog, click/tap on Next.
8. Make sure the Simple volume size is the same size as Maximum disk space (ex: 1021), and click/tap on Next.
9. Select (dot) Assign the following drive letter, select a drive letter (ex: "F") you want in the drop menu for the virtual hard disk, and click/tap on Next.
10. Select (dot) Format this volume with the following settings, select the file system (ex: NTFS) you want for the virtual hard disk, type a volume label (ex: "Example VHD") you want for the mounted virtual hard disk name, and click/tap on Next.
11. Click/tap on Finish.
You can now mount and unmount this .vhd or .vhdx file on any Windows 10/11 PC you like.
Possible difficulties and ways to overcome them
Along with the many advantages of virtualizing the environment (lower hardware costs, software isolation, mobility and more efficient IT operations, etc.), there are certain disadvantages:
For example, the virtual machine is not as efficient as a real machine because the virtual machine does not have direct access to the hardware, and the need to allocate physical resources creates additional overhead. This is especially evident when several virtual machines are running.
Also,if a physical host crashes, it will affect all the virtual machines that reside on it. Thus, all virtual machines will become inaccessible.
Tip:VMware image recovery.Problems with data sharing
The exchange of information between the host OS and the guest OS is as follows: both OS are started and virtual network transport is used. Usually, there is a transport wrapper for the guest OS that allows you to exchange files using a simple drag and drop procedure. This process can take a long time, and in some situations it may be simply impossible, for example:
- The guest OS is not equipped with special network protocols.
- File size limitation.
How to recover information with VMFS Recovery
DiskInternals VMFS Recovery VHD recovery tool has been in use for many years and automatically checks the current state of volumes, VMware VMFS datastores and disks, and reads images on ESXi / ESX servers, VMware vSphere and VMFS fabrics where possible. Lost information is recovered online without shutting down the system, which is very useful and convenient. In addition to VHD recovery, you will receive a Preview of the found data, which is necessary for testing the program and checking the integrity of the data. If you are satisfied with the result, purchase a license and then simply export the data to the desired storage location. The recovery wizard will guide you through all the steps of virtual disk data recovery process, so there is no cause for concern if you are an inexperienced user!
