How to use Shared Folder in Virtualbox
It's challenging for virtual machines to access data on the host computer or other virtual machines since they don't have access to your computer's file system. You must establish shared folders in order to access data and share files. By using specialized software like VirtualBox or VMware, these shared folders are displayed as network shared files. Therefore, the folder on your PC could be accessed by the host operating system as if it were a network shared folder.
This post will show you how to create shared folders in VirtualBox and VMware Workstation Player, two of the most popular virtual machine software. In any case, you may use it as an example because the procedure will be identical in other apps.
Here's what you'll learn:
1) how to enable Shared Folders
2) how to add Shared Folder
3) how to use Shared Folders
Are you ready? Let's read!
How to enable a Shared Folder for a Virtual Machine?
You can share folders with a single virtual machine. You must setup each virtual machine to utilize the same directory on the host system or network share to set up a folder for sharing between virtual machines.
Prerequisites
- Check to see if the virtual machines are running a guest operating system that allows shared folders. Guest Operating Systems That Support Shared Folders is a list of guest operating systems that support shared folders.
- Check that the guest operating system has the most recent version of VMware Tools installed.
- Check that the host system's permissions enable access to the shared folders' files. If you run Workstation Player as a user called User, for example, the virtual machine can only read and write files in the shared folder if User has permission to do so.
Procedure
For a given virtual machine, you can allow shared folders. The steps are as follows:
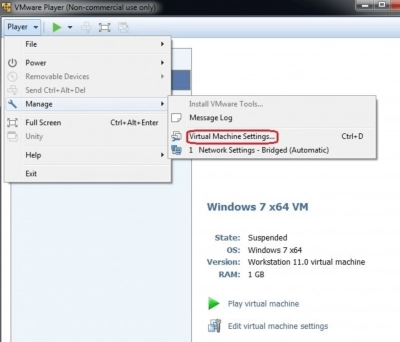
- 1. Choose the virtual machine and select Player > Manage > Virtual Machine Settings:
- 2. Select the Shared Folders option from the Options tab:
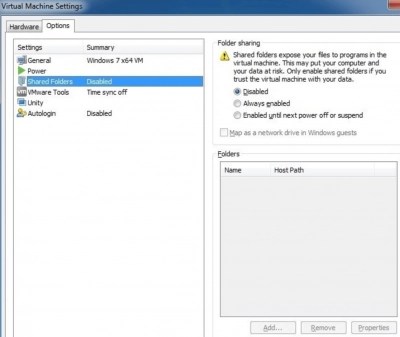
- 3. Select a sharing option under Folder sharing. There are two possibilities:
- Always enabled - even when the virtual machine is shut down, suspended, or switched off, folder sharing remains enabled.
- Enabled until next power off or suspend - temporarily enable folder sharing until the virtual machine is switched off, halted, or shut down. Shared folders will stay enabled even if the virtual machine is rebooted.
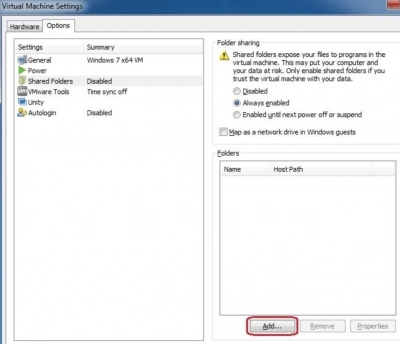
- 4. You may map the drive to the Shared Folders directory, which contains all shared folders (optional). To do so, go to Windows guests and choose Map as a network drive.
- 5. To create a sharing folder, click Add:
- 6. The Add Shared Folder Wizard opens. Click Next to Continue:
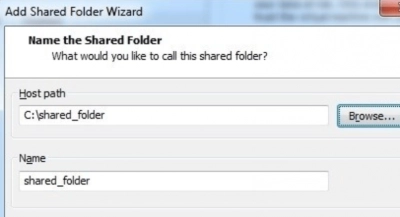
- 7. On the host system, type the path to the directory you wish to share and its name:
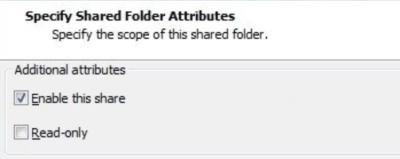
- 8. Select shared folder options:
- how to deal with Tiworker.exe issue
- how to deal with Tiworker.exe issue
- Enable this share - the shared folder is enabled. If you wish to disable the shared folder without eliminating it from the virtual machine setup, deselect this option.
- Read-only - creates a read-only folder in a shared folder. The virtual computer can read and copy files from the shared folder, but it can't modify or delete them.
View a shared folder
Depending on the kind and version of the guest operating system, a shared folder displays differently. Go to Windows Browser > Network on a Windows guest OS to see a shared folder. A list of available computers on the network should appear, including one labeled vmware-host:
- Double click vmware-host and browse to the shared folder;
- You can also go directly to the shared folder by using the UNC path;
- In a Linux virtual machine, shared folders appear under the /mnt/hgfs directory.
Add a Shared Folder
Using shared folders, you may transfer data between virtual computers and your Mac.
- 1. Select Window > Virtual Machine Library.
- 2. Select a virtual machine in the Virtual Machine Library window and click Settings.
- 3. Under Systems Settings in the Settings window, click Sharing.
- 4. Select the Enable Shared Folders check box.
On Windows and macOS virtual machines, a VMware Shared Folders shortcut is created on the guest operating system.
- 5. At the bottom of the display box, click the add (+) button.
- 6. Find the location of the folder you want to share in the Finder sheet, select it, and click Add.
- 7. Set the virtual machine permissions on the contents of the Mac's shared folder in the Permissions box.
| Option | Description |
| Read & Write | Enables the virtual machine to change the contents of the shared folder on your Mac. |
| Read Only | Prevents the virtual machine from changing the contents of the shared folder on your Mac. |
Access to files in the shared folder is also determined by permission settings on your Mac. A file or folder's read-only permission takes priority over the Shared Folder permission setting.
- 8. (Optional) To open the shared folder on the virtual computer, click the Open in Guest button.
This option is only accessible for powered-on Windows virtual computers. Fusion 8.1 introduced the Open in Guest option.
Using Shared Folders
Shared folders may be used to exchange files across virtual machines as well as between virtual machines and the host system. The directories you add as shared folders might be local to the host system or network directories accessible from the host machine.
Important: You can't open a shared folder file from more than one program at the same time. Do not, for example, open the same file in a host operating system application and in a guest operating system application. Data may be corrupted if one of the programs writes to the file.
Shared Folder Support in Guest Operating Systems. A virtual machine must have a compatible guest operating system in order to use shared folders.
Enable a Virtual Machine's Shared Folder. You can share folders with a single virtual machine. You must setup each virtual machine to utilize the same directory on the host system or network share to set up a folder for sharing between virtual machines.
Shared Folders for Other Users' Virtual Machines. By default, if the person who starts the virtual machine does not establish a shared folder, it is deactivated. This is a precautionary measure to ensure your safety.
Using Windows Guest to View Shared Folders. Shared folders may be viewed using desktop icons in a Windows guest operating system.
In a Linux Guest, Mounting Shared Folders. You can mount one or more directories or subdirectories in a shared folder to any place in the file system, not just /mnt/hgfs, after you enable it.
Change the properties of a shared folder. You may alter the folder name, the host path, and other parameters after you create a shared folder.
Change the Shared Folders of a Virtual Machine. You may alter which directories a virtual machine is permitted to share.
For a virtual machine, disable folder sharing. For a specific virtual machine, you can prevent folder sharing.
VMFS Recovery
If something is wrong with your \ machine (for example, if the .vmdk files are missing or deleted), you can restore them and rebuild the virtual machine using DiskInternals VMFS Recovery.
The recovery wizard supports every step of the process, so it is unrealistic to make mistakes when recovering data. Virtual disks can be mounted as local disks and are accessible from Windows Explorer (for reading). The VHD data recovery process bypasses all Windows limitations.
In addition, after scanning and mounting the VMDK file, you will be prompted to view all found files for free and make sure that you can actually restore them in their original form. It will not take long, and the result of the application will pleasantly surprise you. Also, by purchasing a license, you get the opportunity to carry out unlimited export and round-the-clock technical assistance from the company's leading specialists.
Please read these instructions for using DiskInternals VMFS Recovery before recovering damaged or deleted VMDK files.
- Download VMFS Recovery from the DiskInternals website, and after launching the application, connect via SSH (if not required, skip this step).
- Then open the disk and start a deep or shallow scan of the lost data.
- Mount all VMDK files with the must-have free preview feature.
- If everything suits you, do not postpone the purchase of a license for this application.
Exporting your files to a trusted source might save you and your job!
If you purchase a license, you do not only get the ability to export recovered data, but you can also use technical support. The company's specialists will help you in the most difficult situations for a whole year after purchasing a license.
