Hyper-V Checkpoint and Its Importance for VM
Here you will find out:
- what is Hyper-V checkpoint
- what are Hyper-V checkpoint types
- when DiskInternals can help you
Are you ready? Let's read!
Virtualization has drastically altered the way organizations operate and deliver services to their consumers. Snapshots are one of the most important virtualization technologies. This technique has revolutionized how data is safeguarded in virtual settings. In this blog article, we'll go over how to manage and setup Hyper-V checkpoints in your virtual environment, as well as the snapshot technology utilized in Hyper-V.
What Is a Hyper-V Checkpoint?
Hyper-V checkpoints allow you to store the state of a virtual machine at a certain moment in time. If you plan to make any system modifications, such as software updates or a program installation, checkpoints can be quite useful. If an unforeseen issue happens, you can roll back a virtual machine to a prior state, erasing any modifications.
It's worth mentioning that the term'snapshots' is presently exclusively used to refer to Hyper-V snapshots generated on previous Windows operating systems that predate Windows 10.
Types of Hyper-V Checkpoints
Prior to the release of Windows 10, Hyper-V only offered conventional checkpoints. There are two sorts of Hyper-V checkpoints accessible right now:
- Standard Checkpoints, formerly known as Hyper-V snapshots, take an image of the virtual machine and its memory state, enabling you to record the state of the virtual machine at a certain time. Normal snapshots do not support application consistency, which could result in missing data transfers. For virtual computers running Active Directory, Microsoft Exchange, SQL Server, or any other program or database that transfers data across nodes, this is crucial. Additionally, remember that a snapshot differs from a full backup.
- Production Checkpoints may create a data-consistent backup using File System Freeze (for Linux VMs) or Volume Shadow Copy Service (for Windows VMs). Therefore, production checkpoints are created in accordance with the guest OS's backup strategy. Setting a production checkpoint does not result in the capture of a snapshot of the VM memory state. Production checkpoints are by default turned on. To change the checkpoint type, you can use PowerShell or Hyper-V Manager.
Managing Hyper-V Checkpoints
From adjusting the checkpoint type to establishing the checkpoint location, the following extract will show you how to manage different elements of Hyper-V checkpoints.
How to change the checkpoint type
As mentioned above, you can change the checkpoint type through Hyper-V Manager or PowerShell. Both approaches are described below.
Using Hyper-V Manager
- 1. Open Hyper-V Manager.
- 2. Right-click on a VM that you want to configure and select Settings.
- 3. Find the Management section and select Checkpoints.
- 4. Choose the checkpoint type. If you have selected Production checkpoints, click the checkbox below in case your guest VM doesn’t support creation of production checkpoints. This allows you to capture checkpoints with full-application state.
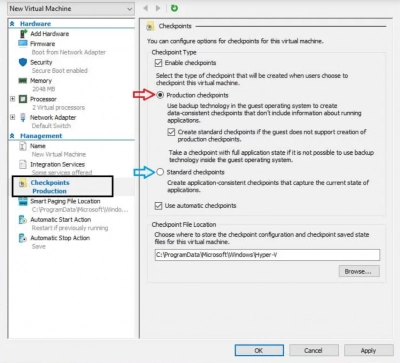
If you've chosen Standard checkpoints, you may activate the Automatic checkpoints option, which takes checkpoints for VMs when they're started and deletes them when they're stopped.
Using PowerShell
To change the checkpoint type, run the following commands in PowerShell:
- To enable the Standard Checkpoint type, insert: Set-VM -Name vmname -CheckpointType Standard.
- To enable the Production Checkpoint type, insert: Set-VM -Name vmname -CheckpointType Production. In case a production checkpoint fails, a standard checkpoint will be taken.
- If you want to ensure that only production checkpoints are created, use the following command: Set-VM -Name vmname -CheckpointType ProductionOnly.
How to create checkpoints
Hyper-V checkpoints can be created using one of two ways: Hyper-V Manager or PowerShell.
Using Hyper-V Manager
- 1. Open Hyper-V Manager.
- 2. Select the VM for which the checkpoint will be created.
- 3. Right-click the name of the VM, and then click the Checkpoint.
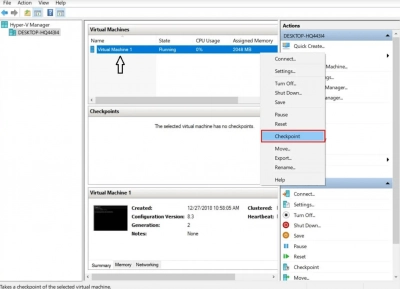
- 4. The checkpoint is created and can be accessed in the Checkpoints section below.
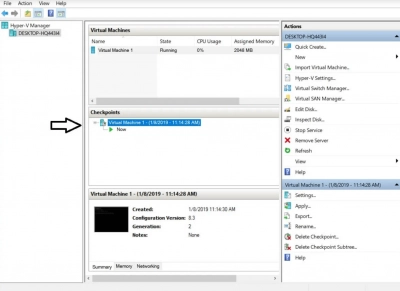
Using PowerShell
Run the following command to create Hyper-V checkpoints: Checkpoint-VM -Name VMName. After the checkpoint has been created, you can see a full list of VM checkpoints by using the command: Get-VMCheckpoint -VMName VMName.
How to revert a VM to a previous state using checkpoints
Hyper-V checkpoints are primarily used to revert a VM to its previous state. Use the steps below to apply the checkpoint for this purpose.
Using Hyper-V Manager
- 1. Open Hyper-V Manager.
- 2. Select the VM which you want to revert.
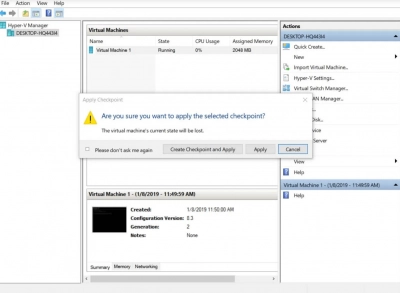
- 3. In the Checkpoints section, you will see the list of checkpoints created for that VM. Right-click the checkpoint that you want to use and click Apply.
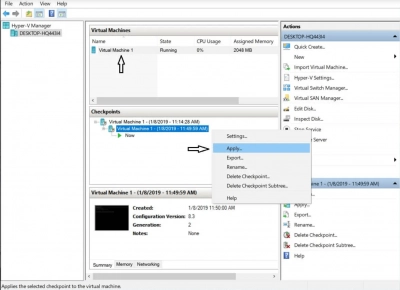
- 4. After that, a dialog box including the following options will appear:
- Create Checkpoint and Apply: Before the chosen checkpoint is applied, a new checkpoint of the VM is created. This way the VM is protected, even if this operation fails.
- Apply: Only the chosen checkpoint is applied. Note that this action cannot be undone.
- Cancel: The dialog box will be closed without applying any changes.
Using PowerShell
To apply the checkpoint via the PowerShell command-line interface (CLI), run the following command: Restore-VMCheckpoint -Name checkpoint name -VMName VMName -Confirm:$false.
How to delete checkpoints
Checkpoints in Hyper-V are saved as.avhdx files in the same directory as the VM's.vhdx files. The.avhdx and.vhdx files are combined as a consequence of eliminating checkpoints to conserve space and guarantee that no vital data is lost. The.avhdx file for the checkpoint is then fully removed from the file system.
To erase checkpoints with Hyper-V Manager, perform these steps:
- 1. Select the necessary VM after launching Hyper-V Manager.
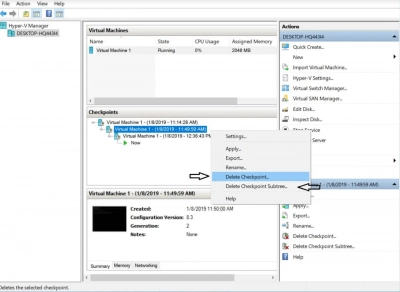
- 2. Right-click the checkpoint you wish to delete in the Checkpoints section below. A drop-down menu with many possibilities will display. Select Delete Checkpoint from the drop-down menu. If you wish to remove a checkpoint tree that includes the primary checkpoint and all future checkpoints, right-click the first checkpoint and select Delete Checkpoint Subtree.
How to enable or disable checkpoints
Using Hyper-V Manager, you can manually set up whether you want checkpoints to be taken off this VM or not. For this purpose, do the following:
- 1. Open Hyper-V Manager, right-click the name of the needed VM, and click Settings.
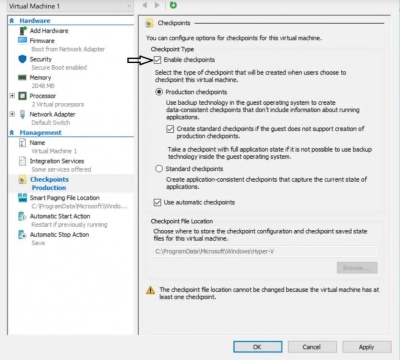
- 2. In the Management section, find the Checkpoints option and select it.
- 3. In the right pane, you will see the Enable Checkpoints checkbox. You can either select or deselect it in order to enable or disable checkpoints.
- 4. Click Apply.
How to set up a checkpoint location
Hyper-V allows you to configure where the checkpoint configuration and checkpoint saved state files will be stored. To set up a checkpoint location, follow the steps below:
- 1. Open Hyper-V Manager, right-click the name of the required VM, and click Settings.
- 2. In the Management section, find the Checkpoints option and select it.
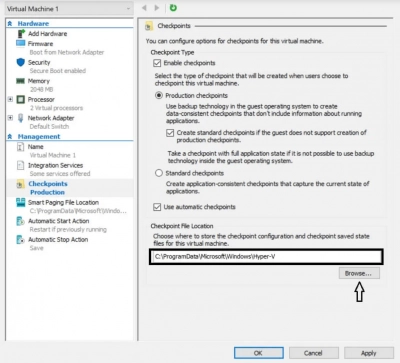
- 3. In the right pane, find the Checkpoint File Location section and click Browse, or manually enter the path to the folder where the checkpoint files will be stored.
- 4. Click Apply.
How to rename checkpoints
The standard checkpoint name includes the name of the VM, the date, and the time when the checkpoint was created (e.g. Virtual Machine – (1/5/2019 – 8:17:35 AM)). To make it more distinguishable, you can rename the selected checkpoint using either Hyper-V Manager or PowerShell.
Using Hyper-V Manager
- 1. Open Hyper-V Manager and select the required VM.
- 2. Right-click the needed checkpoint and select the Rename option, which appears in the drop-down menu.
- 3. Type in the new checkpoint name and click ENTER.
Using PowerShell
To rename the checkpoint in the PowerShell CLI, run the following command: Rename-VMCheckpoint -VMName virtual machine name -Name checkpoint name -NewName new checkpoint name.
How to recover snapshots
To recover snapshots or other files like VMDK, use DiskInternals VMFS Recovery. This application is designed to be used by professionals, so the competency of the program is obvious. At the same time, the interface is intuitive enough for any user, even a beginner. DiskInternals VMFS Recovery can provide unhindered access to both healthy and damaged virtual disks that are used by VMware vSphere and ESX/ESXi Server.
All recovery steps are guided by the Recovery Wizard. After that, the scan results become available for a free preview.
Use the step-by-step guide below to facilitate data recovery:
Download and install DiskInternals VMFS Recovery on your laptop or computer.
Establish an SSH connection; if this is not necessary, proceed immediately to the next step.
Left-click on a local drive or SSH.
Next, start scanning the disk, after which you will find the necessary VMDK files; mount them.
As soon as you open this file, browse the files for free to check their integrity.
After that, data export will begin. It will become available after purchasing a license.
Conclusion
When it comes to backing up your virtual infrastructure, Hyper-V checkpoints are highly beneficial. Creating checkpoints allows you to restore the virtual machine to a prior state, removing all undesired configuration changes and upgrades that may have created problems. Checkpoints, on the other hand, cannot be used in place of backups. Hyper-V checkpoints, unlike backups, cannot be utilized for long-term data preservation and do not ensure system recovery if too many things have been modified.
