Enable SSH on ESX
Here you will find out:
- How to Enable SSH on ESXi
- Test SSH ESXi Connection
- When DiskInternals can help you
Are you ready? Let's read!
Maintaining and administering a VMware system necessitates remote access to ESXi hosts. SSH may be used to connect to the ESXi shell, for example, by using PuTTy as a Secure Shell client. This feature, however, is disabled by default to protect against security dangers such as brute force assaults.
The task of enabling SSH on VMware ESXi hosts is simple. This procedure can be completed in a few different ways.
Using the Direct Console UI and the vSphere Web Client, this post will teach you how to activate SSH on an ESXi host. The procedures are applicable to versions 6 and above.
Prerequisites:
- SSH client on the remote machine,
- Root access to the ESXi host,
- Admin account for the vSphere Web Client.
How to Enable SSH on ESXi
If you receive the "Connection refused" error when trying to connect to your ESXi host, then SSH is disabled.

Choose a method and follow the steps below to enable SSH on ESXi.
Note: If you're using a Bare Metal Cloud, utilize the DCUI or vSphere Host approach instead of vCenter because vCenter isn't supported right now.Method 1: Enable SSH on ESXi via DCUI (Direct Console User Interface)
Follow these steps to allow SSH access on an ESXi host using DCUI:
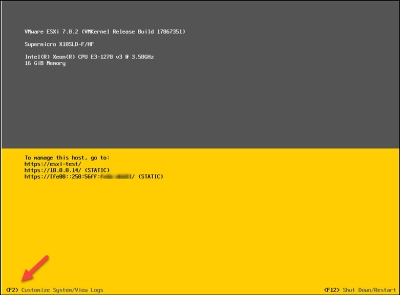
1. To log in, load the DCUI panel and click F2. Customers of the Bare Metal Cloud, for example, access the Remote Console through the BMC site.
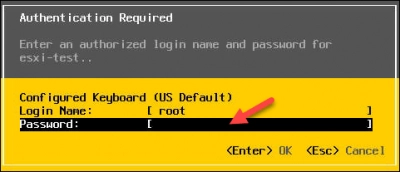
2. Enter the root password.
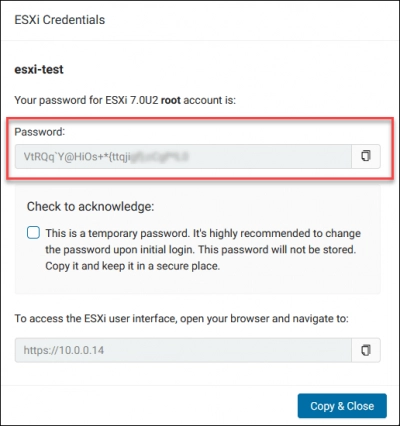
For phoenixNAP BMC servers, the root password appeared when you deployed your ESXi server.
The System Customization menu loads.
3. Navigate to Troubleshooting Options and hit Enter.

4. Navigate to Enable SSH and press Enter to enable the service.

When you enable SSH, the option in the menu changes and lets you know the service is enabled:

Use the ESC key to go back to the DCUI main menu.
Note that your session has been timed out. To avoid multiple logins, be sure to modify the settings before the session ends. To raise the value, use the Modify DCUI Idle timeout option.
Ready to get your data back?
To start recovering your data, documents, databases, images, videos, and other files, press the FREE DOWNLOAD button below to get the latest version of VHD recovery tool and begin the step-by-step recovery process. You can preview all recovered files absolutely for FREE. To check the current prices, please press the Get Prices button. If you need any assistance, please feel free to contact Technical Support. The team is here to help you get your data back!
Method 2: Enable SSH on ESXi Host via vSphere (vSphere 8.0 included) Web Client
To connect in to the ESXi host and activate SSH, this technique uses the vSphere Web UI.
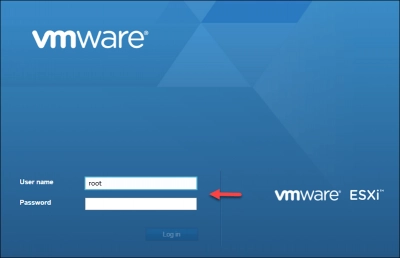
1. Select Manage in the navigator pane.
2. Click the Services tab on the right side.
3. Select the TSM-SSH entry on the list. The service status shows Stopped. (TSM stands for Tech Support Mode).
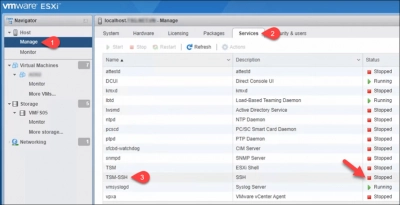
4. Click Start to start the SSH service.
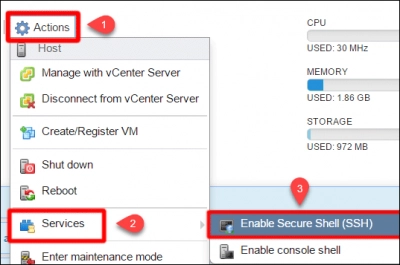
Alternatively, you can enable SSH by selecting Host in the left navigator pane. Then:
1. Click Actions.
2. Select Services.
3. Click Enable Secure Shell (SSH).
SSH is automatically disabled when your VMware host restarts. The default behavior is set to this. To automatically activate SSH after a restart, follow the instructions below.
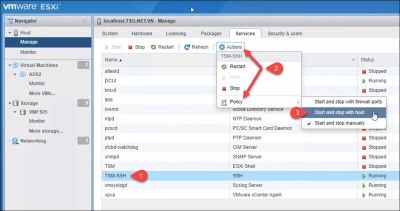
To start SSH after ESXi host restart:
1. Select the TSM-SSH entry on the list.
2. Click Actions - > Policy.
3. Choose Start and stop with host, and the SSH service will activate after every host restart.
Method 3: Enable SSH on ESXi via vCenter
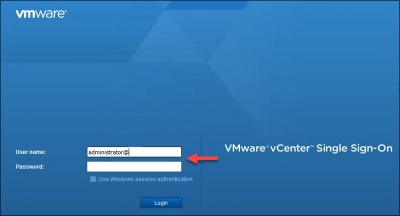
Non-BMC users can connect in to the vCenter instance and activate SSH using the Web Client.
Once you log in, select the host and:
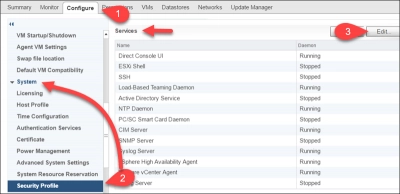
1. Navigate to the Configure tab.
2. Scroll down and select Security Profile under the System section.
3. Locate the Services section and click the Edit button.
4. Locate and click the SSH entry on the list. Click Start to enable SSH.
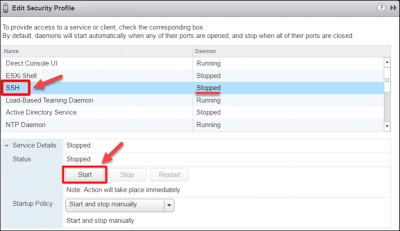
If needed, you can edit the startup policy for the SSH service.
Test SSH ESXi Connection
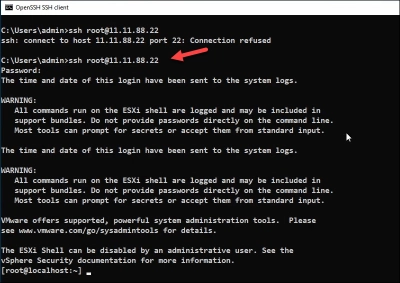
Finally, launch the SSH client and try to connect to your SSH host after you've enabled SSH. Try logging in as the root user.
The Connection denied error will not appear if the SSH service is enabled. Instead, you connect in to the ESXi host successfully.
Tip: learn more about virtual servers!
Conclusion
This article covered three methods for enabling SSH on ESXi. Either of the first two approaches will work for Bare Metal Cloud customers.
This procedure is simple, but it allows for remote ESXi management, so proceed with caution. If you aren't going to use SSH for a while, you may disable it by using the same methods you used to enable it.
