Partition Recovery guide
How to Recover an Unallocated Partition Without Overwriting Your Data
Last updated: October 16, 2026
Unallocated is a Windows disk-layout state. It reports that the current layout does not assign that sector range to a recognized partition entry. It does not prove the area is empty, intact, or recoverable. Stop writing to the physical device, then work in a safe order: preserve the source, diagnose the state, image it when warranted, scan without writing, recover files to another physical device, validate them, and only then consider repair or reuse.
Recovering files, discovering a missing partition, restoring a partition entry, and making the space usable again are four different tasks. Treating them as one operation is the most common way this situation becomes unrecoverable.
Stop if the device clicks, grinds, repeatedly spins up, overheats, disconnects, is detected intermittently, reports an implausible capacity, or produces recurring read errors. These symptoms may indicate physical or electrical failure. Repeated scans and power cycles can increase stress on the device.
Start Here: Protect the Source and Prepare for Recovery
Everything below depends on one gate: no new writes reach the affected physical device until the needed data is recovered and validated. Complete this preparation before diagnosis, before comparing causes, and before evaluating any software.
Stop activity that writes to the device:
- downloads, installations, and application updates that may target the affected disk;
- copying files to the device or to any other partition on the same physical disk;
- backup, sync, indexing, and antivirus jobs that scan and write;
- disk utilities that repair, initialize, convert, or rewrite layout metadata;
- restarting the computer repeatedly in the hope that Windows will fix the layout.
Prepare before you diagnose:
- a different physical device with enough free space for the recovered files and, when imaging is warranted, for a full image of the source;
- a written record of the device model, capacity, disk number in Disk Management, connection type, partition order, approximate sizes, and the event that preceded the problem;
- a capture of the initial Disk Management state, taken without exposing serial numbers or personal file paths;
- encryption passwords, recovery keys, and any credential needed to unlock the volume later.
Another partition on the same physical disk is not a safe destination. Windows shows it as a separate drive letter, but the writes land on the same physical media, in sector ranges that recovery software may still need to read. A partition boundary is a layout convention, not a write barrier.
If the Unallocated region is on the Windows system disk, minimize use of that computer. Every session writes logs, updates, temporary files, and page-file data. Where possible, shut the system down and attach the disk to another computer as a secondary device, or ask a qualified technician to do so.
Stop If the Device Shows Hardware-Instability Symptoms
Software cannot correct a physical or electrical failure. When the symptoms below are present, stop and assess professional evaluation instead of continuing.
- clicking, grinding, or repeated spin-up and spin-down;
- overheating that is noticeable to the touch or reported by the system;
- repeated disconnects, or detection that appears and disappears between sessions;
- a reported capacity that changes or does not match the device;
- severe slowdown, system freezes, or a scan that stalls at the same region;
- recurring read errors that increase as work continues.
Repeated scans, reconnections, and power cycles may increase stress on an unstable device. Imaging is conditional, not automatically safe: creating an image still requires reading every sector of the source, which is exactly what a failing device tolerates least.
What Unallocated Space Means in Windows
Windows reports a sector range as Unallocated when the current disk layout does not assign that range to a recognized partition entry. The report describes the layout, not the content. A genuinely unused area and an area whose partition entry is missing can look identical in Disk Management.
The label does not prove whether the content behind it is absent, intact, overwritten, encrypted, trimmed, or physically readable. Establishing that requires reading the region, not reading its description.
Five terms that are often merged into one:
- 01Physical disk
- the hardware device itself, listed in Disk Management as Disk 0, Disk 1, and so on. This is the unit that fails, disconnects, and gets imaged
- 02Partition
- an entry in the disk layout that reserves a sector range for use. When this entry is missing, the range is reported as Unallocated
- 03Volume
- the usable storage area built on a partition, with a file system and a size that Windows can mount
- 04File system
- the structures that record where files and folders live inside the volume, such as NTFS, FAT32, or exFAT
- 05Drive letter
- an assignment that makes a mounted volume visible in File Explorer. Its absence is a mounting issue, not evidence that data is gone
Unallocated is not the same as these adjacent states:
- RAW — the partition entry exists, but Windows cannot identify a mountable file system on it;
- Healthy without a drive letter — the volume is recognized and mountable, but not assigned a letter;
- Offline — the disk is recognized but deliberately not brought online by policy, signature conflict, or connection state;
- Not Initialized — Windows finds no usable partitioning scheme on the disk and offers to write one.
Treating these four as synonyms for Unallocated leads to the wrong first action, and several of those actions write to the source.
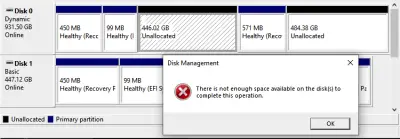
Diagnose the Disk State Before Choosing a Recovery Path
Classify what you are actually looking at before you accept any recommendation, including the ones in this guide. The same Disk Management screen can represent several different problems with different safe responses.
Inspect Disk Management Without Making Changes
Open Disk Management in read-only fashion: look, record, and close. Do not accept any prompt that changes the layout.
- match the physical device by model, capacity, disk number, and connection type before drawing any conclusion;
- record whether the entire disk is Unallocated or only one region within it;
- record the partition order, sizes, labels, file systems, and the exact status text Windows displays;
- compare the region's approximate size and position against the layout you remember, while treating a close match as a hypothesis rather than proof;
- cancel the initialization prompt whenever the disk previously contained data or its history is uncertain;
- leave every context-menu action that creates, deletes, extends, converts, or formats untouched.
Match the Observed State to the Safest Next Step
Find the row that matches what you observed. Each state carries its own next step and its own list of actions to avoid; the wording of the state matters more than the device type.
Confirmed new or intentionally empty area
- What it may indicate
- No prior data is expected in this region
- Safest next step
- Verify device identity and history before any later allocation
- Actions to avoid
- Assuming an unfamiliar disk is blank because the region looks empty
Expected partition replaced by Unallocated space
- What it may indicate
- A missing or removed partition entry, an interrupted layout change, or metadata damage
- Safest next step
- Preserve the source, then run non-destructive partition discovery or a file scan
- Actions to avoid
- Initialization, formatting, extending a neighbor into the region, or writing a partition entry back
Recognized RAW or inaccessible volume
- What it may indicate
- The partition exists, but its file system is not recognized
- Safest next step
- Follow the RAW or inaccessible partition workflow instead of this one
- Actions to avoid
- Treating a RAW volume as ordinary Unallocated space
Healthy volume without a drive letter
- What it may indicate
- A mounting or letter-assignment issue rather than Unallocated space
- Safest next step
- Verify the volume state and file system before changing anything
- Actions to avoid
- Running recovery software only because the drive letter is absent
Offline, Unknown, or Not Initialized disk
- What it may indicate
- A policy, metadata, connection, controller, or layout issue
- Safest next step
- Identify the disk history and check the hardware path before any layout action
- Actions to avoid
- Accepting the initialization prompt automatically
Known formatting event
- What it may indicate
- File-system structures were replaced by a format operation
- Safest next step
- Follow the formatted-partition workflow, which addresses replaced structures directly
- Actions to avoid
- Describing a known format as merely Unallocated space
RAID, Dynamic Disk, or Storage Spaces member
- What it may indicate
- The layout requires several members or layout-aware handling to be assembled
- Safest next step
- Preserve every member and use layout-aware evaluation, such as DiskInternals RAID Recovery for arrays
- Actions to avoid
- Scanning one member as if it were a normal standalone disk
Encryption present
- What it may indicate
- The correct key or recovery information may be required before content is readable
- Safest next step
- Preserve credentials and identify the encryption context before scanning
- Actions to avoid
- Treating encrypted content as file-system corruption
Unstable or inconsistently detected hardware
- What it may indicate
- Possible physical or electrical failure, regardless of what the layout shows
- Safest next step
- Stop and escalate to professional evaluation
- Actions to avoid
- Repeated scans, reconnections, and power cycles while hoping the device stabilizes
None of these rows is a diagnosis. Each is a starting classification that tells you what evidence to gather next and which actions would destroy that evidence.
Choose Direct Scanning, Imaging, or Professional Evaluation
The second decision is how to read the source, not what the source shows. These three paths have different eligibility conditions.
| Path | Eligible when | Reconsider or stop when |
|---|---|---|
| Direct scan of the source | The device is stable and consistently detected, the reported capacity matches the hardware, read risk is low, and the scan mode is verified not to write to the source | Read errors appear, the scan stalls at the same region, or repeated passes will be needed |
| Image first, then scan the image | The source is readable and stable, the data matters, repeated analysis is expected, and a separate destination with sufficient capacity is available | The device is already unstable, capacity is inconsistent, or imaging itself produces growing error counts |
| Professional evaluation | There is instability or physical damage, the data is irreplaceable, the multi-disk layout is unknown, encryption is unresolved, or capacity is reported inconsistently | Not applicable — this is the escalation path when the other two are unsafe |
A clean SMART report does not prove the device is healthy, and imaging is not universally safe. Both are inputs to the decision, not permissions to proceed.
Why a Partition May Appear as Unallocated
Causes fall into groups, and each group leaves different traces. Do not conclude a cause from the Disk Management label alone; look for the corroborating evidence beside it.
- Deletion or a missing partition entry
- Corroborated by a recent partitioning action, a disk-management session, an installer that offered to manage partitions, or a region whose size and position match the previous volume
- Interrupted layout operation
- Corroborated by a resize, clone, conversion, installation, or partitioning task that stopped early, lost power, or reported an error before finishing
- Layout metadata corruption
- Corroborated by a software crash, an unexpected shutdown, an unsafe removal, or a controller or cable problem that occurred around the time the region disappeared
- Unsupported or incompletely assembled multi-disk layout
- Corroborated by a RAID array, Dynamic Disk set, or Storage Spaces pool whose members are not all present, or a disk that was moved out of its original controller or enclosure
- Encryption or controller translation
- Corroborated by an encryption product in use, a hardware-encrypted enclosure, a self-encrypting drive, or an adapter that presents sectors differently than the original host
- Physical read instability
- Corroborated by clicking, disconnects, intermittent detection, growing read errors, or a capacity that is implausible for the device
- A genuinely unused area
- Corroborated by a new device, a documented layout that intentionally left space free, or a purchase and setup history that accounts for the region
Several causes can be present at once. When the evidence points in two directions, treat the more destructive interpretation as the working assumption and preserve the source accordingly.
Choose the Recovery Outcome You Actually Need
Decide which of these four you are trying to achieve before you start. They have different prerequisites and different risks, and finding files does not prove the original partition can be restored.
Recover files to another physical device
- Goal
- Obtain a usable copy of the needed data, independent of the original layout
- Prerequisites
- A stable source or a valid image, and a separate destination with sufficient free space
- Source-write risk
- Low, provided the scan mode does not write and nothing is saved back to the source
- Likely limitations
- Original filenames, folder structure, timestamps, and completeness may be partly or wholly unavailable
- Verification
- Open representative files with real applications and check content, size, and dates
Discover a plausible missing partition
- Goal
- Identify candidate partition boundaries and file-system identity without writing anything to the source
- Prerequisites
- A discovery mode that reports candidates rather than applying them, and known facts about the previous layout
- Source-write risk
- Low while the result stays virtual; the risk begins when a candidate is written back
- Likely limitations
- Old, duplicate, or overlapping candidates are common and none of them is self-verifying
- Verification
- Compare size, position, file system, label, and folder tree against known facts
Restore a partition entry
- Goal
- Return the volume to a mountable state in the original layout
- Prerequisites
- Needed files already recovered and validated, high confidence in boundaries, and specialist review for anything ambiguous
- Source-write risk
- High — this writes layout metadata to the source
- Likely limitations
- An incorrect entry can hide valid volumes and complicate any later recovery attempt
- Verification
- Mount behavior, file-system consistency, and the continued readability of adjacent volumes
Allocate the space for future use
- Goal
- Make the region usable again for new data
- Prerequisites
- Confirmation that no needed data remains, plus validated recovery records
- Source-write risk
- High and intentional — new structures are written over the region
- Likely limitations
- This is not a recovery action and it removes most remaining recovery options
- Verification
- The new volume mounts, reports the expected capacity, and passes a write and read test
The order matters. Outcomes three and four are only reasonable after outcome one has been completed and independently validated.
How to Recover Data from Unallocated Space Safely
This is the core procedure for recovering data from Unallocated space when the case is logical and the device is stable. Complete the preparation section first; these steps assume no writes are reaching the source.
Create an Image When Source Preservation Is Warranted
An image is a sector-level copy of the source stored on another device. Scanning the image instead of the original reduces repeated reads from hardware you may not be able to read twice, and it lets you repeat analysis without touching the source again.
Image first when:
- the data matters enough that a second attempt must remain possible;
- you expect to run more than one scan, mode, or comparison;
- the source reads consistently now but you cannot assume it will keep doing so;
- a separate physical device with capacity for the full image is available.
Confirm both identities explicitly before you start: the source by model, capacity, and disk number, and the destination as a different physical device with enough free space. An image written to the wrong target is a destructive operation.
Stop imaging and reassess if error counts grow, the device disconnects during the copy, throughput collapses, or the reported capacity changes. Imaging reads every sector, so an unstable device is stressed by the process rather than protected by it.
Discover Partitions or Scan Files Without Writing to the Source
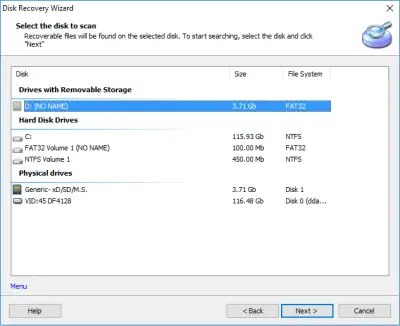
Select the source deliberately. Verify the selected disk or image by model and capacity rather than by drive letter, because the affected region has no letter to select.
Three different operations are often described with the same word:
- partition discovery looks for evidence of former partition boundaries and file-system identity;
- file-system scanning reads recognizable file-system structures to rebuild a folder tree;
- raw file carving ignores structure and recognizes files by their internal signatures, usually without original names or folders.
Use only scan modes you have verified do not modify the source, and keep the result virtual until you have judged it. Discovery frequently returns several candidates — old layouts, duplicates, and overlapping ranges — and their presence in a list is not evidence that any of them is correct.
Once the case looks logical and the device is stable, DiskInternals Partition Recovery is one option for partition discovery and file scanning on Windows. A free trial version can be downloaded from the product page, and saving recovered files may require a license — verify the current terms there before you rely on them.
Preview Results and Test Their Plausibility
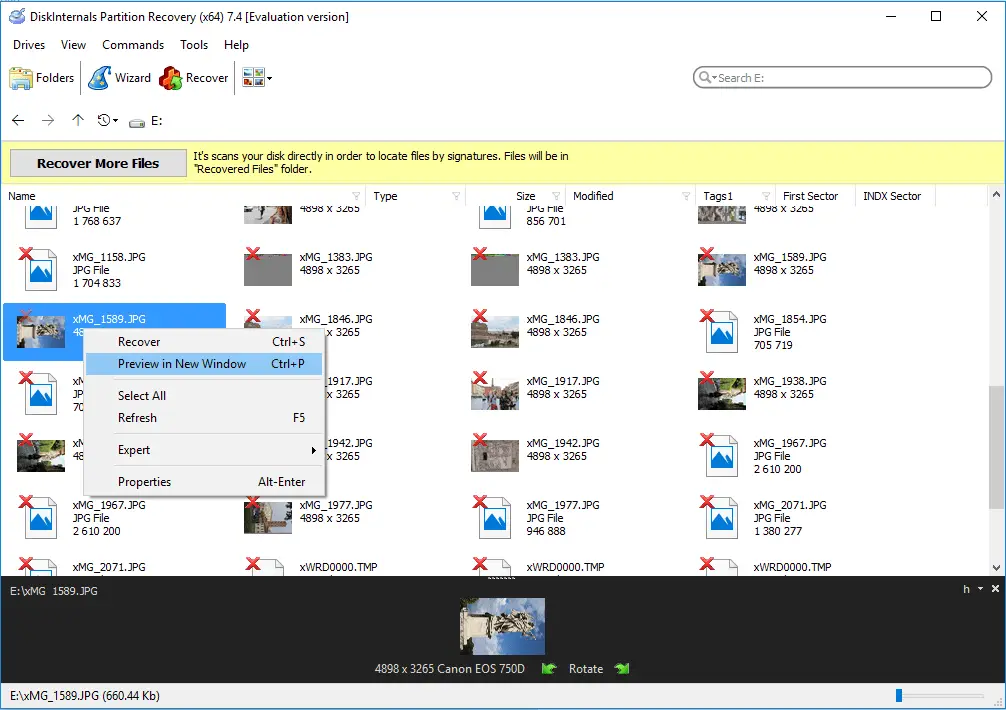
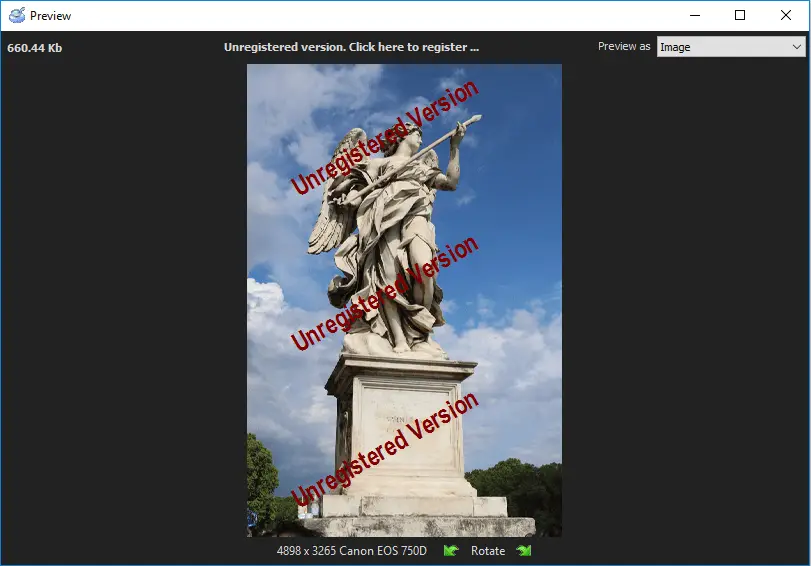
Preview representative files of different types where preview is supported: a document, a photo, a video, and something from the folder you care about most. A candidate that previews nothing is not necessarily wrong, but a candidate that previews meaningful content is meaningfully stronger.
Compare each candidate against what you already know:
- approximate size and position relative to the layout you recorded earlier;
- file-system type and volume label, where either is reported;
- folder tree shape — top-level folder names you recognize carry more weight than file counts;
- timestamps that fall in a plausible range rather than at epoch defaults.
One successful preview does not prove complete integrity. Treat overlapping candidates, implausible dates, folder trees that mix unrelated content, and widespread preview failures as reasons for further analysis rather than as noise to scroll past.
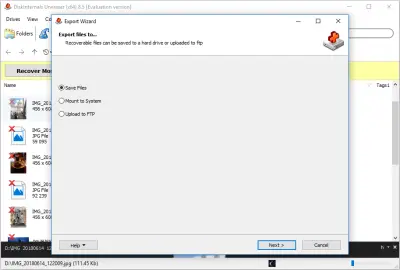
Recover Selected Files to Another Physical Device
Before saving anything, confirm once more that the destination is a different physical device — not another partition, not a mapped folder that resolves back to the same disk, and not a virtual disk stored on the source.
When source stability, time, or destination capacity is limited, recover in priority order:
- irreplaceable material first — documents, photos, and records that exist nowhere else;
- then data that would be expensive to reproduce;
- then anything that can be downloaded, reinstalled, or regenerated later.
Keep the source or image unchanged until validation is finished. A completed copy operation reports that bytes were written, not that the files are usable.
Validate Recovered Files Before Changing the Disk
Validation is a separate step, and it happens before any disk change:
- open representative files with the applications that normally handle them, not with a preview pane;
- check expected content, file sizes, meaningful dates, and whether folders contain what they should;
- compare checksums where a trusted original or an earlier backup exists;
- verify critical files independently and keep more than one copy of them;
- record what is missing, corrupt, unnamed, or only partially recovered.
Spot-checking a sample does not prove that every untested file is intact. Treat the record of failures as part of the result: it is what tells you whether a second attempt from the image is worth running before the disk is changed.

Decide Whether Partition Restoration Is Justified
Restoration writes a partition entry to the source. It is a layout change, not a recovery step, and it is justified only when all of the following hold.
- the important files are already recovered and independently verified;
- there is high confidence in the boundaries and in the file-system identity of the candidate;
- no other candidate overlaps the same range;
- the disk is a straightforward single-disk layout with no unresolved encryption.
An incorrect entry can hide valid volumes, misalign the file system, and complicate every later recovery attempt. Ambiguous candidates, encrypted volumes, overlapping ranges, and multi-disk layouts belong with a specialist. This guide does not provide a write-back procedure, because restoration is not a routine operation and a generic recipe is where most of the avoidable damage comes from.
Troubleshoot Incomplete or Conflicting Results
Incomplete results are normal, and most of them point to a specific next check rather than to failure. The preparation rules still apply throughout: no writes to the source, and no saving to the affected device.
| Symptom | What it may mean | Next check |
|---|---|---|
| No plausible partition candidate is found | The wrong source was scanned, the scan mode was too shallow, or the structures are gone | Reconfirm the physical device and capacity, then compare a deeper scan mode against a file-signature scan |
| Files are found without original names or folders | File-system structures are unavailable, so results come from signature-based carving | Sort by type and date, recover the priority material first, and accept that naming may not be restorable |
| Candidates report conflicting boundaries | Several layouts have existed on the disk, or a candidate is a remnant of an older one | Compare each candidate against the recorded size, position, and label before trusting any of them |
| Previews fail across most files | Content may be overwritten, encrypted, or read from the wrong offset | Test files of several types and sizes, then reassess whether the candidate is correct at all |
| Read errors appear or the scan stalls | Possible physical instability or a damaged region | Stop the scan, record the symptoms, and reassess imaging or professional evaluation |
| The wrong source or an incomplete layout was scanned | Selection by letter or label, or a multi-disk set with missing members | Reselect by model and capacity, and assemble or preserve every member before scanning again |
| Encryption was not identified before scanning | Encrypted content can resemble corruption or random data | Identify the encryption context, locate credentials, and unlock before drawing conclusions |
| Evidence suggests data was overwritten or trimmed | New writes, a completed format, or SSD TRIM and garbage collection reached the region | Recover what is verifiable, record what is not, and stop actions that would overwrite more |
Actions That Reduce Recovery Options
These are the operations that most often turn a recoverable case into an unrecoverable one.
- Initializing the disk
- Writes a new partitioning scheme and can replace the layout information that discovery would have used
- Formatting
- Creates new file-system structures over the region, which can displace the structures a scan needs to read
- Creating a new volume
- Writes a partition entry and file-system metadata into exactly the range under investigation
- Extending a neighboring volume
- Absorbs the Unallocated range into another volume and writes layout and file-system metadata across it
- Running
DiskPart clean - Removes layout information from the disk and is not a diagnostic command
- Converting the disk
- Rewrites the partitioning scheme, including between MBR and GPT, and changes where structures are expected to be
- Repeating scans on an unstable device
- Adds read stress without adding evidence, and may end the window in which the device is readable at all
- Saving recovered files to the source
- Writes new data into the sector ranges the recovery still depends on
Make the Space Usable Only After Recovery Is Validated
Allocating the space is the last step, and it is secondary to everything above. It writes new structures over the region and is not a recovery action.
Proceed only when every condition below is met:
- the needed files are recovered and independently validated;
- the correct physical device and the region boundaries are confirmed;
- recovery records and any source image are retained, not deleted to free space;
- no unresolved candidate and no adjacent valid volume remains at risk.
Create a New Volume Only in Verified Empty Space
Creating a volume writes a partition entry and a new file system into the range. Do this only when you have established that no needed data remains there, and only on the device you have identified by model and capacity. If any doubt remains about whether a candidate was correct, keep the image and postpone the decision — the region will still be there tomorrow, and the evidence will not survive the format.
Extend an Existing Volume Only When the Layout Supports It
Extending writes layout and file-system metadata across the absorbed range. It is valid only for a compatible, verified layout, typically where the Unallocated region is adjacent to the volume and the file system supports growth. Not every Unallocated region can be merged into a neighbor, and an extension attempt on the wrong layout is a write to the exact area you may still need.
Frequently Asked Questions
-
Strictly speaking, an Unallocated area is not a partition. Windows uses the label to report that the current disk layout assigns no recognized partition entry to that sector range. It describes the layout, not the content, and it cannot prove whether data behind it is absent, intact, overwritten, encrypted, or physically readable. See what Unallocated space means in Windows.
-
Sometimes. The outcome depends on whether the region has been overwritten, whether file-system structures survived, whether the device reads reliably, whether encryption is unresolved, and whether SSD TRIM has already discarded the content. Recovering files and restoring the original partition are separate tasks with separate odds — files are often recoverable when the partition entry is not. Start with the recovery workflow.
-
Separate the two meanings of access. Reading prior data means scanning the region without writing to it and saving results elsewhere. Making the area usable means allocating it, which writes new structures and removes most remaining recovery options. When prior data may exist, recovery comes first; see making the space usable for the conditions that come after.
-
Cancel the prompt if the disk previously contained data or its history is uncertain, and diagnose it without making changes first. Initialization is reasonable only for a disk you have confirmed to be new and blank. If a disk that worked yesterday now asks to be initialized, treat that as a symptom to investigate — see the diagnosis section.
Next Step
Use software only when the physical device is stable, consistently detected, and the missing area is a logical layout problem rather than a hardware failure.
Learn more about DiskInternals Partition RecoveryFree trial · scan and preview
The free trial scans the disk and previews what can be recovered before you pay for anything, so you can confirm your files are there first. Install it on a healthy Windows system drive — never on the affected disk — then scan the stable source or a verified disk image, open a few of the files you actually need in preview, and save the recovered data to a different physical drive.
Do not run recovery software on a drive that clicks or grinds, disconnects on its own, reports the wrong capacity, overheats, or is only detected some of the time. Repeated scans add stress to hardware that is already failing. Stop and talk to a professional data recovery service instead.