How to Recover Files from Corrupted WD MY Passport Hard Drive
Ensuring the safety and accessibility of data is paramount. Whether for personal or professional use, countless users rely on Western Digital (WD) drives to store their invaluable information. However, data loss or partition corruption can strike unexpectedly, resulting in frustration and potential setbacks.
This is where a robust WD partition repair and recovery tool can save the day. In this article, we'll explore how these specialized tools work to recover lost data, repair corrupted partitions, and restore peace of mind for users who depend on their WD drives. Whether you're experiencing a minor hiccup or a full-blown partition crisis, understanding these tools can make all the difference.
Critical Facts: Why Partition Failure Destroys WD Data Fast
Partition failure is a critical issue for Western Digital (WD) drive users, primarily because it can swiftly render vast amounts of data inaccessible. Unlike gradual data degradation scenarios, partition failures often strike suddenly and with severe consequences. Understanding why partition failure poses such a high risk to WD data is essential for users who want to safeguard their digital assets.
Symptoms: RAW Volume, Missing Drive Letter, Slow Enumeration
When a partition failure occurs, certain symptoms can provide early warning signs:
- RAW Volume: One of the most common signs of partition failure is when a drive's file system is indicated as RAW. This means that the operating system no longer recognizes the file system type (such as NTFS or exFAT). As a result, the data stored becomes temporarily unreachable without specialized recovery tools. The RAW format usually appears when the partition table is damaged or when there has been an unexpected shutdown, interrupting the file allocation process.
- Missing Drive Letter: Another symptom is when the drive no longer displays its drive letter, such as "D:" or "E:". This disappearance typically signifies that the system cannot properly map the partition — a problem often associated with file system corruption or a dismounted partition. Without a drive letter, applications and services can't locate or utilize the data stored on the drive.
- Slow Enumeration: Slow enumeration refers to the unusually long time the system takes to read or access files on the drive. This may occur due to underlying damage to the partition structure, causing delays in data retrieval processes. It's an early indicator that something is amiss, and if not addressed promptly, could lead to more severe partition damage.
Risk Window: From Corrupted MBR to Full Head Crash
The risk window for a WD drive experiencing partition failure is a spectrum of potential hazards:
- Corrupted MBR (Master Boot Record): The MBR is a crucial part of any storage drive as it holds the partition table and boot loader. If this becomes corrupted, often due to malware, improper shutdowns, or system crashes, the drive may fail to boot, thereby locking out the user from accessing any stored data. The corruption of the MBR is usually the first sign of partition trouble that, when detected, should be addressed immediately to prevent further issues.
- Full Head Crash: At the extreme end, if corrective measures aren't taken after initial symptoms, a partition failure could escalate to a full head crash. This is a physical failure where the read/write head of the drive actually comes into contact with its data storage platters. The result is often catastrophic, leading to unrecoverable data loss. This kind of damage is usually associated with severe impacts, such as a drop or shock to the drive, and can obliterate the magnetic material that stores data, resulting in permanent data loss.
First Response: Safe Imaging Before Any Western Digital Partition Repair
When faced with a partition failure on a Western Digital drive, the immediate priority should be preserving the existing data before attempting any repair strategies. Safe imaging of the drive is a critical first step, ensuring that an exact replica of the original data is created for recovery and investigative purposes. This approach minimizes the risk of exacerbating the issue during repair attempts.
Block-Level Clone With HDD Low-Level Copy Hardware
A block-level clone involves creating an exact bit-by-bit copy of the drive, capturing all data sectors regardless of file location or continuity. This comprehensive cloning captures partitions, boot sectors, and unused disk areas, guaranteeing a complete replica of the drive's current state.
Utilizing HDD low-level copy hardware is recommended for this procedure. This specialized equipment facilitates efficient and accurate cloning, minimizing the risk of further corrupting or damaging the original data during transfer. The hardware-based approach is typically faster and more reliable than software alternatives, and is essential, especially in scenarios where system integrity is compromised.
Checksum Verification to Confirm a Readable Image
After creating a block-level clone, ensuring that the image is not only intact but also reliable is crucial. This verification step involves generating checksums—unique hash values—for both the original data and the cloned image. By comparing these checksums, users can verify that the clone is accurate and complete, with no data loss or corruption during the copying process.
Checksum verification confirms the integrity and readability of the image, serving as a crucial step in the preparation for any subsequent repair or recovery activities. By establishing a verifiable, error-free image, users create a safety net that safeguards against potential data loss during the partition repair process. This proactive measure is essential for any effective partition recovery strategy, ensuring that the underlying data remains accessible and recoverable, even amid significant partition challenges.
Core Solution: Western Digital Partition Recovery Tool Methods
Addressing partition failures on Western Digital drives requires a blend of different recovery tools and methods. The core solution often involves utilizing both manual and automated techniques to restore data accessibility and integrity. Understanding these methods equips users with the knowledge needed to tackle even the most stubborn partition challenges effectively.
Partition Recovery™ by DiskInternals — Rapid Scan, Metadata Rebuild
To retrieve files from a WD Passport External Hard Drive on Windows using DiskInternals Partition Recovery, please follow the steps below:
- Download and install DiskInternals Partition Recovery software on your Windows computer.
- Connect your WD Passport External Hard Drive to your computer and launch the software.
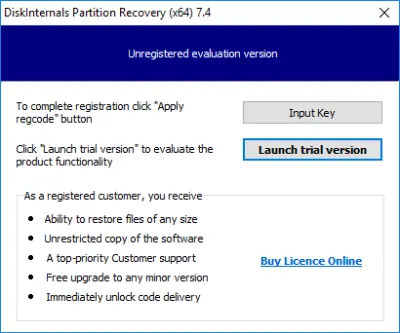
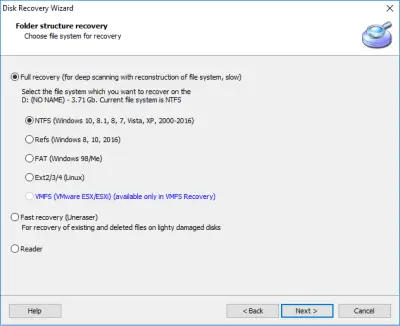
- Select your external hard drive from the list of available drives displayed in the software interface.
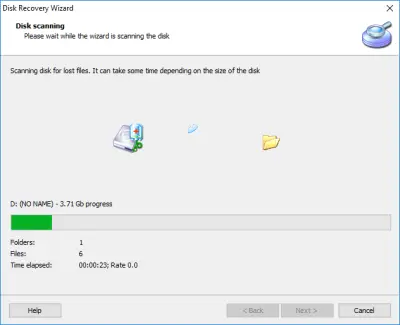
- Click on the "Scan" button to start the scanning process. The software will scan your external hard drive for all deleted or lost files.
- Once the scanning process is complete, you will be able to see a list of all the files that can be recovered. You can use the search bar to locate specific files.
- Select the files you want to recover and click on the "Recovery" button.
- Choose the location where you want to save the recovered files. It is recommended that you choose a different drive than the one you are recovering files from.
- Wait for the software to complete the recovery process. The time taken will depend on the number and size of files you are recovering.
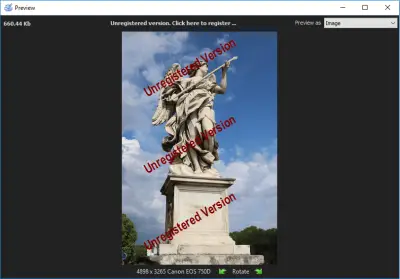
- Once the recovery process is complete, you can go to the location you selected to view the recovered files.
Note: It is important to avoid writing new data to the WD Passport External Hard Drive until the recovery process is complete to prevent overwriting the lost or deleted files.
DiskInternals can help you with a wide array of issues:
- WD My passport recovery
- Free damaged partition recovery
- Learn how to remove a partition on external hard drive
- How to recover data from a dead hard drive
- How to recover a deleted folder
- How to recover deleted files from Windows 11
- How to fix corrupted drives and other.
Manual Fix: DiskPart and TestDisk for GPT/MBR Rewrite
For those who enjoy a more hands-on approach, manual tools like DiskPart and TestDisk offer effective methods for rewriting the partition structures, such as GPT (GUID Partition Table) or MBR (Master Boot Record).
- DiskPart: DiskPart is a command-line utility in Windows that allows users to manage disk partitions directly. It is particularly useful for resolving issues with drive letters and partition recognition. Users can access DiskPart to clean, create, or format partitions, thereby rewriting any corrupted elements and potentially restoring access to lost data.
- TestDisk: TestDisk is an open-source tool renowned for its powerful capabilities in recovering lost partitions and repairing damaged filesystems. It is particularly effective for rewriting both GPT and MBR structures. This utility scans the drive for partition table inconsistencies and rebuilds them when necessary, offering a reliable solution for recovering data from inaccessible partitions.
Firmware Factors That Block Software Repair
While software tools are instrumental in partition recovery, certain firmware-related issues can impede their effectiveness. Understanding these firmware factors is crucial to developing a comprehensive recovery strategy.
- Firmware Corruption: Firmware is the essential software that manages a drive's hardware components. Corruption here can manifest as random drive behavior, inaccurate capacity reporting, or complete drive failure. Such issues can obstruct software repair efforts by interfering with the drive's basic operations.
- Locked Firmware: Some Western Digital drives come with proprietary firmware that limits access to low-level drive functions. This can pose a challenge for recovery software, as blocked operations may prevent necessary partition fixes or restorations from being executed.
- Compatibility Issues: After firmware updates, compatibility issues can arise, especially if the software tools aren't updated in tandem. New firmware can introduce different addressing methods, encryption protocols, or disk management techniques, restricting older software tools from functioning effectively.
Western Digital Dead Hard Drive Recovery Strategy
Navigating a recovery strategy for a "dead" Western Digital hard drive involves understanding various failure scenarios and employing targeted techniques to tackle them. These strategies are essential for recovering data from drives that may seem beyond repair.
Drive Spins Up, No Detection — USB-SATA Bridge Bypass
In some instances, a drive may spin up but remain undetected by the computer. This situation often indicates issues with the USB-SATA bridge or the drive interface itself. Bypassing the USB-SATA bridge provides a direct connection to the drive, thus circumventing faulty interfaces.
- Solution: By using a compatible SATA cable and connecting the drive directly to a computer motherboard, users might be able to detect and access the drive. This method removes potential barriers associated with faulty USB enclosures and can reveal if the drive itself is still functional.
Drive Completely Dead — PCB Swap and ROM Transfer
A completely dead drive often points to electronic faults, particularly on its printed circuit board (PCB). Addressing this requires more than just straightforward solutions, but a focused hardware intervention.
- PCB Swap: Swapping the drive's PCB with an identical model can often resolve these electronic issues. However, due to firmware-unique identifiers stored in the drive's ROM, merely swapping the PCB is usually insufficient.
- ROM Transfer: The ROM chip on the original PCB stores essential drive-specific calibration data. Transferring this chip to the new PCB is critical for the drive to work with the new board. This procedure typically requires precision soldering skills and understanding of the PCB's layout.
Clean-Room Requirements for Head Stack or Platter Swap
Physical damages, such as head crashes or platter issues, necessitate the most delicate recovery methods.
- Head Stack Swap: When the drive’s read/write heads are damaged, a head stack replacement can be performed. This involves replacing the damaged head assembly with one from a donor drive.
- Platter Swap: In severe cases of platter damage, swapping the platters to a functioning drive assembly might be necessary to recover the data.
Both head stack and platter swaps require clean-room environments to minimize contamination by dust or debris, which can irreversibly damage drive components. Typically, professionals equipped with specialized tools conduct these operations, as they uphold strict cleanliness and precision standards to ensure the drive is not further compromised during recovery attempts.
Comparison Table: DIY Tools vs Professional Lab vs Partition Recovery™
| Method | Repairs Partition | Rescues Files | Needs Drive Spin-Up | Cost Range | Skill Level |
| Partition Recovery™ | Yes | Yes | Yes | Low | Beginner |
| DiskPart/TestDisk | Yes | No | Yes | Free | Intermediate |
| Clean-Room Lab | Yes | Yes | No | High | Outsource |
DiskInternals Case Study: 6 TB WD Red, Partition Lost, 99% Data Restored

The DiskInternals campaign tackled a complex case involving a 6 TB WD Red drive that suffered from partition loss, resulting in significant data at risk. Despite the challenges, their expert intervention led to an impressive 99% data restoration, showcasing the effectiveness of their recovery strategies when faced with large-capacity drives and partition issues.
Imaging Time, Scan Duration, File Count Rescued
The recovery process began with an efficient imaging procedure, allowing DiskInternals to create a secure replica of the drive’s data for safe handling and further analysis. The subsequent scan, which thoroughly examined the drive, involved a considerable duration due to the drive's size and the intricate nature of the data organization. By the end of this exhaustive process, a remarkable number of files were resurrected from the depths of digital loss, confirming the high success rate of the intervention.
Preventive Measures After Recovery
Once recovery is completed, implementing preventive measures is crucial to avoid future data loss and ensure the integrity of the restored information.
SMART Monitoring, Power Surge Protection, Scheduled Backups
- SMART Monitoring: Regularly using Self-Monitoring, Analysis and Reporting Technology (SMART) ensures that potential drive issues are identified and addressed before they escalate into failures. Implementing this monitoring allows users to act on vital health indicators, thus significantly reducing the risk of sudden drive malfunctions.
- Power Surge Protection: By employing effective power surge protectors, users can shield their drives from electrical spikes that may cause irreparable damage. Protection against power abnormalities is fundamental for the longevity of both internal and external storage devices.
- Scheduled Backups: Establishing routine backup schedules is perhaps the most reliable preventive strategy. Regularly backing up data ensures that even in the event of drive failure, the majority of essential files remain secure and retrievable, providing peace of mind and safeguarding against unexpected data disasters.
FAQ
-
- Connect the WD My Passport drive to your computer and make sure it is properly connected.
- Open Disk Management on your computer by pressing Windows Key + X and then selecting Disk Management.
- Find the WD My Passport drive in the list of drives. If the drive is not recognized, it may appear as unallocated space or may not appear at all.
- If the drive appears as unallocated space, you can try to recover the partition. To do this, you can use a partition recovery software like DiskInternals Partition Recovery.
- Download and install the software, then launch it and select the WD My Passport drive from the list of available drives.
- Follow the on-screen instructions to scan the drive and recover the partition. If successful, the drive should now appear in Disk Management and your files should be accessible.
-
- Connect the WD My Passport drive to your computer.
- Open Windows File Explorer and locate the WD My Passport drive.
- Right-click on the drive and select "Format".
- In the "Format" window, select the file system as "NTFS" and allocation unit size as "Default allocation size".
- Check the box next to "Perform a quick format" and then click on "Start".
- Wait for the formatting process to complete.
- Once the formatting process is complete, your WD My Passport drive will be restored to its factory settings.
-
Yes, it is possible to recover data from a formatted WD My Passport drive using data recovery software such as DiskInternals Partition Recovery or similar tools.
When you format a drive, the file system is erased and the data becomes inaccessible. However, the data is not completely erased from the drive, and can be recovered using specialized software that can scan the drive and recover the lost files.
DiskInternals Partition Recovery is a powerful tool that can recover lost data from formatted, damaged, or deleted partitions. It supports a wide range of file systems including NTFS, FAT, exFAT, and HFS+.
-
- Connect your WD My Passport drive to your old computer.
- Copy all the files and folders you want to transfer to your new computer onto the WD My Passport drive.
- Safely eject the WD My Passport drive from your old computer.
- Connect the WD My Passport drive to your new computer.
- Open Windows File Explorer and locate the WD My Passport drive.
- Copy the files and folders you want to transfer from the WD My Passport drive to your new computer.
Note: If you are transferring a large amount of data, it may be faster to use an external hard drive docking station or an external hard drive enclosure with a SATA to USB adapter. This will allow you to connect the WD My Passport drive directly to your new computer's motherboard and transfer files at a faster speed.
-
- 1. Check your connections: Ensure that the USB cable is properly connected to both the Western Digital Passport and your computer. Try connecting the drive to a different USB port on your computer or using a different cable to rule out any issues with the cable or port.
- 2. Check the power source: If your Western Digital Passport is not receiving power, it may not function properly. Make sure that the drive is plugged into a power source if it requires one.
- 3. Run a diagnostic test: Western Digital provides a diagnostic tool called Data Lifeguard Diagnostics that you can use to check for any hardware issues with your drive. You can download this tool from the Western Digital website.
- 4. Check for drive errors: If you are experiencing issues with accessing data on your Western Digital Passport, you can try running a disk check. On Windows, you can right-click on the drive in File Explorer, select Properties, and then go to the Tools tab to run a disk check. On Mac, you can use the Disk Utility tool to run First Aid on the drive.
- 5. Format the drive: If you are still experiencing issues with your Western Digital Passport, you may need to format the drive. Keep in mind that formatting the drive will erase all data on it, so be sure to back up any important data before proceeding.
-
In some cases, a Western Digital hard disk can be repaired, but this will depend on the nature of the issue. Here are some common issues that can occur with a hard disk and whether they can be repaired:
- 1. Logical errors: Logical errors occur when there is an issue with the file system on the hard disk. These can often be fixed by running disk repair tools, such as chkdsk on Windows or fsck on macOS.
- 2. Bad sectors: Bad sectors occur when a portion of the hard disk becomes unreadable. This can be caused by physical damage to the disk or software errors. In some cases, bad sectors can be repaired by using disk repair tools or by reformatting the drive. However, if the bad sectors are caused by physical damage, the drive may need to be replaced.
- 3. Mechanical failure: Mechanical failure occurs when there is physical damage to the hard disk, such as a broken head or motor. In these cases, the drive will need to be replaced or sent to a professional data recovery service for repair.
It's important to note that attempting to repair a hard disk yourself can be risky and can potentially cause further damage to the drive. If you're not sure how to fix the issue or if the drive contains important data, it's best to consult a professional data recovery service.