How to Recover RAID Configuration
RAID (Redundant Array of Independent Disks) configurations present an effective strategy, providing enhanced storage capabilities and improved data protection. Despite their robust design, these systems can still succumb to various issues, including failures and misconfigurations. When a RAID configuration encounters problems, the consequences can be significant, potentially jeopardizing essential data. This article is dedicated to thoroughly exploring the steps necessary for the recovery of RAID array configurations, aiming to safeguard your data's accessibility and integrity.
In this guide, we will cover a wide range of scenarios, from dealing with hardware failures to rectifying human errors that may disrupt a RAID setup. We begin by understanding the fundamentals of RAID technology and the different types of RAID configurations. This foundational knowledge is crucial in diagnosing and addressing the specific issues that may arise in each RAID type.
How to Recover the RAID Array Configuration
Recovering a RAID array configuration can be a daunting task, but with the right approach, it's achievable. Here's a structured guide to assist you:
1. Assess the Situation
- Determine the RAID Level: Understand which RAID configuration you had (RAID 0, RAID 1, RAID 5, RAID 6, RAID 10, etc.).
- Establish the Cause: Identify what caused the loss of the RAID configuration. This can range from a failed drive, a malfunctioning RAID controller, software errors, or accidental reconfigurations.
2. Backup Data If Accessible
If you're still able to access the data on your RAID, make a backup before attempting any recovery actions. This will ensure that you have a fallback if anything goes wrong.
1: Disconnect the Disks From the RAID Controller
Alright, if you're planning to recover a RAID array configuration and the first step you're considering is disconnecting the disks from the RAID controller, let's explore this carefully. Disconnecting the disks can be essential in situations where you suspect further data corruption may occur or when you're transitioning to another system for recovery.
1. Backup Your Data
Always start with a backup of any accessible data on the RAID. This ensures that you have a safety net in case of any issues during the recovery process.
2. Shut Down the System
Turn off the computer or server system properly using the operating system's shutdown process. Avoid hard shutdowns as they can exacerbate issues or cause new problems.
3. Unplug the Power Cord
Once the system is fully powered down, disconnect it from its power source. This step ensures safety against electrical mishaps during the process.
4. Open the Computer/Server Case
- Depending on your machine, use the appropriate tools (often a screwdriver) to open the case.
- Ensure you follow any manufacturer guidelines or instructions to prevent damage.
5. Ground Yourself
Before touching any internal hardware:
- Use an anti-static wrist strap to prevent any static discharge that could damage the components.
- If you don't have a wrist strap, periodically touch an unpainted metal part of the case to discharge static electricity.
6. Locate the RAID Disks
Identify the disks that are part of your RAID array. They will be connected to the RAID controller, which might be a dedicated card or part of the motherboard, depending on your setup.
7. Carefully Disconnect the Disks
- Gently unplug the data cables (often SATA or SAS) from each disk.
- Also, disconnect the power cables from each disk.
- Be sure to handle the drives by their sides and avoid touching the connectors or the PCB (Printed Circuit Board).
8. Document Everything
Label each drive with its respective position/order in the RAID array. This step is crucial because the order of drives can be vital for RAID configurations, especially RAID 0, RAID 5, and other striped or parity-based setups.
9. Store Disks Safely
If you won't be reconnecting them immediately:
- Place each disk in an anti-static bag.
- Store them in a cool, dry place away from direct sunlight or heat sources.
10. Proceed with Caution
Remember, this disconnection step should be approached with care. If the RAID array issues arose from a suspected disk failure, keeping the disks in the same order will assist in diagnosing which disk (if any) has failed.
Note: Disconnecting the disks is often just the beginning of the RAID recovery process. Further steps will be necessary, depending on the nature of the problem and the type of RAID configuration you had.
2: Connect the Disks to the Motherboard Using SATA Cables
After safely disconnecting the disks from the RAID controller in Step 1, the next step involves connecting them directly to a motherboard. This procedure is often done to access the drives individually, especially when using software tools for RAID recovery.
1. Prepare the Recovery System
- Ensure the system you're using for recovery has enough SATA ports on the motherboard to accommodate all the disks from your RAID array.
- The system should ideally not have any other critical operations running, given the sensitive nature of RAID recovery.
2. Ground Yourself
Before handling any hardware components:
- Use an anti-static wrist strap if available to prevent static electricity from damaging the disks.
- If a strap isn't available, make sure to touch an unpainted metal surface of the computer case to discharge any static electricity.
3. Connect SATA Data Cables
- One by one, connect each disk's SATA interface to the available SATA ports on the motherboard.
- Remember the order in which you connect them. Maintaining the order of the drives as they were in the RAID setup can be crucial, especially if you'll be attempting software-based RAID recovery.
4. Connect Power Cables
- Ensure each disk is connected to the power supply using the appropriate power cables. These will typically be SATA power connectors, which are larger than the data connectors.
- Double-check the connections to make sure they're secure.
5. System BIOS/UEFI Configuration
- Once the drives are connected, power on the system and enter the BIOS/UEFI setup.
- Ensure the system recognizes all connected drives.
- Adjust the boot order if necessary, especially if you have a boot drive separate from the RAID drives. You don't want the system attempting to boot from one of the RAID disks.
6. Boot into the Operating System
- After configuring the BIOS/UEFI, save the settings and reboot the system.
- Once booted into the operating system, verify that all the drives are detected. They might not necessarily have readable file systems, but they should appear as connected devices.
7. RAID Recovery Software (if applicable)
If you're planning to use software to recover the RAID:
- Download and install a trusted RAID recovery software, such as ReclaiMe, R-Studio, or UFS Explorer.
- Follow the software's instructions to reconstruct the RAID array. The software will typically scan the disks for RAID metadata to identify the type of RAID and its configuration.
8. Proceed with Care
Remember, when working with potentially damaged or compromised RAID arrays, every action should be taken with consideration for preserving the integrity of the data.
Note: Always consider creating disk images (if space allows) before recovery attempts. Working with images, rather than the original disks, provides an additional safety layer against further data corruption or accidental data loss.
3: Connect Power Cables to the Disks and Turn on the PC
Once you've connected the SATA data cables to your disks in the previous step, it's time to provide them with power and boot up the computer. Here's how you can do this safely:
1. Identify the Correct Power Connectors
- Modern SATA hard drives will typically use a 15-pin SATA power connector. This is distinct from the smaller 7-pin SATA data connector you've already connected.
- Ensure you're using power cables directly from your PC's power supply unit (PSU). These cables will fit snugly into the power ports on your SATA hard drives.
2. Connect Power Cables to Each Disk
- Carefully connect the power cables to each hard drive. Push the connector in gently but firmly until it fits securely.
- Double-check to ensure all connections are snug and that no pins are bent or damaged in the process.
3. Ensure Proper Ventilation
- Before turning on the PC, make sure each hard drive is positioned in a way that it won't overheat. If they are internal drives, they should be mounted in their respective slots inside the PC case, allowing for airflow around them.
- If you're working with the drives externally (outside of a PC case), make sure they're on a non-conductive, cool surface and spaced apart from each other.
4. Boot Up the Computer
- Once everything is connected and in place, you can plug your computer's power cable back into the wall socket or power strip.
- Turn on the PC by pressing the power button.
5. Enter the BIOS/UEFI (Optional)
- Depending on your intentions and the nature of the RAID issue, you might want to enter the computer's BIOS/UEFI setup during startup. This is typically done by pressing a specific key (like Del, F2, or F10) during the boot process.
- Within the BIOS/UEFI, you can verify that all connected drives are recognized. If they aren't, you might have a connection issue or a potentially failed drive.
6. Boot into the Operating System
- If you didn't enter the BIOS/UEFI or after you've checked the connected drives, let the system boot up into its operating system.
- Once inside the OS, you can further inspect the drives, check their statuses, and proceed with any diagnostic or recovery tools you intend to use.
7. Proceed with Caution
Remember, especially if you're working with a RAID setup that has potential issues, take every action carefully. Unnecessary write operations or misconfigurations can further complicate recovery efforts.
Note: It's always a good practice to document each step you take. This documentation can be invaluable if you decide to consult with a professional or need to backtrack in your recovery process.
4: Download the DiskInternals RAID Recovery Software
DiskInternals RAID Recovery is a well-regarded tool for retrieving data from corrupted RAID arrays (Synology RAID recovery included). Before downloading and using the software, make sure you've followed the previous steps and have your RAID drives safely connected to a computer. Here's how to download and set up DiskInternals RAID Recovery:
4.1. Download the Software
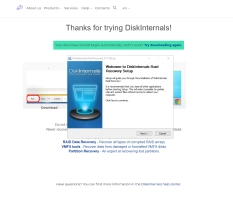
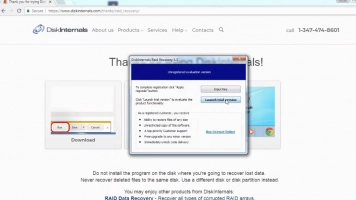
- Once you've located the RAID Recovery software page, click on the download link or button to begin the download process.
- Save the installer file to a location on your computer that's easy to access, such as the desktop.
4.2. Install the Software
- Navigate to the location where you saved the installer.
- Double-click on the installer file to launch the installation process.
- Follow the on-screen instructions to complete the installation. This will typically involve agreeing to a license agreement, selecting an installation location, and clicking through a few setup prompts.
4.3. Launch the RAID Recovery Software
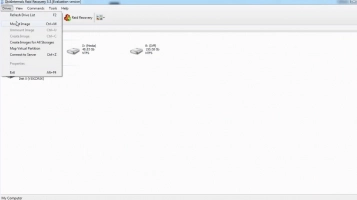
- Once the installation is complete, you can either launch the software from the final installation screen or locate the software shortcut on your desktop or start menu.
- Open the software to access its main interface.
4.4. Select the RAID Drives for Recovery
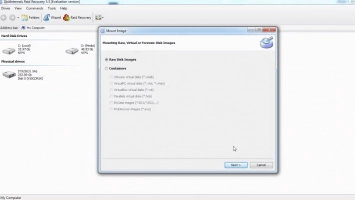
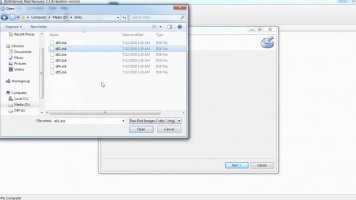
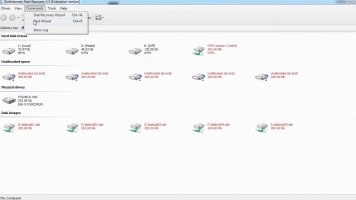
- In the software interface, you'll be prompted to select the drives that were part of your RAID setup. If you've kept the drives in their original order, this should be straightforward.
- The software might automatically detect the RAID type and configuration. If not, you'll need to manually select the RAID type (e.g., RAID 0, RAID 1, RAID 5, etc.)
4.5. Begin the Recovery Process
- Once the drives are selected and the RAID type is set, you can start the recovery process. The software will scan the drives for recoverable data and attempt to rebuild the RAID array.
4.6. Preview and Save Recovered Data
- After the scan, the software will display a list of recoverable files. You can preview these files to check their integrity.
- To save the recovered data, you might need a licensed version of the software. Choose a safe location to save the recovered files, ideally on a different drive or external storage device.
DiskInternals RAID Recovery Video Guide
How to Restore a RAID Controller Configuration
Restoring a RAID controller configuration is a crucial step, especially when replacing a failed RAID controller or when configurations have been lost or corrupted. Before diving into the process, it's essential to understand that mistakes during RAID configuration restoration can result in data loss. Always proceed with caution and backup any data if possible.
1. Backup Your Data
Before you begin, if you can access the data on your RAID array, take a backup. This step provides an extra layer of protection against accidental data loss.
2. Document Current Settings (if accessible)
If you can still access the RAID controller's settings, document all the configurations. This includes drive order, RAID level, stripe size, and any other specific settings.
3. Access RAID Controller BIOS/UEFI
- Restart or power on the computer or server.
- As it boots, watch for a prompt related to your RAID controller (e.g., "Press Ctrl + I to enter RAID setup"). The exact key combination will depend on your RAID controller model.
- Enter the RAID controller's BIOS/UEFI utility.
4. Locate Configuration Restore Options
- Navigate through the RAID BIOS/UEFI utility.
- Look for options related to "Configuration Restore," "Import Configuration," or something similar.
5. Import or Manually Configure
- If you have a saved configuration profile, use the "Import" option to load it.
- If not, you'll need to manually recreate the RAID configuration. Use the documentation from step 2 to assist you.
6. RAID Rebuild (if necessary)
If one or more drives were replaced or are flagged as degraded, the RAID array may need to rebuild:
- Some RAID controllers start this process automatically once the configuration is restored.
- In others, you may need to manually initiate the rebuild.
- Note: RAID rebuilds can take a long time, especially for large arrays or high-capacity drives.
7. Verify Data Accessibility
Once the configuration is restored (and a rebuild is completed, if necessary):
- Exit the RAID BIOS/UEFI utility and let the system boot to its operating system.
- Verify if you can access the data on the RAID array.
8. Update RAID Controller Firmware (Optional)
Sometimes, RAID issues can be caused by outdated or buggy firmware. If everything else is stable:
- Check the RAID controller manufacturer's website for firmware updates.
- Download and apply any updates as directed by the manufacturer.
9. Keep Monitoring RAID Health
Going forward, use RAID management software or utilities provided by the RAID controller manufacturer to monitor the health and status of your RAID array regularly.
Note: If you're unsure about any steps or encounter difficulties, consider seeking help from IT professionals or the RAID controller's manufacturer support. RAID operations can be complex, and a misstep can lead to data loss or prolonged downtime.
Conclusion
RAID arrays, while offering enhanced performance and data redundancy, come with their own set of challenges, especially when faced with failures or configuration issues. Recovering and restoring RAID configurations is a nuanced process, necessitating precision, patience, and a deep understanding of RAID architectures.
From the initial steps of disconnecting disks to interfacing directly with the motherboard, to using specialized software like DiskInternals RAID Recovery, each stage requires meticulous attention to detail. Further, restoring a RAID controller's configuration, whether after a hardware replacement or other disruptions, is no less demanding. It's imperative to have data backups, thorough documentation, and a firm grasp of the RAID controller's BIOS/UEFI environment.
One key takeaway from this exploration is the inherent risks associated with RAID operations. While the steps provided offer a blueprint to address typical scenarios, the exact procedures can vary based on hardware, RAID types, and specific situations. It's always wise to proceed with caution, regularly monitor RAID health, and seek professional assistance when in doubt. Ultimately, while RAID systems offer robust solutions for data storage, maintaining their integrity and health is paramount for long-term data security and accessibility.
FAQ
What is RAID and why is it used?
RAID stands for Redundant Array of Independent Disks. It's a technology that combines multiple hard drives into a single unit, referred to as an array. RAID is used primarily for two reasons: to improve performance and/or to provide data redundancy. Different RAID levels (like RAID 0, RAID 1, RAID 5, etc.) offer various balances between performance enhancement and data protection.
If one drive fails in a RAID 1 setup, will I lose my data?
No, in a RAID 1 configuration (also known as mirroring), data is duplicated across two drives. If one drive fails, the other drive still contains a complete copy of the data. However, it's essential to replace the failed drive and rebuild the RAID array as soon as possible to restore its redundancy.
Can I recover data from a failed RAID 0 array?
RAID 0, or striping, distributes data across multiple drives but offers no redundancy. If one drive in a RAID 0 array fails, it results in a loss of all data since portions of every file are on every drive. While specialized data recovery software (like DiskInternals RAID Recovery) can sometimes retrieve data from a malfunctioning RAID 0 array, success is not guaranteed. It's crucial to maintain backups when using RAID 0.
How do I know which RAID configuration is best for me?
The ideal RAID configuration depends on your specific needs:
- RAID 0 is for performance but offers no redundancy.
- RAID 1 provides redundancy by mirroring data across two drives.
- RAID 5 offers a balance between performance and redundancy, distributing data and parity information across three or more drives.
- RAID 6 is similar to RAID 5 but with added redundancy, using two parity blocks.
- RAID 10 (or 1+0) combines mirroring and striping for both redundancy and performance. Evaluate your needs concerning performance, redundancy, and storage capacity to choose the right RAID level.
Is RAID a substitute for regular data backups?
No, while RAID provides redundancy and can protect against certain types of hardware failures (depending on the RAID level), it's not a replacement for regular backups. RAID won't protect against data corruption, malware, accidental deletions, or catastrophic events like fires or floods. Always maintain regular backups of critical data, ideally both locally and off-site or in the cloud.
